Nissan Almera Tino V10. Manual - part 879


  Index      Nissan     Nissan Almera Tino V10 - Service Manual (2003 year)


Search            


Content   ..  877  878  879  880   ..


Nissan Almera Tino V10. Manual - part 879


EM-172

[YD]

SECONDARY TIMING CHAIN

3.

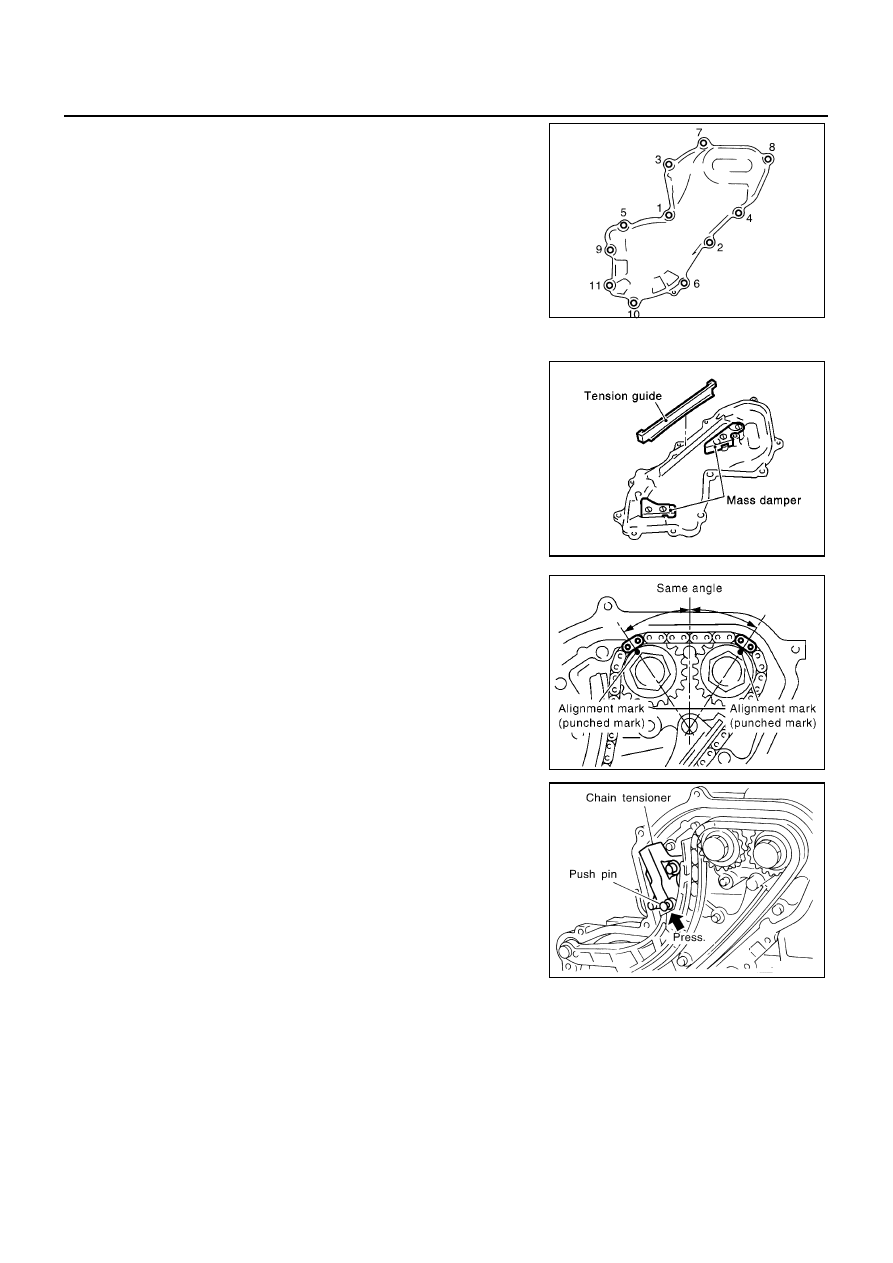
Remove front chain case.

Move power steering fluid reservoir tank from the bracket.

Loosen fixing bolts in the reverse order of that shown in the
figure and remove them.

Remove No. 6, 10 and 11 bolts with the rubber washer as
space is limited for pulling them out.

CAUTION:

While front chain case is removed, cover openings to
prevent entry of foreign material into engine.

Do not remove two mass dampers on the back of cover.

4.

Set the No. 1 piston to TDC on its compression stroke.

Turn crankshaft pulley clockwise so that the alignment mark
(punched mark) on each camshaft sprocket is positioned as
shown in the figure.

No position indicator is provided on the crankshaft pul-
ley.

When installing, color coded links on the secondary tim-
ing chain can be used as alignment marks. Marking may
not be necessary for removal; however, make alignment
marks as required because the alignment mark on fuel
supply pump sprocket may not be easy to see.

5.

Remove chain tensioner.

a.

Push the plunger of chain tensioner and keep it pressed with a
push pin.

JEM121G

SBIA0189E

SEM515G

JEM124G

SECONDARY TIMING CHAIN

EM-173

[YD]

C

D

E

F

G

H

I

J

K

L

M

A

EM

b.

Using a hexagon-head wrench [face to face 5 mm, (0.20 in)
SST], remove bolts to remove chain tensioner.

6.

Remove timing chain slack guide.

Using a hexagon-head wrench [face to face 6 mm (0.24 in)
SST], remove bolt to remove timing chain slack guide.

7.

Remove timing chain tension guide.

8.

Remove secondary timing chain.

Timing chain alone can be removed without removing sprock-
ets.

INSPECTION AFTER REMOVAL
Timing Chain

Check for cracks and excessive wear at roller links. Replace
chain if necessary.

SBIA0227E

SBIA0228E

JEM127G

SEM984C

EM-174

[YD]

SECONDARY TIMING CHAIN

INSTALLATION

1.

Install secondary timing chain.

When installing, match the alignment marks on sprockets with
color coded alignment marks (colored links) on the chain.

2.

Install timing chain tension guide.

The upper bolt has a longer shank than the lower bolt.

3.

Using a hexagon-head wrench [face to face 6 mm (0.24 in)
SST], install timing chain slack guide.

4.

Install chain tensioner.

a.

Push the plunger of the chain tensioner. While holding it with a
push pin, install the chain tensioner.

b.

Using a hexagon-head wrench [face to face 5 mm (0.20 in)
SST], tighten bolts.

c.

Pull out the push pin, etc. holding the plunger.

Check again that the alignment marks on the sprockets
and the colored alignment marks on the timing chain are
aligned.

MBIA0030E

SBIA0228E

SBIA0227E

SECONDARY TIMING CHAIN

EM-175

[YD]

C

D

E

F

G

H

I

J

K

L

M

A

EM

5.

Install front chain case.

a.

Install tension guide on the back surface of front chain case.

Hold front chain case vertically when installing. Tension guide
may come off if front chain case is tilted.

b.

Apply Genuine Liquid Gasket or equivalent (Refer to

EM-110,

"Precautions for Liquid Gasket"

.) on both ends of arched area

(locations where rear chain case is adjoined) as shown in the
figure.

c.

Install front chain case.

When installing, align dowel pin on oil pump case with the pin
hole.

Install No. 6, 10 and 11 bolts with the rubber washer to the
front chain case.

d.

Tighten fixing bolts in the numerical order shown in the figure.

e.

After tightening all the bolts, re-tighten in the same order.

6.

Hereafter, install in the reverse order of removal.

SBIA0189E

JEF370Y

JEM121G


Content   ..  877  878  879  880   ..