Nissan Almera Tino V10. Manual - part 195


  Index      Nissan     Nissan Almera Tino V10 - Service Manual (2003 year)


Search            


Content   ..  193  194  195  196   ..


Nissan Almera Tino V10. Manual - part 195


AT-504

[ALL]

ASSEMBLY

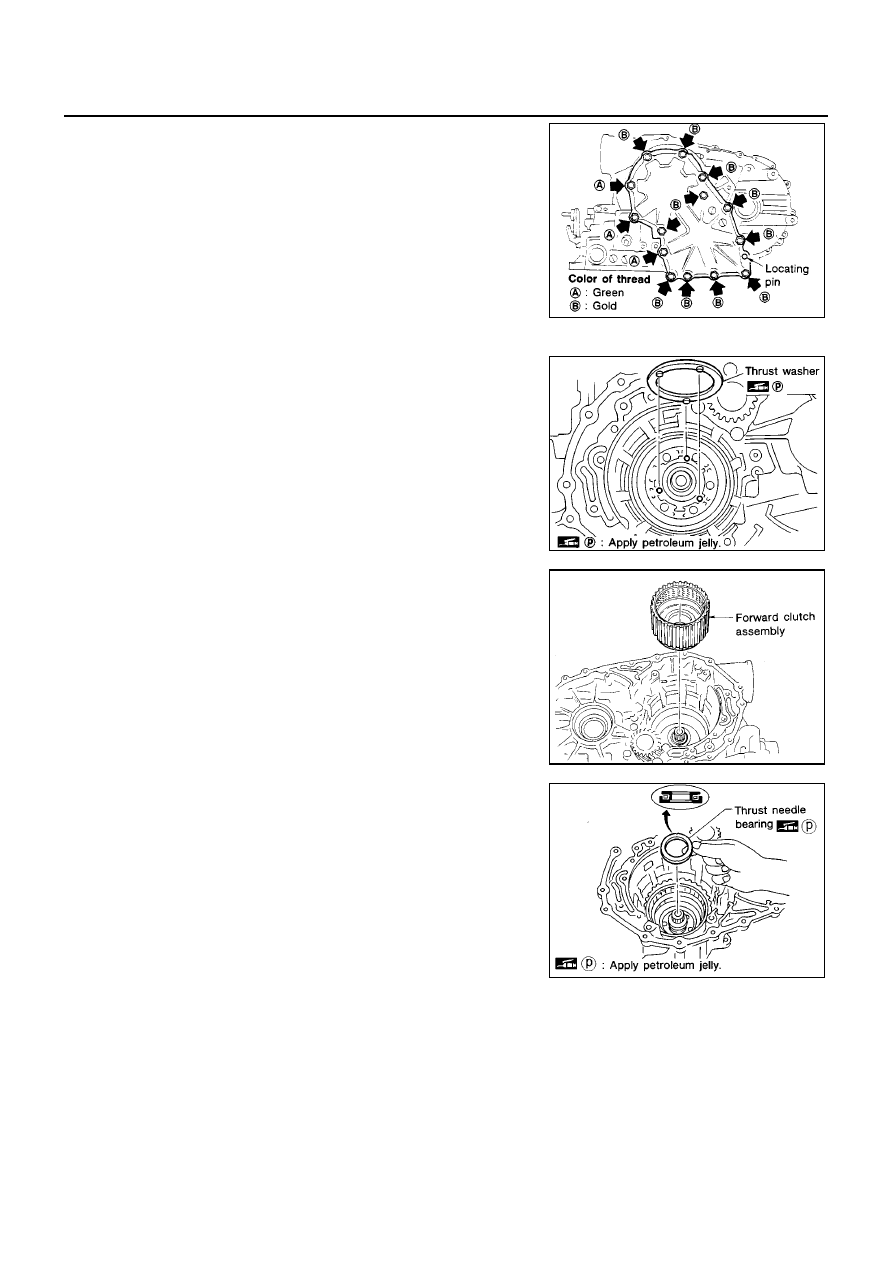
10. Tighten side cover fixing bolts to specified torque.

Do not mix bolts A and B.

Always replace bolts A as they are self-sealing bolts.

Assembly (2)

ECS009CW

1.

Remove paper rolled around bearing retainer.

2.

Install thrust washer on bearing retainer.

Apply petroleum jelly to thrust washer.

3.

Install forward clutch assembly.

Align teeth of low & reverse brake drive plates before
installing.

Make sure that bearing retainer seal rings are not spread.

4.

Install thrust needle bearing on bearing retainer.

Apply petroleum jelly to thrust bearing.

Pay attention to direction of thrust needle bearing.

SAT124E

SAT354D

SAT355D

SAT356D

ASSEMBLY

AT-505

[ALL]

D

E

F

G

H

I

J

K

L

M

A

B

AT

5.

Install thrust needle bearing on rear internal gear.

Apply petroleum jelly to thrust needle bearing.

Pay attention to direction of thrust needle bearing.

6.

Hold forward clutch hub and turn overrun clutch hub.
Check overrun clutch hub for directions of lock and unlock.

If not as shown in illustration, check installed direction of for-
ward one-way clutch.

7.

Install rear internal gear assembly.

Align teeth of forward clutch and overrun clutch drive
plate.

8.

Install needle bearing on rear planetary carrier.

Apply petroleum jelly to needle bearing.

Pay attention to direction of needle bearing.

9.

Install rear sun gear on rear planetary carrier.

Pay attention to direction of rear sun gear.

SAT357D

SAT358D

SAT359D

SAT360D

SAT052D

AT-506

[ALL]

ASSEMBLY

10. Install rear planetary carrier on transmission case.

11. Install thrust needle bearing on front planetary carrier.

Apply petroleum jelly to thrust needle bearing.

Pay attention to direction of thrust needle bearing.

12. Install low one-way clutch to front planetary carrier by turning it

in the direction of the arrow as shown.

13. While holding front planetary carrier, turn low one-way clutch.

Check low one-way clutch for correct directions of lock and
unlock.

14. Install front planetary carrier assembly on transmission case.

15. Install snap ring with screwdriver.

Forward clutch and bearings must be correctly installed
for snap ring to fit groove of transmission case.

SAT362D

SAT363D

SAT048D

SAT047D

SAT046D

ASSEMBLY

AT-507

[ALL]

D

E

F

G

H

I

J

K

L

M

A

B

AT

16. Install needle bearing on front sun gear.

Apply petroleum jelly to needle bearing.

Pay attention to direction of needle bearing.

17. Install front sun gear on front planetary carrier.

18. Install needle bearing on front sun gear.

Apply petroleum jelly to needle bearing.

Pay attention to direction of needle bearing.

19. Install high clutch hub on front sun gear.

20. Install needle bearing on high clutch hub.

Apply petroleum jelly to needle bearing.

Pay attention to direction of needle bearing.

SAT367D

SAT368D

SAT369D

SAT370D

SAT371D


Content   ..  193  194  195  196   ..