Nissan GT-R. Manual - part 174


  Главная      Nissan     Nissan GT-R (2007-2014 year) - Service Manual


поиск по сайту            


содержание   ..  172  173  174  175   ..


Nissan GT-R. Manual - part 174


STEP LAMP

INL-21

< REMOVAL AND INSTALLATION >

C

D

E

F

G

H

I

J

K

M

A

B

INL

N

O

P

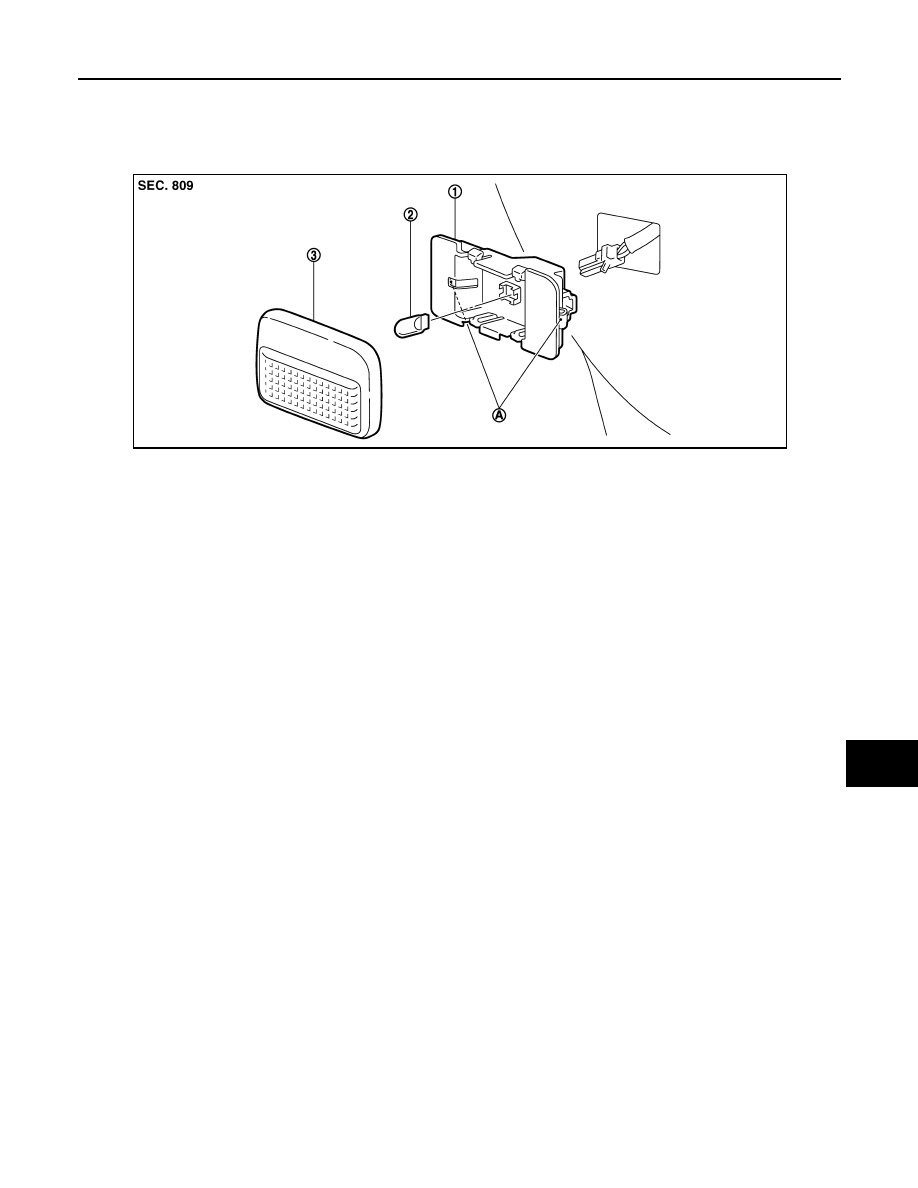
STEP LAMP

Exploded View

INFOID:0000000009161939

Removal and Installation

INFOID:0000000009161940

CAUTION:

Disconnect the battery negative terminal or remove the fuse.

REMOVAL

1.

Insert any appropriate tool into the gap between the step lamp and the door trim. Remove the step lamp.

2.

Disconnect the connector.

INSTALLATION

Install in the reverse order of removal.

Replacement

INFOID:0000000009161941

CAUTION:

• Disconnect the battery negative terminal or remove the fuse.
• Never touch the glass of bulb directly by hand. Keep grease and other oily matters away from it.
• Never touch bulb by hand while it is lit or right after being turned off.
• Never leave bulb out of lamp reflector for a long time because dust, moisture smoke, etc. may affect

the performance of lamp. When replacing bulb, be sure to replace it with new one.

STEP LAMP BULB

1.

Remove the step lamp.

2.

Remove the lens.

3.

Remove the bulb.

1.

Step lamp case

2.

Bulb

3.

Lens

A

Metal clip

NNLIA0036ZZ

INL-22

< REMOVAL AND INSTALLATION >

TRUNK ROOM LAMP

TRUNK ROOM LAMP

Exploded View

INFOID:0000000009161942

Removal and Installation

INFOID:0000000009161943

CAUTION:

Disconnect the battery negative terminal or remove the fuse.

REMOVAL

1.

Widen the pawl (A). Open the lens (1).

2.

Remove the bulb.

3.

Pressing the pawl (B) to the arrow direction (

). Pull out the

trunk room lamp. 

4.

Disconnect the connector.

5.

Remove the trunk room lamp.

INSTALLATION

Install in the reverse order of removal.

Replacement

INFOID:0000000009161944

CAUTION:

• Disconnect the battery negative terminal or remove the fuse.
• Never touch the glass of bulb directly by hand. Keep grease and other oily matters away from it.
• Never touch bulb by hand while it is lit or right after being turned off.
• Never leave bulb out of lamp reflector for a long time because dust, moisture smoke, etc. may affect

the performance of lamp. When replacing bulb, be sure to replace it with new one.

TRUNK ROOM LAMP BULB

1.

Widen the lens pawl. Open the lens.

2.

Remove the bulb.

1.

Trunk room lamp

2.

Bulb

A

Pawl (for lens fixing)

B.

Pawl (for case installation)

JPLIA0065ZZ

SKIB8336J

SERVICE DATA AND SPECIFICATIONS (SDS)

INL-23

< SERVICE DATA AND SPECIFICATIONS (SDS) 

C

D

E

F

G

H

I

J

K

M

A

B

INL

N

O

P

SERVICE DATA AND SPECIFICATIONS (SDS)

SERVICE DATA AND SPECIFICATIONS (SDS)

Bulb Specifications

INFOID:0000000009161945

Item

Type

Wattage (W)

Push-button ignition switch illumination

LED

Map lamp

Wedge

8

Vanity mirror lamp

1.8

Glove box lamp

1.4

Step lamp

Wedge

2.7

Trunk room lamp

Wedge

3.4

INT-1

BODY INTERIOR

C

D

E

F

G

H

I

K

L

M

SECTION 

INT

A

B

INT

N

O

P

CONTENTS

INTERIOR

SYMPTOM DIAGNOSIS  ...............................

2

SQUEAK AND RATTLE TROUBLE DIAG-
NOSES ................................................................

2

Work Flow  .................................................................

2

Inspection Procedure  ................................................

4

Diagnostic Worksheet  ...............................................

6

PRECAUTION ...............................................

8

PRECAUTIONS ...................................................

8

Precaution for Supplemental Restraint System 
(SRS) "AIR BAG" and "SEAT BELT PRE-TEN-
SIONER" .................................................................
..

8

Precautions Necessary for Steering Wheel Rota-
tion After Battery Disconnection  ..............................
..

8

Precaution for Procedure without Cowl Top Cover 

......

9

Precaution for Work  ..................................................

9

PREPARATION ...........................................

10

PREPARATION ..................................................

10

Special Service Tools ..............................................

10

Commercial Service Tools  ......................................

10

CLIP LIST  ...........................................................

11

Clip List  ...................................................................

11

REMOVAL AND INSTALLATION  ...............

12

DOOR FINISHER  ..............................................

12

Exploded View .........................................................

12

Removal and Installation  .........................................

12

BODY SIDE TRIM  .............................................

15

Exploded View .........................................................

15

Removal and Installation  .........................................

15

REAR PARCEL SHELF FINISHER  ..................

19

Exploded View .........................................................

19

Removal and Installation  .........................................

19

FLOOR TRIM  ....................................................

22

Exploded View .........................................................

22

Removal and Installation  .........................................

22

HEADLINING ....................................................

24

Exploded View .........................................................

24

Removal and Installation  .........................................

24

TRUNK ROOM TRIM ........................................

27

Exploded View .........................................................

27

Removal and Installation  .........................................

27

TRUNK LID TRIM ..............................................

29

Exploded View .........................................................

29

Removal and Installation  .........................................

29


содержание   ..  172  173  174  175   ..