Nissan GT-R. Manual - part 116


  Главная      Nissan     Nissan GT-R (2007-2014 year) - Service Manual


поиск по сайту            


содержание   ..  114  115  116  117   ..


Nissan GT-R. Manual - part 116


EXT-18

< REMOVAL AND INSTALLATION >

FRONT BUMPER

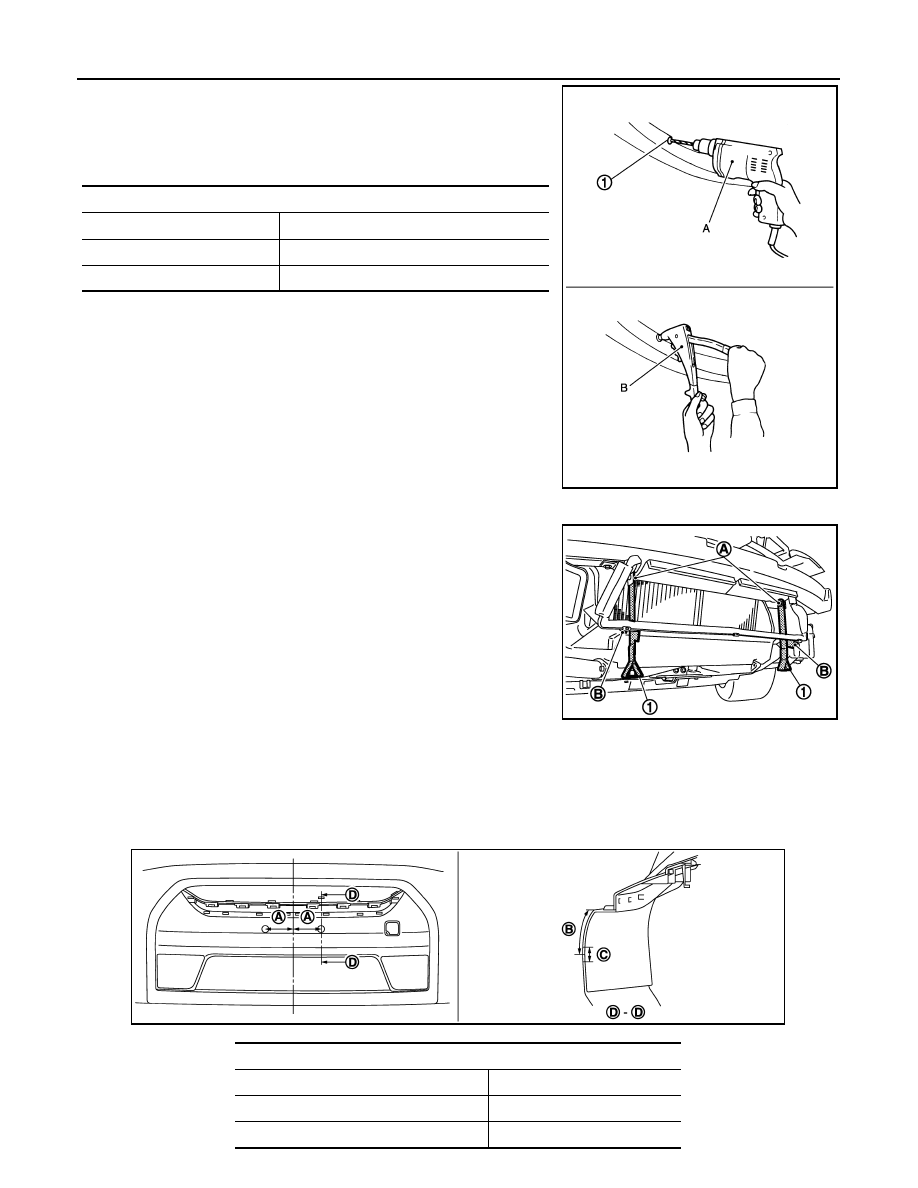
• Grind the head of rivet (1) with a drill (A) [bit of 

φ

 4.0 – 4.5 mm

(

φ

 0.157 – 0.177 in)], and then remove the bumper side

bracket. 

• Securely crimp the bumper side bracket with the bumper fas-

cia using a hand riveter (B). 

13. Remove the energy absorber. 

14. Remove the mounting bolts (A) and (B), and then remove the

bumper brackets (1) (LH/RH). 

15. Remove the mounting bolts, and then remove the bumper reinforcement with power tool. 

INSTALLATION

Note the following, and install in the reverse order of removal.

If front bumper fascia is replaced with new one, install blind nut following the steps as below.

1.

Make a hole in the front bumper fascia with drill, shown in the figure.

Bumper side bracket

Crimping thickness

: 1.2 – 6.4 mm (0.047 – 0.252 in)

Prepared hole diameter

φ

 4.1 –

φ

 4.4 mm (0.161 – 0.173 in)

Used rivet head diameter : 

φ

 8.0 mm (0.315 in)

NNKIA0122ZZ

NNKIA1693ZZ

Dimension

A: Distance from vehicle center

: 88.9 mm (3.500 in)

B: Distance from edge

: 41.6 mm (1.638 in)

C: Hole size

φ

 9.7 mm (0.382 in)

JMKIA2995ZZ

FRONT BUMPER

EXT-19

< REMOVAL AND INSTALLATION >

C

D

E

F

G

H

I

J

L

M

A

B

EXT

N

O

P

2.

Insert blind nut (A) to hand nut rivet setter (B).

3.

Set blind nut with hand nut rivet setter (A).

CAUTION:

Tighten the bumper brackets (LH/RH) and the bumper reinforcement after installing the engine under-
cover because the structure is so designed not to have any dimensional fluctuation between bumper
reinforcement and engine under cover.   
NOTE:
Clearance between front bumper and each unit. 

JMKIA2996ZZ

JMKIA2997ZZ

JMKIA3006ZZ

Portion

Clearance

Surface height difference 

Front bumper and hood

A – A 1.5 – 5.5 mm (0.059 – 0.217 in)

2.0 – 0.0 mm (

0.079 – 0.000 in)

Front bumper and head lamp

B – B 0.5 – 3.5 mm (0.020 – 0.138 in)

Front bumper and front fender C – C 0.0 – 0.8 mm (0.000 – 0.031 in)

0.2 – 1.8 mm (

0.008 – 0.071 in)

Front bumper and engine un-
dercover

D – D 0.0 – 1.0 mm (0.000 – 0.039 in)

1.0 – 1.0 mm (

0.039 – 0.039 in)

EXT-20

< REMOVAL AND INSTALLATION >

REAR BUMPER

REAR BUMPER

Exploded View

INFOID:0000000009161555

1.

Bumper fascia

2.

Energy absorber

3.

Bumper reinforcement

4.

Bumper stay RH

5.

Bumper side bracket B RH

6.

Bumper side bracket A RH

7.

Rear bumper upper frame RH

8.

Rear bumper upper frame LH

9.

Bumper side bracket A LH

JMKIA2775ZZ

REAR BUMPER

EXT-21

< REMOVAL AND INSTALLATION >

C

D

E

F

G

H

I

J

L

M

A

B

EXT

N

O

P

Removal and Installation

INFOID:0000000009161556

CAUTION:

• Be careful of being burned because the rear bumper guard is very hot after driving. 
• The bumper fascia is made of resin. Never apply strong force to it, and be careful to prevent contact

with oil. 

REMOVAL

1.

Open trunk lid.

2.

Remove the trunk floor carpet, trunk rear finisher and rear wheel house finishers (LH/RH). Refer to 

INT-

27, "Removal and Installation"

3.

Remove the mounting nuts (A) of rear combination lamps (1)
(LH/RH).

4.

Disconnect the harness connector (B) and remove the harness
grommet (C) from the rear combination lamps (LH/RH).

5.

Remove the mounting nuts (A) of the side marker lens (1) (LH/
RH).

6.

Remove the clips (A) from the lower surface of bumper fascia. 

10. Bumper side bracket B LH

11.

Bumper stay LH

12. Rear emblem

13. Rear combination lamp RH

14. Rear combination lamp LH

15. Side marker lens LH

16. Rear bumper side frame B LH

17. Bumper side bracket C LH

18. Rear bumper guard LH

19. Bumper fascia (lower)

20. Bumper side bracket C RH

21. Rear bumper side frame B RH

22. Rear bumper side frame A RH

23. License lamp bracket

24. Rear bumper side frame A LH

25. Side marker lens RH

26. Bumper finisher

27. Rear bumper guard RH

28. J-nut

Refer to 

GI-4, "Components"

 for symbols in the figure. 

NNKIA0111ZZ

NNKIA0112ZZ

NNKIA0113ZZ


содержание   ..  114  115  116  117   ..