Nissan GT-R. Manual - part 115


  Главная      Nissan     Nissan GT-R (2007-2014 year) - Service Manual


поиск по сайту            


содержание   ..  113  114  115  116   ..


Nissan GT-R. Manual - part 115


EXT-14

< REMOVAL AND INSTALLATION >

FRONT BUMPER

REMOVAL AND INSTALLATION

FRONT BUMPER

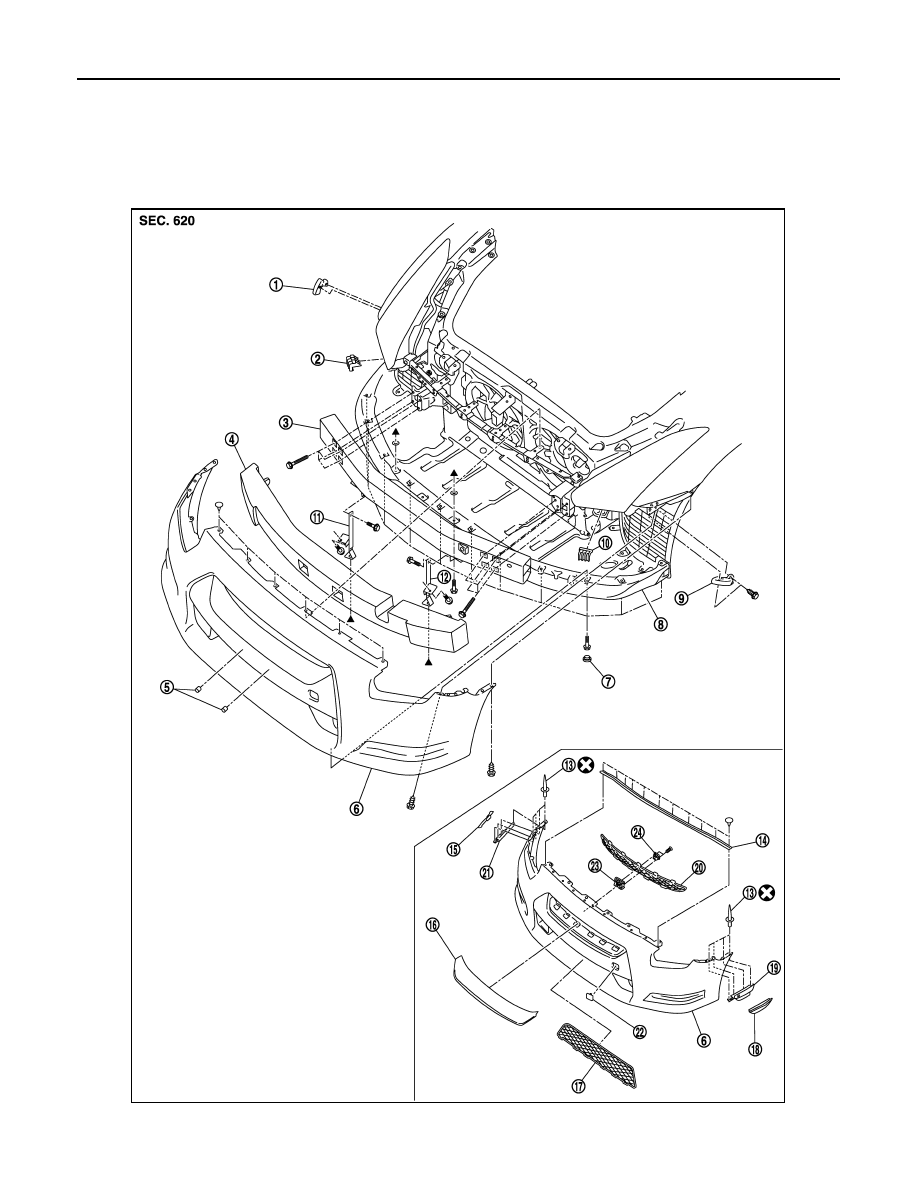
Exploded View

INFOID:0000000009161553

NNKIA1739ZZ

FRONT BUMPER

EXT-15

< REMOVAL AND INSTALLATION >

C

D

E

F

G

H

I

J

L

M

A

B

EXT

N

O

P

Removal and Installation

INFOID:0000000009161554

CAUTION:

The bumper fascia is made of resin. Never apply strong force to it, and be careful to prevent contact
with oil. 

REMOVAL

1.

Open hood.

2.

Apply protective tape (A) to protect the front fender (1) (LH/RH)
from damage. 

3.

Disengage the clips (A), and then remove the radiator cover. 

4.

Remove the clips (A) from the top surface of bumper fascia. 

5.

Remove the engine under cover. Refer to 

EXT-36, "ENGINE UNDER COVER : Removal and Installation"

1.

Bumper side stiffener RH

2.

Bumper side bracket clip RH

3.

Bumper reinforcement

4.

Energy absorber

5.

Blind nut

6.

Bumper fascia

7.

Hole cover

8.

Engine undercover

9.

Bumper side stiffener LH

10. Bumper side bracket clip LH

11.

Bumper bracket RH

12. Bumper bracket LH

13. Rivet

14.

Hood seal assembly (front)

15. Side turn signal lamp RH

16. Side turn signal lamp RH

17.

Front bumper grille

18. Side turn signal lamp LH

19. Bumper side bracket LH

20.

Front bumper finisher B

21. Bumper side bracket RH

22. Bumper bracket cover

23.

Front emblem

24. Front emblem bracket

Refer to 

GI-4, "Components"

 for symbols in the figure. 

NNKIA0160ZZ

NNKIA1687ZZ

JMKIA3004ZZ

EXT-16

< REMOVAL AND INSTALLATION >

FRONT BUMPER

6.

Disengage the pawls and the metal clips with the remover tool
(A), and then remove the side turn signal lamps (1) (LH/RH). 
Refer to 

EXL-52, "Removal and Installation"

7.

Remove the fender protector (front). Refer to 

EXT-30, "FENDER PROTECTOR : Removal and Installa-

tion"

8.

Remove the screws connecting the front fender and the bumper fascia (LH/RH).

9.

Pull bumper fascia (2) in the direction shown in the figure while
lifting up both sides, and then disengage if from the bumper side
bracket (1). 

CAUTION:

Never damage the pawls integrated with the bumper fascia
and bumper side bracket during removal. 

10. Pull the bumper fascia toward vehicle front, and then disengage it from the bumper side bracket clip on

the LH/RH head lamp lower end. 

11. Remove the bumper fascia. 

CAUTION:

When removing bumper fascia, 2 workers are required so as to prevent it from dropping. 

12. Remove the following parts after removing the bumper fascia. 

• Hood front seal: Refer to 

DLK-128, "HOOD ASSEMBLY : Exploded View"

• Front bumper finisher A

Disengage the clips from back of bumper fascia (2), and then remove the front bumper finisher A (1) in
the order 1–2 as shown in the figure. 

: Pawl

: Metal clip

NNKIA1688ZZ

: Screw

NNKIA1689ZZ

: Pawl

NNKIA1690ZZ

JMKIA3005ZZ

FRONT BUMPER

EXT-17

< REMOVAL AND INSTALLATION >

C

D

E

F

G

H

I

J

L

M

A

B

EXT

N

O

P

• Front bumper finisher B

Disengage the pawls from the back of the bumper fascia (1),
and then remove the front bumper finisher B (2). 

• Front bumper grille

Disengage the pawls from the back of the bumper fascia, and
then remove the front bumper grille (3). 

• Front emblem

Remove the mounting screws, and then remove the front
emblem (3) from the front bumper finisher B (1). 
Disengage pawls, and then remove the front emblem bracket
(2). 

• Disengage the mounting screws and pawls, and then remove the front emblem. 
• Bumper side bracket (LH/RH).

Remove the rivet (A), and then remove the bumper side
bracket (1) from the bumper fascia (2). 

NOTE:
Removal and installation of rivet

: Pawl

NNKIA1692ZZ

: Pawl

NNKIA0215ZZ

NNKIA1694ZZ


содержание   ..  113  114  115  116   ..