Nissan Pathfinder (2010 year). Manual - part 131


  Index      Manuals     Nissan Pathfinder (2010 year) - Service and Repair Manual


Search            copyright infringement  


Content      ..     129      130      131      132     ..


Nissan Pathfinder (2010 year). Manual - part 131


CO-46

< ON-VEHICLE REPAIR >

[VK56DE]

RADIATOR

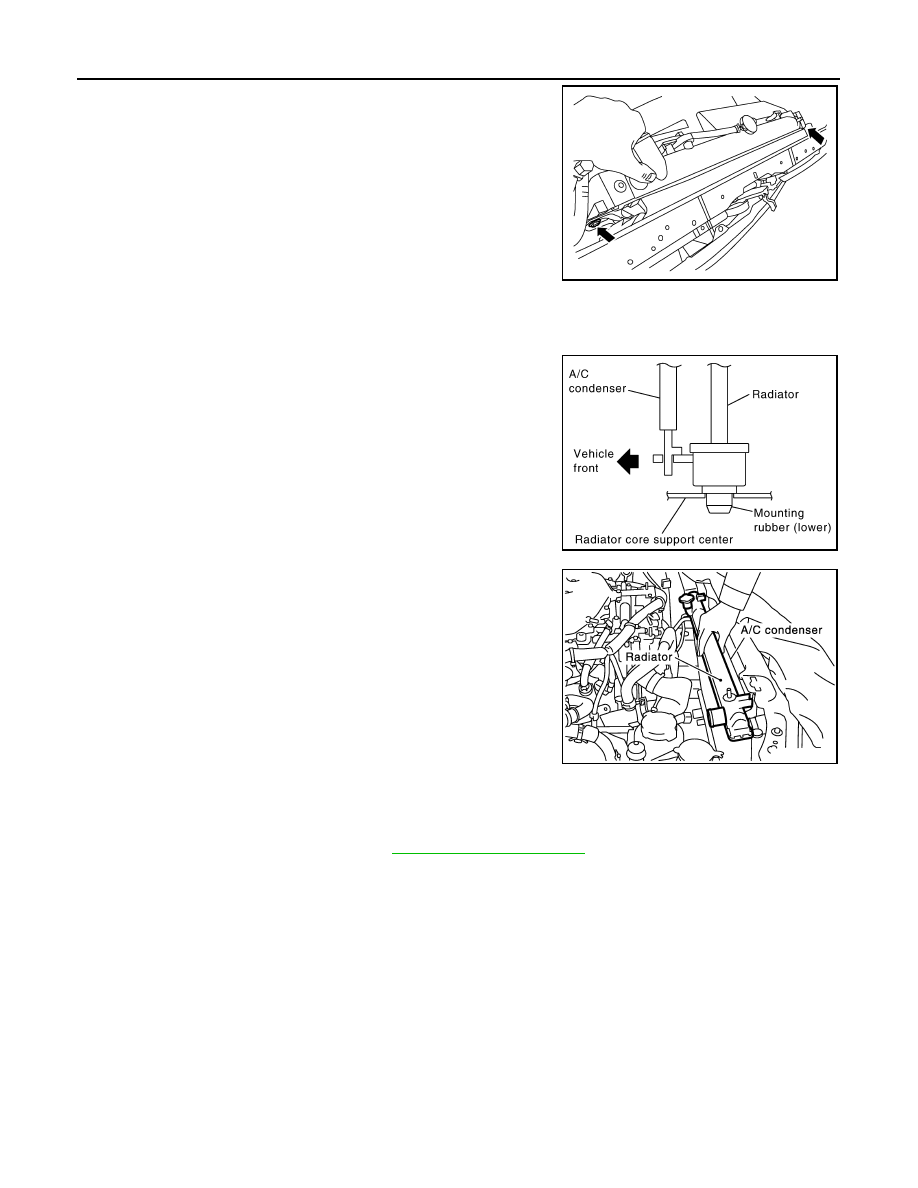
12. Remove the two A/C condenser bolts.

13. Remove radiator as follows:

CAUTION:

Do not damage or scratch A/C condenser and radiator core when removing.

a. With lifting and pulling radiator in a rear direction, disassemble

mounting rubber (lower) from radiator core support center.

CAUTION:

Because A/C condenser is attached to the front-lower por-

tion of radiator, moving it in the rear direction should be at

minimum.

b. Lift A/C condenser up and remove radiator after disengaging the

fitting at front-bottom surface.

CAUTION:

Lifting A/C condenser should be minimum to prevent a load

to A/C piping.

c.

After removing radiator, put A/C condenser on radiator core sup-

port center to prevent a load to A/C piping, and temporarily fix it

with rope or similar means.

INSTALLATION

Installation is in the reverse order of removal.

INSPECTION AFTER INSTALLATION

• Check for leaks of engine coolant. Refer to 

CO-11, "System Inspection"

.

• Start and warm up engine. Visually check there are no leaks of engine coolant and A/T fluid.

Checking Radiator

INFOID:0000000005260583

Check radiator for mud or clogging. If necessary, clean radiator as follows.

CAUTION:

• Be careful not to bend or damage the radiator fins.

• When radiator is cleaned without removal, remove all surrounding parts such as cooling fan, radia-

tor shroud and horns. Then tape the harness and electrical connectors to prevent water from enter-

ing.

1. Apply water by hose to the back side of the radiator core vertically downward.
2. Apply water again to all radiator core surfaces.
3. Stop washing when dirt and debris no longer flow out from the radiator.
4. Blow air into the back side of radiator core vertically downward.

• Use compressed air lower than 490 kPa (5 kg/cm

2

, 71 psi) and keep distance more than 30 cm (11.8 in). 

LBIA0421E

PBIC1936E

PBIC1054E

2010 Pathfinder

RADIATOR

CO-47

< ON-VEHICLE REPAIR >

[VK56DE]

C

D

E

F

G

H

I

J

K

L

M

A

CO

N

P

O

5.  Blow air again into all the radiator core surfaces until no water sprays out.
6. Check for leaks.

2010 Pathfinder

CO-48

< ON-VEHICLE REPAIR >

[VK56DE]

ENGINE COOLING FAN

ENGINE COOLING FAN

Exploded View

INFOID:0000000005260584

Crankshaft Driven Type

Removal and Installation (Crankshaft Driven Type)

INFOID:0000000005260585

REMOVAL

1. Remove the engine front under cover. Refer to 

EXT-14, "Removal and Installation"

.

2. Partially drain engine coolant from radiator. Refer to 

CO-11

.

CAUTION:

• Perform this step when engine is cold.

• Do not spill engine coolant on drive belts.

3. Remove engine room cover. Refer to 

EM-160, "Removal and Installation"

.

4. Remove the air duct and resonator assembly. Refer to 

EM-161, "Removal and Installation"

.

5. Remove reservoir tank hose from radiator.
6. Remove reservoir tank hose from engine.
7. Removal radiator hose (upper).

CAUTION:

Do not spill engine coolant on drive belts.

8. Remove radiator hose (lower).
9. Remove A/T fluid cooler hose from radiator.
10. Remove the radiator shroud (lower) and position aside. 

• Release the tabs, pull radiator shroud (lower) rearwards and

down to remove.

AWBIA0087GB

1.

Cooling fan

2.

Fan coupling

3.

Fan bracket

4.

Cooling fan pulley

A.

Front mark

Front

WBIA0407E

2010 Pathfinder

ENGINE COOLING FAN

CO-49

< ON-VEHICLE REPAIR >

[VK56DE]

C

D

E

F

G

H

I

J

K

L

M

A

CO

N

P

O

11. Remove the radiator shroud (upper) bolts and remove the radia-

tor shroud (upper) (A).

12. Remove the drive belt. Refer to 

EM-149, "Removal and Installation"

.

13. Remove the engine cooling fan.
14. Remove fan coupling, if necessary.
15. Remove cooling fan pulley, if necessary.
16. Remove fan bracket, if necessary.

INSPECTION AFTER REMOVAL

Fan Coupling

• Inspect fan coupling for oil leakage and bimetal conditions. 

• If there are any unusual concerns, replace the fan coupling.

Fan Bracket

• Visually check that there is no significant looseness in the fan

bracket shaft, and that it turns smoothly by hand.

• If there are any unusual concerns, replace the fan bracket assem-

bly.

INSTALLATION

Installation is in the reverse order of removal.

• Install cooling fan with its front mark “F” facing front of engine. Refer to 

CO-48, "Removal and Installation

(Crankshaft Driven Type)"

.

INSPECTION AFTER INSTALLATION

• Check for leaks of engine coolant. Refer to 

CO-39, "System Inspection"

.

• Start and warm up the engine. Visually make sure that there are no leaks of engine coolant.

Removal and Installation (Motor Driven Type)

INFOID:0000000005260586

REMOVAL

1. Remove the front grille. Refer to 

EXT-18, "Removal and Installation"

.

WBIA0695E

SLC072

WBIA0418E

2010 Pathfinder

CO-50

< ON-VEHICLE REPAIR >

[VK56DE]

ENGINE COOLING FAN

2. Loosen the lower fan motor nuts (A).

3. Disconnect harness connector (A) from fan motor.
4. Remove the upper fan motor bolts (B) and remove the fan grille

and motor assembly. 

INSTALLATION

Installation is in the reverse order of removal.

• Cooling fan is controlled by ECM. For details, refer to 

EC-530, "Description"

.

ALBIA0405GB

ALBIA0404GB

2010 Pathfinder

WATER PUMP

CO-51

< ON-VEHICLE REPAIR >

[VK56DE]

C

D

E

F

G

H

I

J

K

L

M

A

CO

N

P

O

WATER PUMP

Exploded View

INFOID:0000000005260587

Removal and Installation

INFOID:0000000005260588

CAUTION:

• When removing water pump, be careful not to get engine coolant on drive belt.

• Water pump cannot be disassembled and should be replaced as a unit.

• After installing water pump, connect hoses and clamps securely, then check for leaks.

REMOVAL

1. Remove engine front under cover. Refer to 

EXT-14, "Removal and Installation"

.

2. Drain engine coolant from the radiator. Refer to 

CO-40, "Changing Engine Coolant"

.

CAUTION:

• Perform when the engine is cold.

• Do not spill engine coolant on drive belt.

3. Remove the engine room cover. Refer to 

EM-160, "Removal and Installation"

.

4. Remove the air duct and resonator assembly. Refer to 

EM-161, "Removal and Installation"

5. Remove drive belt. Refer to 

EM-149, "Removal and Installation"

.

6. Remove reservoir tank hose from radiator shroud (upper).
7. Remove reservoir tank hose from engine.
8. Remove radiator hose (upper).

CAUTION:

Do not spill engine coolant on drive belt.

9. Remove the radiator hose (lower).
10. Remove the A/T fluid cooler hose from the radiator.
11. Remove the radiator shroud (lower) and position aside. 

• Release the tabs, pull radiator shroud (lower) rearwards and

down to remove.

KBIA2543E

1. Gasket

2. Water pump

3. Water pump pulley

WBIA0407E

2010 Pathfinder

CO-52

< ON-VEHICLE REPAIR >

[VK56DE]

WATER PUMP

12. Remove the radiator shroud (upper) bolts and remove the radia-

tor shroud (upper) (A).

13. Remove the engine cooling fan (crankshaft driven type). Refer to 

CO-48, "Removal and Installation

(Crankshaft Driven Type)"

.

14. Remove the water pump pulley.
15. Remove the water pump.

• Engine coolant will leak from the cylinder block, so have a receptacle ready below.

CAUTION:

Handle water pump vane so that it does not contact any other parts.

INSPECTION AFTER REMOVAL

• Visually check that there is no significant dirt or rust on the water

pump body and vane.

• Make sure there is no looseness in the vane shaft, and that it turns

smoothly when rotated by hand.

• Replace the water pump, if necessary.

INSTALLATION

Installation is in the reverse order of removal.

• After installation bleed the air from the cooling system. Refer to 

CO-40, "Changing Engine Coolant"

.

INSPECTION AFTER INSTALLATION

• Check for leaks of engine coolant. Refer to 

CO-39, "System Inspection"

.

• Start and warm up engine. Visually check for leaks of engine coolant.

WBIA0695E

KBIA2552E

2010 Pathfinder

THERMOSTAT AND WATER PIPING

CO-53

< ON-VEHICLE REPAIR >

[VK56DE]

C

D

E

F

G

H

I

J

K

L

M

A

CO

N

P

O

THERMOSTAT AND WATER PIPING

Exploded View

INFOID:0000000005260589

Removal and Installation

INFOID:0000000005260590

REMOVAL

Removal of Thermostat

1. Remove engine under cover. Refer to 

EXT-14, "Removal and Installation"

.

2. Partially drain engine coolant from the radiator. Refer to 

CO-40, "Changing Engine Coolant"

.

CAUTION:

Perform when engine is cold.

3. Remove the engine room cover. Refer to 

EM-160, "Removal and Installation"

.

4. Remove the air duct and resonator assembly. Refer to 

EM-161, "Removal and Installation"

.

5. Disconnect the water suction hose from the water inlet.
6. Remove the water inlet and thermostat.

Removal of Thermostat Housing, Water Outlet and Heater Pipe

1. Remove the intake manifold. Refer to 

EM-162, "Removal and Installation"

.

2. Remove the thermostat housing, water outlet and heater pipe.

INSPECTION AFTER REMOVAL

KBIA2501E

1.

Heater pipe

2.

Gasket

3.

Water outlet

4.

Gasket

5.

O-ring

6.

O-ring

7.

Thermostat housing

8.

Rubber ring

9.

Thermostat

10.

Water inlet

11.

Water suction hose

12. Water suction pipe

13.

Gasket

14. Heater pipe

2010 Pathfinder


Content      ..     129      130      131      132     ..