Nissan Pathfinder (2006 year). Manual - part 99


  Index      Manuals     Nissan Pathfinder (2006 year) - Service and Repair Manual


Search            copyright infringement  


Content      ..     97      98      99      100     ..


Nissan Pathfinder (2006 year). Manual - part 99


DOOR

BL-93

C

D

E

F

G

H

J

K

L

M

A

B

BL

2006 Pathfinder

Installation is in the reverse order of removal.

REAR DOOR

1.

Remove the door finisher. Refer to 

EI-25, "DOOR FINISHER"

 .

2.

Remove the inner seal. 

3.

Remove the rear door glass and regulator. Refer to 

GW-61, "REAR DOOR GLASS AND REGULATOR"

 .

4.

Remove the door harness.
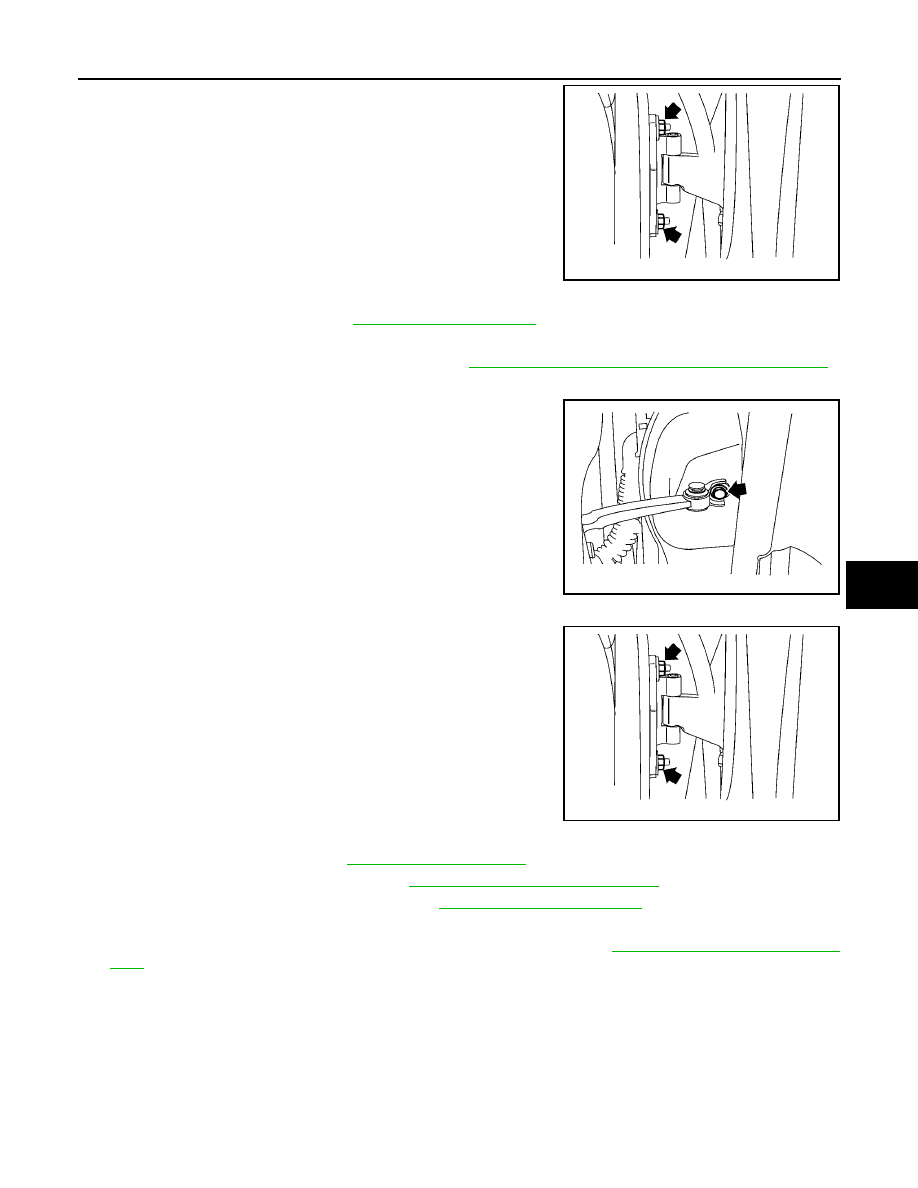
5.

Remove the check link bolt from the hinge pillar.

6.

Remove the door-side hinge nuts, and remove the door assembly.

Installation is in the reverse order of removal.

BACK DOOR

1.

Remove the glass hatch. Refer to 

GW-66, "GLASS HATCH"

 .

2.

Remove the license lamp finisher. Refer to 

EI-19, "LICENSE LAMP FINISHER"

 .

3.

Remove the back door lock assembly. Refer to 

BL-99, "BACK DOOR LOCK"

 .

4.

Remove the back door wire harness.

5.

Remove the rear washer nozzle and hose from the back door. Refer to 

WW-44, "REAR WASHER NOZ-

ZLE"

CAUTION:

Two technicians should be used to avoid damaging the back door during removal.

6.

Support the back door.

7.

Remove the back door stays.

Door hinge nuts

24.5 N·m (2.5 kg-m, 18 ft-lb)

LIIA1727E

Check link to hinge pillar 
bolt

14.7 N·m (1.5 kg-m, 11 ft-lb)

LIIA1726E

Door hinge nuts

24.5 N·m (2.5 kg-m, 18 ft-lb)

LIIA1727E

BL-94

DOOR

2006 Pathfinder

8.

Remove the door side nuts and the back door assembly.

Installation is in the reverse order of removal.

Align the back door. Refer to 

BL-90, "Fitting Adjustment"

 .

WIIA1056E

FRONT DOOR LOCK

BL-95

C

D

E

F

G

H

J

K

L

M

A

B

BL

2006 Pathfinder

FRONT DOOR LOCK

PFP:80502

Component Structure

EIS007Q3

Removal and Installation

EIS007Q4

REMOVAL

1.

Remove the front door window regulator. Refer to 

GW-57, "Front Door Glass"

 .

2.

Remove door side grommet, and remove door key cylinder assembly (driver side) or outside handle
escutcheon (passenger side) bolts (TORX T30) from grommet hole.

CAUTION:

Do not forcibly remove the TORX bolts (T30).

3.

Separate the key cylinder rod from the key cylinder assembly.

1.

Grommet

2.

Front door striker

3.

Door lock assembly

4.

Outside handle cable

5.

Inside handle assembly

6.

Inside handle cable

7.

Door lock cable

8.

Key cylinder rod (Driver side only)

9.

Door key cylinder

10. Outside handle bracket

11.

Front gasket

12. Outside handle

13. Door key cylinder assembly (Driver 

side) Outside handle escutcheon 
(Passenger side)

14. Rear gasket

Vehicle front

WIIA0736E

Torx bolt

5.3 N·m (0.54 kg-m, 47 in-lb)

PIIA3553E

BL-96

FRONT DOOR LOCK

2006 Pathfinder

4.

While pulling the outside handle, remove door key cylinder
assembly or escutcheon.

5.

While pulling outside handle, slide toward rear of vehicle to
remove outside handle.

6.

Remove the front gasket and rear gasket.

7.

Remove the TORX bolts (T30), remove the door lock assembly.

8.

While pulling outside handle bracket, slide toward rear of vehicle
to remove outside handle bracket and door lock assembly.

PIIA3554E

LIIA0532E

PIIA3557E

Door lock assembly bolts

5.8 N·m (0.59 kg-m, 51 in-lb)

PIIA1090E

PIIA3558E

FRONT DOOR LOCK

BL-97

C

D

E

F

G

H

J

K

L

M

A

B

BL

2006 Pathfinder

9.

Disconnect the door lock actuator connector.

10. Separate the outside handle cable connection from the outside

handle bracket.

INSTALLATION

Installation in the reverse order of removal.

CAUTION:

To install each rod, be sure to rotate the rod holder until a click is felt.

Disassembly and Assembly

EIS007Q5

DOOR KEY CYLINDER ASSEMBLY

Remove the key cylinder escutcheon pawl and remove the door key cylinder.

PIIA5059E

1.

Door key cylinder assembly

2.

Key cylinder escutcheon

3.

Door key cylinder

Pawl

WIIA1057E

BL-98

REAR DOOR LOCK

2006 Pathfinder

REAR DOOR LOCK

PFP:82502

Component Structure

EIS007Q6

Removal and Installation

EIS007Q7

REMOVAL

1.

Remove the rear door window regulator. Refer to 

GW-61, "Rear Door Glass"

 .

2.

Remove door grommets, and remove outside handle nuts from the hole.

3.

Remove outside handle.

4.

Disconnect the outside handle cable connection.

5.

Remove the inside door handle.

6.

Disconnect the door lock and inside door handle cables from the inside door handle.

7.

Disconnect the door lock actuator connector and remove the assembly.

INSTALLATION

Installation is in the reverse order of removal.

1.

Outside door handle

2.

Rear door striker

3.

Rear door lock assembly

4.

Outside door handle cable

5.

Inside door handle cable

6.

Inside door handle assembly

7.

Door lock cable

Vehicle front

WIIA0737E

BACK DOOR LOCK

BL-99

C

D

E

F

G

H

J

K

L

M

A

B

BL

2006 Pathfinder

BACK DOOR LOCK

PFP:90504

Component Structure

EIS007Q8

1.

Glass hatch latch assembly

2.

Emergency exit handle cable

3.

Back door latch cable

4.

Back door latch

5.

Back door release handle

6.

Back door striker

7.

Glass hatch release handle

8.

Emergency exit handle 

Vehicle front

WIIA0776E

BL-100

NVIS(NISSAN VEHICLE IMMOBILIZER SYSTEM-NATS)

2006 Pathfinder

NVIS(NISSAN VEHICLE IMMOBILIZER SYSTEM-NATS)

PFP:28591

Component Parts and Harness Connector Location

EIS007Q9

LIIA2414E

1.

NATS antenna amplifier M21
(View with cluster lid A removed)

2.

BCM M18, M19, M20
(View with instrument lower panel LH 
removed)

3.

IPDM E/R E118, E119, E120, E121, 
E122, E123, E124 

4.

ECM E16

5.

Combination meter M24


Content      ..     97      98      99      100     ..