Nissan Murano Z51. Manual - part 866


  Главная      Nissan     Nissan Murano Z51 (2010 year) - Service Manual


поиск по сайту            


содержание   ..  864  865  866  867   ..


Nissan Murano Z51. Manual - part 866


PRECAUTIONS

HAC-119

< PRECAUTION >

[WITHOUT 7 INCH DISPLAY]

C

D

E

F

G

H

J

K

L

M

A

B

HAC

N

O

P

with a hammer. Heavy vibration could activate the sensor(s) and deploy the air bag(s), possibly
causing serious injury.

• When using air or electric power tools or hammers, always switch the ignition OFF, disconnect the

battery, and wait at least 3 minutes before performing any service.

Precaution Necessary for Steering Wheel Rotation after Battery Disconnect

INFOID:0000000005514663

NOTE:
• Before removing and installing any control units, first turn the push-button ignition switch to the LOCK posi-

tion, then disconnect both battery cables.

• After finishing work, confirm that all control unit connectors are connected properly, then re-connect both

battery cables.

• Always use CONSULT-III to perform self-diagnosis as a part of each function inspection after finishing work.

If a DTC is detected, perform trouble diagnosis according to self-diagnosis results.

For vehicle with steering lock unit, if the battery is disconnected or discharged, the steering wheel will lock and
cannot be turned.
If turning the steering wheel is required with the battery disconnected or discharged, follow the operation pro-
cedure below before starting the repair operation.

OPERATION PROCEDURE

1.

Connect both battery cables.
NOTE:
Supply power using jumper cables if battery is discharged.

2.

Turn the push-button ignition switch to ACC position.
(At this time, the steering lock will be released.)

3.

Disconnect both battery cables. The steering lock will remain released with both battery cables discon-
nected and the steering wheel can be turned.

4.

Perform the necessary repair operation.

5.

When the repair work is completed, re-connect both battery cables. With the brake pedal released, turn
the push-button ignition switch from ACC position to ON position, then to LOCK position. (The steering
wheel will lock when the push-button ignition switch is turned to LOCK position.)

6.

Perform self-diagnosis check of all control units using CONSULT-III.

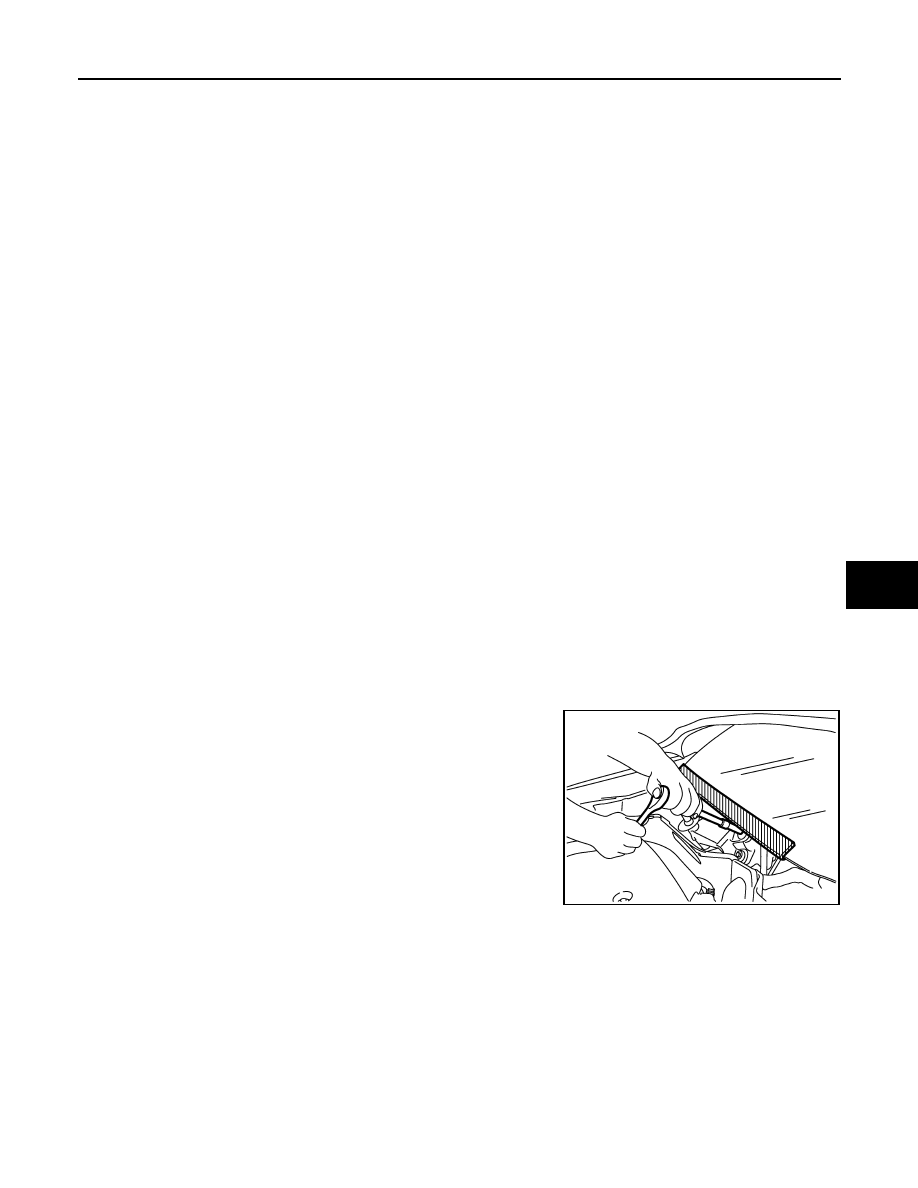
Precaution for Procedure without Cowl Top Cover

INFOID:0000000005514664

When performing the procedure after removing cowl top cover, cover
the lower end of windshield with urethane, etc.

Precautions For Xenon Headlamp Service

INFOID:0000000005514665

WARNING:

Comply with the following warnings to prevent any serious accident.
• Disconnect the battery cable (negative terminal) or the power supply fuse before installing, remov-

ing, or touching the xenon headlamp (bulb included). The xenon headlamp contains high-voltage
generated parts.

• Never work with wet hands.
• Check the xenon headlamp ON-OFF status after assembling it to the vehicle. Never turn the xenon

headlamp ON in other conditions. Connect the power supply to the vehicle-side connector.
(Turning it ON outside the lamp case may cause fire or visual impairments.)

• Never touch the bulb glass immediately after turning it OFF. It is extremely hot. 

CAUTION:

PIIB3706J

HAC-120

< PRECAUTION >

[WITHOUT 7 INCH DISPLAY]

PRECAUTIONS

Comply with the following cautions to prevent any error and malfunction.
• Install the xenon bulb securely. (Insufficient bulb socket installation may melt the bulb, the connec-

tor, the housing, etc. by high-voltage leakage or corona discharge.)

• Never perform HID circuit inspection with a tester.
• Never touch the xenon bulb glass with hands. Never put oil and grease on it.
• Dispose of the used xenon bulb after packing it in thick vinyl without breaking it. 
• Never wipe out dirt and contamination with organic solvent (thinner, gasoline, etc.).

Working with HFC-134a (R-134a)

INFOID:0000000005514666

CAUTION:

• CFC-12 (R-12) refrigerant and HFC-134a (R-134a) refrigerant are not compatible. Compressor mal-

function is likely to occur if the refrigerants are mixed, refer to “CONTAMINATED REFRIGERANT”
below. To determine the purity of HFC-134a (R-134a) in the vehicle and recovery tank, use Refriger-
ant Recovery/Recycling Recharging equipment and Refrigerant Identifier.

• Use only specified lubricant for the HFC-134a (R-134a) A/C system and HFC-134a (R-134a) compo-

nents. Compressor malfunction is likely to occur if lubricant other than that specified is used.

• The specified HFC-134a (R-134a) lubricant rapidly absorbs moisture from the atmosphere. The fol-

lowing handling precautions must be observed:

- Immediately cap (seal) the component to minimize the entry of moisture from the atmosphere when

removing refrigerant components from a vehicle.

- Never remove the caps (unseal) until just before connecting the components when installing refrig-

erant components to a vehicle. Connect all refrigerant loop components as quickly as possible to
minimize the entry of moisture into system.

- Use only the specified lubricant from a sealed container. Immediately reseal containers of lubricant.

Lubricant becomes moisture saturated and should not be used without proper sealing.

- Never allow lubricant (NISSAN A/C System Oil Type S) to come in to contact with styrene foam parts.

Damage may result.

CONTAMINATED REFRIGERANT

Take the appropriate steps shown below if a refrigerant other than pure HFC-134a (R-134a) is identified
in a vehicle:
• Explain to the customer that environmental regulations prohibit the release of contaminated refrigerant into

the atmosphere.

• Explain that recovery of the contaminated refrigerant could damage service equipment and refrigerant sup-

ply.

• Suggest the customer return the vehicle to the location of previous service where the contamination may

have occurred.

• If repairing, recover the refrigerant using only dedicated equipment and containers. Never reintroduce

contaminated refrigerant into the existing service equipment. Contact a local refrigerant product retailer
for available service if the facility does not have dedicated recovery equipment. This refrigerant must be dis-
posed of in accordance with all federal and local regulations. In addition, replacement of all refrigerant sys-
tem components on the vehicle is recommended.

• The air conditioner warranty is void if the vehicle is within the warranty period. Please contact Nissan Cus-

tomer Affairs for further assistance.

General Refrigerant Precaution

INFOID:0000000005514667

WARNING:

• Never breath A/C refrigerant, lubricant vapor or mist. Exposure may irritate eyes, nose and throat.

Remove HFC-134a (R-134a) from the A/C system, using certified service equipment meeting require-
ments of SAE J-2210 [HFC-134a (R-134a) recycling equipment], or J-2209 [HFC-134a (R-134a) recov-
ery equipment]. Ventilate work area before resuming service if accidental system discharge occurs.
Additional health and safety information may be obtained from refrigerant and lubricant manufactur-
ers.

• Never release refrigerant into the air. Use approved recovery/recycling equipment to capture the

refrigerant each time an air conditioning system is discharged.

• Always wear eye and hand protection (goggles and gloves) when working with any refrigerant or air

conditioning system.

• Never store or heat refrigerant containers above 52

°

C (126

°

F).

• Never heat a refrigerant container with an open flame. Place the bottom of the container in a warm

pail of water if container warming is required.

PRECAUTIONS

HAC-121

< PRECAUTION >

[WITHOUT 7 INCH DISPLAY]

C

D

E

F

G

H

J

K

L

M

A

B

HAC

N

O

P

• Never intentionally drop, puncture, or incinerate refrigerant containers.
• Keep refrigerant away from open flames. Poisonous gas is produced if refrigerant burns.
• Refrigerant displaces oxygen, therefore be certain to work in well ventilated areas to prevent suffo-

cation.

• Never pressure test or leakage test HFC-134a (R-134a) service equipment and/or vehicle air condi-

tioning systems with compressed air during repair. Some mixtures of air and HFC-134a (R-134a)
have been shown to be combustible at elevated pressures. These mixtures, if ignited, may cause
injury or property damage. Additional health and safety information may be obtained from refriger-
ant manufacturers.

Refrigerant Connection

INFOID:0000000005514668

A new type refrigerant connection has been introduced to all refrigerant lines except the following location.
• Expansion valve to evaporator
• Refrigerant pressure sensor to liquid tank

O-RING AND REFRIGERANT CONNECTION

CAUTION:

The new and former refrigerant connections use different O-ring configurations. Never confuse O-
rings since they are not interchangeable. Refrigerant may leak at the connection if a wrong O-ring is
installed.

O-Ring Part Numbers and Specifications

F.

Former type refrigerant connection

N.

New type refrigerant connection

:

O-ring size

JPIIA0453ZZ

HAC-122

< PRECAUTION >

[WITHOUT 7 INCH DISPLAY]

PRECAUTIONS

WARNING:

Check that all refrigerant is discharged into the recycling equipment and the pressure in the system is
less than atmospheric pressure. Then gradually loosen the discharge side hose fitting and remove it.

CAUTION:

Observe the following when replacing or cleaning refrigerant cycle components.
• Store it in the same way at it is when mounted on the car when the compressor is removed. Failure

to do so will cause lubricant to enter the low-pressure chamber.

• Always use a torque wrench and a back-up wrench when connecting tubes.
• Immediately plug all openings to prevent entry of dust and moisture after disconnecting tubes.
• Connect the pipes at the final stage of the operation when installing an air conditioner in the vehicle.

Never remove the seal caps of pipes and other components until just before required for connection.

• Allow components stored in cool areas to warm to working area temperature before removing seal

caps. This prevents condensation from forming inside A/C components.

• Thoroughly remove moisture from the refrigeration system before charging the refrigerant.
• Replace always used O-rings.
• Apply lubricant to circle of the O-rings shown in illustration when connecting tube. Be careful not to

apply lubricant to threaded portion.

• O-ring must be closely attached to the groove portion of tube.
• Be careful not to damage O-ring and tube when replacing the O-ring.
• Connect tube until a click can be heard. Then tighten the nut or bolt by hand. Check that the O-ring is

installed to tube correctly.

Connection type

Piping connection point

Part number

QTY

O-ring size

New

Low-pressure flexible hose to low-pressure pipe

92474 N8210

1

φ

19

High-pressure pipe to condenser pipe assembly (Outlet)

92471 N8210

1

φ

8

Condenser pipe assembly (Inlet) to high-pressure flexible 
hose (One-touch joint)

92472 N8210

1

φ

12

Condenser assembly to condenser pipe as-
sembly

Inlet

92472 N8210

1

φ

12

Outlet

92471 N8210

1

φ

8

Low-pressure pipe to expansion valve

92473 N8210

1

φ

16

High-pressure pipe to expansion valve

92471 N8210

1

φ

8

Compressor to low-pressure flexible hose

92474 N8210

1

φ

19

Compressor to high-pressure flexible hose

92472 N8210

1

φ

12

Liquid tank to condenser assembly

Inlet

92471 N8210

1

φ

8

Outlet

1

Former

Refrigerant pressure sensor to liquid tank

J2476 89956

1

φ

10

Expansion valve to evaporator pipe assembly

Inlet

92475 71L00

1

φ

12

Outlet

92475 72L00

1

φ

16

Evaporator to evaporator pipe assembly

Inlet

92475 71L00

1

φ

12

Outlet

92475 72L00

1

φ

16

Name

: NISSAN A/C System Oil Type S


содержание   ..  864  865  866  867   ..