Murano Cross Cabriolet Z51 (2013 year). Manual - part 26


  Index      Manuals     Murano Cross Cabriolet Z51 (2013 year) - Service and Repair Manual


Search            copyright infringement  


Content      ..     24      25      26      27     ..


Murano Cross Cabriolet Z51 (2013 year). Manual - part 26


CO-4

< PREPARATION >

PREPARATION

PREPARATION

PREPARATION

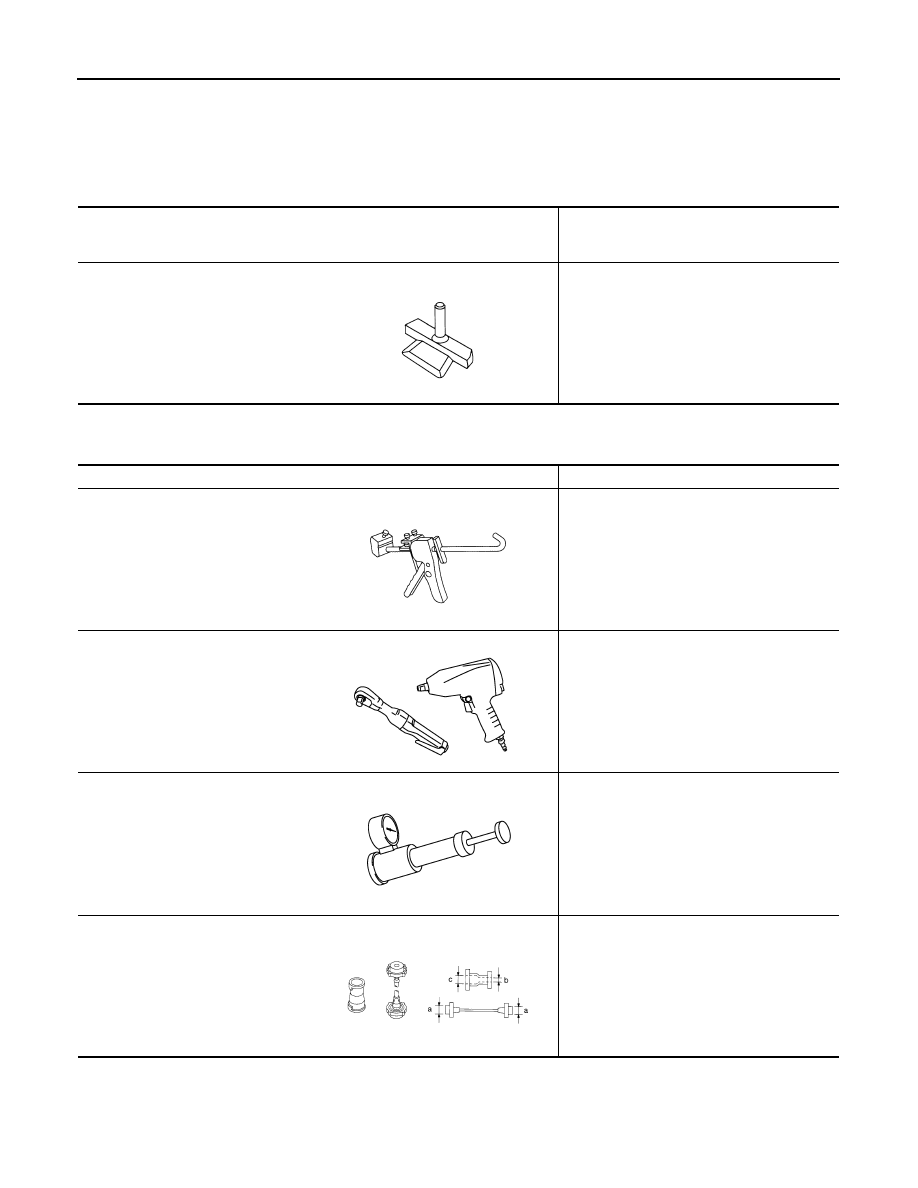
Special Service Tool

INFOID:0000000008462724

The actual shapes of Kent-Moore tools may differ from those of special service tools illustrated here.

Commercial Service Tools

INFOID:0000000008462725

Tool number
(Kent-Moore No.)
Tool name

Description

KV10111100
(J-37228)
Seal cutter

Removing water pump cover

NT046

Tool name

Description

Tube presser

Pressing the tube of liquid gasket

Power tool

Loosening nuts and bolts

Radiator cap tester

Checking radiator and radiator cap

Radiator cap tester adapter

Adapting radiator cap tester to radiator cap 
and radiator pipe (upper) filler neck
a: 28 (1.10) dia.
b: 31.4 (1.236) dia.
c: 41.3 (1.626) dia.
Unit: mm (in)

S-NT052

PBIC0190E

PBIC1982E

S-NT564

Revision: 2012 October

2013 Murano CrossCabriolet

DESCRIPTION

CO-5

< SYSTEM DESCRIPTION >

C

D

E

F

G

H

I

J

K

L

M

A

CO

N

P

O

SYSTEM DESCRIPTION

DESCRIPTION

Engine Cooling System

INFOID:0000000008462726

Engine Cooling System Schematic

INFOID:0000000008462727

JPBIA5297GB

JPBIA5298GB

Revision: 2012 October

2013 Murano CrossCabriolet

CO-6

< SYMPTOM DIAGNOSIS >

OVERHEATING CAUSE ANALYSIS

SYMPTOM DIAGNOSIS

OVERHEATING CAUSE ANALYSIS

Troubleshooting Chart

INFOID:0000000008462728

Symptom

Check items

Cooling sys-
tem parts 
malfunction

Poor heat transfer

Water pump malfunction

Worn or loose drive belt

Thermostat stuck closed

Damaged fins

Dust contamination or pa-
per clogging

Physical damage

Clogged radiator cooling 
tube

Excess foreign material 
(rust, dirt, sand, etc.)

Reduced air flow

Cooling fan does not oper-
ate

Fan assembly

High resistance to fan rota-
tion

Damaged fan blades

Damaged radiator shroud

Improper engine coolant 
mixture ratio

Poor engine coolant quality

Engine coolant density

Insufficient engine coolant

Engine coolant leakage

Cooling hose

Loose clamp

Cracked hose

Water pump

Poor sealing

Radiator cap

Loose

Poor sealing

Radiator

O-ring for damage, deterio-
ration or improper fitting

Cracked radiator tank

Cracked radiator core

Reservoir tank

Cracked reservoir tank

Overflowing reservoir tank

Exhaust gas leakage into 
cooling system

Cylinder head deterioration

Cylinder head gasket deteri-
oration

Revision: 2012 October

2013 Murano CrossCabriolet

OVERHEATING CAUSE ANALYSIS

CO-7

< SYMPTOM DIAGNOSIS >

C

D

E

F

G

H

I

J

K

L

M

A

CO

N

P

O

Except cool-
ing system 
parts mal-
function

Overload on engine

Abusive driving

High engine rpm under no 
load

Driving in low gear for ex-
tended time

Driving at extremely high 
speed

Powertrain system malfunc-
tion

Installed improper size 
wheels and tires

Dragging brakes

Improper ignition timing

Blocked or restricted air 
flow

Blocked bumper

Blocked radiator grille

Installed car brassiere

Mud contamination or paper 
clogging

Blocked radiator

Blocked condenser

Blocked air flow

Installed large fog lamp

Symptom

Check items

Revision: 2012 October

2013 Murano CrossCabriolet

CO-8

< PERIODIC MAINTENANCE >

ENGINE COOLANT

PERIODIC MAINTENANCE

ENGINE COOLANT

Inspection

INFOID:0000000008462729

LEVEL 

• Check if the reservoir tank engine coolant level is within the “MIN”

to “MAX” when the engine is cool.

• Adjust the engine coolant level if necessary.

CAUTION:

Refill Genuine NISSAN Long Life Antifreeze/Coolant (blue) or
equivalent in its quality mixed with water (distilled or demineral-
ized). Refer t

MA-10, "Fluids and Lubricants"

.

LEAKAGE

• To check for leakage, apply pressure to the cooling system with the

radiator cap tester (commercial service tool) (A) and radiator cap
tester adapter (commercial service tool) (B).

WARNING:

Never remove radiator cap when engine is hot. Serious burns
could occur from high-pressure engine coolant escaping from
engine cooling system.

CAUTION:

Higher test pressure than specified may cause radiator dam-
age.
NOTE:
In a case that engine coolant decreases, replenish radiator with engine coolant.

• If anything is found, repair or replace damaged parts.

Draining

INFOID:0000000008462730

WARNING:

• To avoid being scalded, never change engine coolant when the engine is hot.
• Wrap a thick cloth around radiator cap and carefully remove radiator cap. First, turn radiator cap a

quarter of a turn to release built-up pressure. Then turn radiator cap all the way.

1.

Remove engine under cover.

2.

Open radiator drain plug (1) at the bottom of radiator, and then
remove radiator cap. 

When draining all of engine coolant in the system, open water drain plugs on cylinder block. Refer
to 

EM-75, "Setting"

.

3.

Remove reservoir tank if necessary, and drain engine coolant and clean reservoir tank before installing. 

A

:  MAX

B

:  MIN

JPBIA0102ZZ

Testing pressure

: Refer to 

CO-28, "Radiator"

.

PBIC5121J

: Vehicle front

JPBIA1684ZZ

Revision: 2012 October

2013 Murano CrossCabriolet

ENGINE COOLANT

CO-9

< PERIODIC MAINTENANCE >

C

D

E

F

G

H

I

J

K

L

M

A

CO

N

P

O

4.

Check drained engine coolant for contaminants such as rust, corrosion or discoloration.
If contaminated, flush the engine cooling system. Refer to 

CO-10, "Flushing"

.

Refilling

INFOID:0000000008462731

CAUTION:

• Do not reuse O-rings.
• Do not put additive such as waterleak preventive, sine it may cause cooling waterway clogging.
• When refilling use Genuine NISSAN Long Life Antifreeze/Coolant (blue) or equivalent in its quality

mixed with water (distilled or demineralized). Refer to 

MA-10, "Fluids and Lubricants"

.

1.

Install reservoir tank if removed and radiator drain plug.

CAUTION:

Be sure to clean drain plug and install with new O-ring.

If water drain plugs on cylinder block are removed, close and tighten them. Refer to 

EM-107, "Dis-

assembly and Assembly"

.

2.

Check that each hose clamp has been firmly tightened.

3.

Remove air duct assembly and air cleaner cases (upper and lower) assembly. Refer to 

EM-26, "Exploded

View"

.

4.

Disconnect heater hose (1) at the position (

) in the figure.

5.

Fill radiator to specified level.

CAUTION:

Never adhere the engine coolant to electronic equipments.
(alternator etc.)
• Pour engine coolant through engine coolant filler neck

slowly of less than 2  (2-1/8 US qt, 1-3/4 lmp qt) a minute
to allow air in system to escape.

• When engine coolant overflows disconnected heater

hose, connect heater hose, and continue filling the engine
coolant.

6.

Refill reservoir tank to “MAX” level line with engine coolant.

Tightening torque

: Refer to 

CO-13, "Exploded View"

.

: Vehicle front

JPBIA1685ZZ

Engine coolant capacity 
(With reservoir tank at “MAX”level)

: Refer to 

CO-28, "Periodical Maintenance Specifica-

tion"

.

Reservoir tank engine coolant capacity
(At “MAX” level)

: Refer to 

CO-28, "Periodical Maintenance Specification"

.

A

: MAX 

B

:  MIN

JPBIA0412ZZ

JPBIA0102ZZ

Revision: 2012 October

2013 Murano CrossCabriolet

CO-10

< PERIODIC MAINTENANCE >

ENGINE COOLANT

7.

Install air duct assembly and air cleaner cases (upper and lower) assembly. Refer to 

EM-26, "Exploded

View"

.

8.

Install radiator cap.

9.

Warm up engine until opening thermostat. Standard for warming-up time is approximately 10 minutes at
3,000 rpm.
• Check thermostat opening condition by touching radiator hose (lower) to see a flow of warm water.

CAUTION:

Watch water temperature gauge so as not to overheat engine.

10. Stop the engine and cool down to less than approximately 50

°

C (122

°

F).

• Cool down using fan to reduce the time.
• If necessary, refill radiator up to filler neck with engine coolant.

CAUTION:

Never adhere the engine coolant to electronic equipments. (alternator etc.)

11. Refill reservoir tank to “MAX” level line with engine coolant.

12. Repeat steps 7 through 10 two or more times with radiator cap installed until engine coolant level no

longer drops. 

13. Check cooling system for leakage with engine running.

14. Warm up the engine, and check for sound of engine coolant flow while running engine from idle up to

3,000 rpm with heater temperature controller set at several position between “COOL” and “WARM”.
• Sound may be noticeable at heater unit.

15. Repeat step 13 three times.

16. If sound is heard, bleed air from cooling system by repeating step 5, and steps from 7 to 14 until engine

coolant level no longer drops. 

Flushing

INFOID:0000000008462732

1.

Install reservoir tank if removed and radiator drain plug.

CAUTION:

Be sure to clean drain plug and install with new O-ring.

If water drain plugs on cylinder block are removed, close and tighten them. Refer to 

EM-107, "Dis-

assembly and Assembly"

.

2.

Remove air duct assembly and air cleaner cases (upper and lower) assembly. Refer to 

EM-26, "Exploded

View"

.

3.

Disconnect heater hose (1) at the position (

) in the figure.

4.

 Fill radiator and reservoir tank with water and reinstall radiator cap.

CAUTION:

Never adhere the water to electronic equipments. (alternator etc.)
• When water overflows disconnected heater hose, connect heater hose, and continue filling the

water.

5.

Run the engine and warm it up to normal operating temperature.

6.

Rev the engine two or three times under no-load.

7.

Stop the engine and wait until it cools down.

Tightening torque

: Refer to 

CO-13, "Exploded View"

.

: Vehicle front

JPBIA1685ZZ

Revision: 2012 October

2013 Murano CrossCabriolet

ENGINE COOLANT

CO-11

< PERIODIC MAINTENANCE >

C

D

E

F

G

H

I

J

K

L

M

A

CO

N

P

O

8.

Drain water from the system. Refer to 

CO-8, "Draining"

.

9.

Repeat steps 1 through 8 until clear water begins to drain from radiator.

Revision: 2012 October

2013 Murano CrossCabriolet

CO-12

< PERIODIC MAINTENANCE >

RADIATOR

RADIATOR

RADIATOR CAP

RADIATOR CAP : Inspection

INFOID:0000000008462733

• Check valve seat (A) of radiator cap. 
- Check if valve seat is swollen to the extent that the edge of the

plunger (B) cannot be seen when watching it vertically from the
top.

- Check if valve seat has no soil and damage.
- Check that there is no dirt or damage on the valve seat of radiator

cap negative-pressure valve. 

- Check that there are no unusualness in the opening and closing

conditions of negative-pressure valve.

• Check radiator cap relief pressure.

- When connecting radiator cap to the radiator cap tester (commer-

cial service tool) and the radiator cap tester adapter (commercial
service tool) (A), apply engine coolant to the cap seal surface. 

• Replace radiator cap if there is an unusualness related to the above three.

CAUTION:

When installing radiator cap, thoroughly wipe out the radiator pipe (upper) filler neck to remove any
waxy residue or foreign material.

RADIATOR

RADIATOR : Inspection

INFOID:0000000008462734

Check radiator for mud or clogging. If necessary, clean radiator as follows:

CAUTION:

• Never bend or damage radiator fins.
• When radiator is cleaned without removal, remove all surrounding parts such as radiator cooling fan

assembly and horns. Then tape harness and connectors to prevent water from entering.

1.

Apply water by hose to the back side of the radiator core vertically downward.

2.

Apply water again to all radiator core surfaces once per minute.

3.

Stop washing if any stains no longer flow out from radiator.

4.

Blow air into the back side of radiator core vertically downward.
• Use compressed air lower than 490 kPa (5 kg/cm

2

, 71 psi) and keep distance more than 30 cm (11.81

in). 

5.

Blow air again into all the radiator core surfaces once per minute until no water sprays out.

JPBIA1961ZZ

Standard and limit

: Refer to 

CO-28, "Radiator"

.

JPBIA0109ZZ

Revision: 2012 October

2013 Murano CrossCabriolet

RADIATOR

CO-13

< REMOVAL AND INSTALLATION >

C

D

E

F

G

H

I

J

K

L

M

A

CO

N

P

O

REMOVAL AND INSTALLATION

RADIATOR

Exploded View

INFOID:0000000008462735

1.

Reservoir tank cap

2.

Reservoir tank

3.

Clamp

4.

Reservoir tank hose

5.

Radiator cap

6.

Radiator cap adapter

7.

Radiator pipe (upper)

8.

Clamp

9.

Radiator hose (upper)

10. Radiator hose (upper)

11.

O-ring

12. Drain plug

13. Water drain hose

14. Mounting rubber (upper)

15. Radiator upper clip

16. Radiator

17. Mounting rubber (lower)

18. Radiator pipe (lower)

19. Radiator hose (lower)

20. Clamp

21. CVT fluid cooler hose

22. CVT fluid cooler hose

23. CVT fluid cooler pipe

24. CVT fluid cooler hose

25. Grommet

26. Cooling fan assembly

27. Radiator hose (lower)

A.

To water outlet

B.

To transaxle assembly

C.

To water inlet

 : N·m (kg-m, in-lb)

 : Always replace after every disassembly.

JPBIA2760GB

Revision: 2012 October

2013 Murano CrossCabriolet

CO-14

< REMOVAL AND INSTALLATION >

RADIATOR

Removal and Installation

INFOID:0000000008462736

REMOVAL

WARNING:

Never remove radiator cap when engine is hot. Serious burns could occur from high-pressure engine
coolant escaping from engine cooling system. Wrap a thick cloth around the cap. Slowly turn it a quar-
ter of a turn to release built-up pressure. Carefully remove radiator cap by turning it all the way.
1.

Remove the following parts:
• Engine under cover.
• Radiator core support covers (RH and LH): Refer to 

EM-26, "Exploded View"

.

• Air duct (inlet): Refer to 

EM-26, "Exploded View"

.

• Front grille: Refer to 

EXT-18, "Exploded View"

.

• Horn: Refer to 

HRN-4, "Exploded View"

.

• Hood lock: Refer to 

DLK-158, "Exploded View"

.

2.

Drain engine coolant from radiator. Refer to 

CO-8, "Draining"

.

CAUTION:

• Perform this step when the engine is cold.
• Never spill engine coolant on drive belt.

3.

Disconnect reservoir tank hose from radiator pipe (upper).

4.

Disconnect CVT fluid cooler hoses from radiator.
• Install blind plug to avoid leakage of CVT fluid.

5.

Remove radiator cap adapter and each radiator hoses (upper) and radiator pipe (upper) assembly.

CAUTION:

Never allow engine coolant to contact drive belt.

6.

Disconnect radiator hose (lower) from radiator.

7.

Remove condenser. Refer to 

HA-38, "Exploded View"

.

CAUTION:

Never damage condenser core.

8.

Remove each radiator upper clips (2) by pulling the tabs (A) out-
side to release the lock (B) and then remove each mounting rub-
bers (upper) (1).

CAUTION:

Never pull the tabs outside excessively to prevent it from
damping.

9.

Lift up and remove radiator (1) from front of radiator core support
(2).

CAUTION:

Never damage or scratch on radiator core.

INSTALLATION

Note the following, and install in the reverse order of removal.

CAUTION:

Do not reuse O-rings.

Radiator Upper Clip

C

: Mounting pin

: Vehicle front

JPBIA1689ZZ

: Vehicle front

JPBIA1699ZZ

Revision: 2012 October

2013 Murano CrossCabriolet

RADIATOR

CO-15

< REMOVAL AND INSTALLATION >

C

D

E

F

G

H

I

J

K

L

M

A

CO

N

P

O

Install each radiator upper clips on radiator core connection as follows:

1.

Install each mounting rubbers (upper) (1) on mounting pins (A)
of radiator.

2.

Align each radiator upper clips (2) with radiator core connection
(B), then insert each radiator upper clips straight into radiator
core connections until a click is heard.

3.

After connecting each radiator upper clips, use the following
method to check it is fully connected.
• Visually confirm that each radiator upper clips are connected

to radiator core connections.

• Move each radiator upper clips and the radiator forward and backward to check they are securely con-

nected.

Radiator hose

CAUTION:

• Use genuine mounting bolts for the cooling fan assembly and strictly observe the tightening torque.

(Breakage prevention for radiator)

NOTE:
• Insert the radiator hose (1) all the way to the stopper (2) or by 33 mm (1.30 in) (hose without a stopper).

• For the orientation of the hose clamp pawl, refer to the figure.

*Refer to the illustrations for the specific position each hose clamp tab.

: Vehicle front

JPBIA1690ZZ

Unit mm (in)

A.

Radiator side

B.

Engine side

JPBIA4294GB

Radiator hose

Hose end

Paint mark

Position of hose clamp*

Radiator hose (upper)

Radiator side

Right side

C

Radiator pipe radiator side

No marking

B

Radiator pipe engine side

No marking

C

Engine side

Upper 

D

Radiator hose (lower)

Radiator side

Upper

A

Radiator pipe radiator side

No marking

A

Radiator pipe engine side

No marking

A

Engine side

Upper

E

Revision: 2012 October

2013 Murano CrossCabriolet

CO-16

< REMOVAL AND INSTALLATION >

RADIATOR

• The angle (b) created by the hose clamp pawl and the specified

line (A) must be within 

±

15

°

 as shown in the figure.

• To install hose clamps (1), check that the dimension (A) from the

end of the paint mark (2) on the radiator hose to the hose clamp is
within the reference value. 

Inspection

INFOID:0000000008462737

INSPECTION AFTER INSTALLATION

• Check for leakage of engine coolant using the radiator cap tester adapter (commercial service tool) and the

radiator cap tester (commercial service tool). Refer to 

CO-8, "Inspection"

.

• Start and warm up the engine. Visually check that there is no leakage of engine coolant and CVT fluid.

F.

View F

g.

45

°

Vehicle upper

Vehicle rear

JPBIA4777ZZ

JPBIA4295ZZ

Dimension “A”

(

1) – (+1) mm

(

0.04) – (+0.04) in

JSBIA0241ZZ

Revision: 2012 October

2013 Murano CrossCabriolet

COOLING FAN

CO-17

< REMOVAL AND INSTALLATION >

C

D

E

F

G

H

I

J

K

L

M

A

CO

N

P

O

COOLING FAN

Exploded View

INFOID:0000000008462738

Removal and Installation

INFOID:0000000008462739

REMOVAL

1.

Remove the following parts.
• Engine under cover
• Air duct (inlet): Refer to 

EM-26, "Exploded View"

.

• Oil level gauge: Refer to 

EM-95, "Exploded View"

.

• Battery and battery tray: Refer to 

PG-109, "Removal and Installation"

.

2.

Drain engine coolant from radiator. Refer to 

CO-8, "Draining"

.

CAUTION:

• Perform this step engine is cold.
• Never spill engine coolant on drive belt.

3.

Remove radiator cap adapter and each radiator hoses (upper) and radiator pipe (upper) assembly. Refer
to 

CO-13, "Exploded View"

.

4.

Disconnect harness connector from fan motors (RH and LH), and move harness to aside.

5.

Disconnect harness connector from crash zone sensor, and move harness to aside. Refer to 

SR-26,

"Exploded View"

.

6.

Remove battery tray bracket mounting bolts, and move battery tray bracket to aside.

1.

Fan motor (LH)

2.

Fan motor (RH)

3.

Fan shroud

4.

Mounting rubber

5.

Cooling fan (RH)

6.

Cooling fan (LH)

A.

Apply on fan motor shaft

: Vehicle front


: Apply genuine high strength thread locking sealant or equivalent.

: N·m (kg-m, in-lb)

JPBIA1687GB

Revision: 2012 October

2013 Murano CrossCabriolet

CO-18

< REMOVAL AND INSTALLATION >

COOLING FAN

7.

Remove cooling fan assembly.

CAUTION:

Never damage or scratch on radiator core.

INSTALLATION

Note the following, and install in the reverse order of removal.

CAUTION:

Only use genuine parts for cooling fan mounting bolt and observe the specified torque (to prevent
radiator from being damaged).
NOTE:
Cooling fans are controlled by ECM. For details, refer to 

EC-40, "COOLING FAN CONTROL : System

Description"

.

Disassembly and Assembly

INFOID:0000000008462740

DISASSEMBLY

1.

Remove cooling fan mounting nuts, and then remove the cooling fans (RH and LH).

2.

Remove fan motors (RH and LH).

ASSEMBLY

Note the following, and assemble in the reverse order of disassembly.

CAUTION:

RH and LH cooling fans are different. Never misassemble them.
• Install each fan in the following position.

• Secure the harness tightly to the fan shroud to prevent the fan rotation area from being loose.

Inspection

INFOID:0000000008462741

INSPECTION AFTER DISASSEMBLY

Cooling Fan

Inspect cooling fan for crack or unusual bend.
• If anything is found, replace cooling fan.

Right side

: 11 blades

Left side

: 9 blades

Revision: 2012 October

2013 Murano CrossCabriolet

WATER PUMP

CO-19

< REMOVAL AND INSTALLATION >

C

D

E

F

G

H

I

J

K

L

M

A

CO

N

P

O

WATER PUMP

Exploded View

INFOID:0000000008462742

Removal and Installation

INFOID:0000000008462743

CAUTION:

• When removing water pump assembly, be careful not to get engine coolant on drive belt.
• Water pump cannot be disassembled and should be replaced as a unit.
• After installing water pump, connect hose and clamp securely, then check for leakage using the radi-

ator cap tester (commercial service tool) and the radiator cap tester adapter (commercial service
tool).

REMOVAL

1.

Remove the following parts.
• Air duct (inlet): Refer to 

EM-26, "Exploded View"

.

• Engine cover: Refer to 

EM-24, "Exploded View"

.

• Engine under cover
• Front road wheel and tire
• Splash guard (RH): Refer to 

EXT-26, "FENDER PROTECTOR : Exploded View"

.

2.

Drain engine coolant from radiator. Refer to 

CO-8, "Draining"

.

CAUTION:

• Perform this step when the engine is cold.
• Never spill engine coolant on drive belt.

3.

Remove drive belt. Refer to 

EM-14, "Removal and Installation"

.

4.

Remove idler pulleys. Refer to 

EM-25, "Exploded View"

.

1.

Timing chain tensioner (primary)

2.

Valve timing control cover gasket 
(bank 1)

3.

Valve timing control cover (bank 1)

4.

Water drain plug (front)

5.

Water pump cover

6.

O-ring

7.

O-ring

8.

Water pump

A.

Apply engine coolant

B.

Identify with white mark

 : N·m (kg-m, ft-lb)

 : N·m (kg-m, in-lb)

 : Always replace after every disassembly.

 : Should be lubricated with oil.

 : Sealing point

JPBIA2460GB

Revision: 2012 October

2013 Murano CrossCabriolet


Content      ..     24      25      26      27     ..