Nissan Murano. Manual - part 916


  Главная      Nissan     Nissan Murano (2014 year) - Service Manual


поиск по сайту            


содержание   ..  914  915  916  917   ..


Nissan Murano. Manual - part 916


BACK DOOR TRIM

INT-41

< REMOVAL AND INSTALLATION >

C

D

E

F

G

H

I

K

L

M

A

B

INT

N

O

P

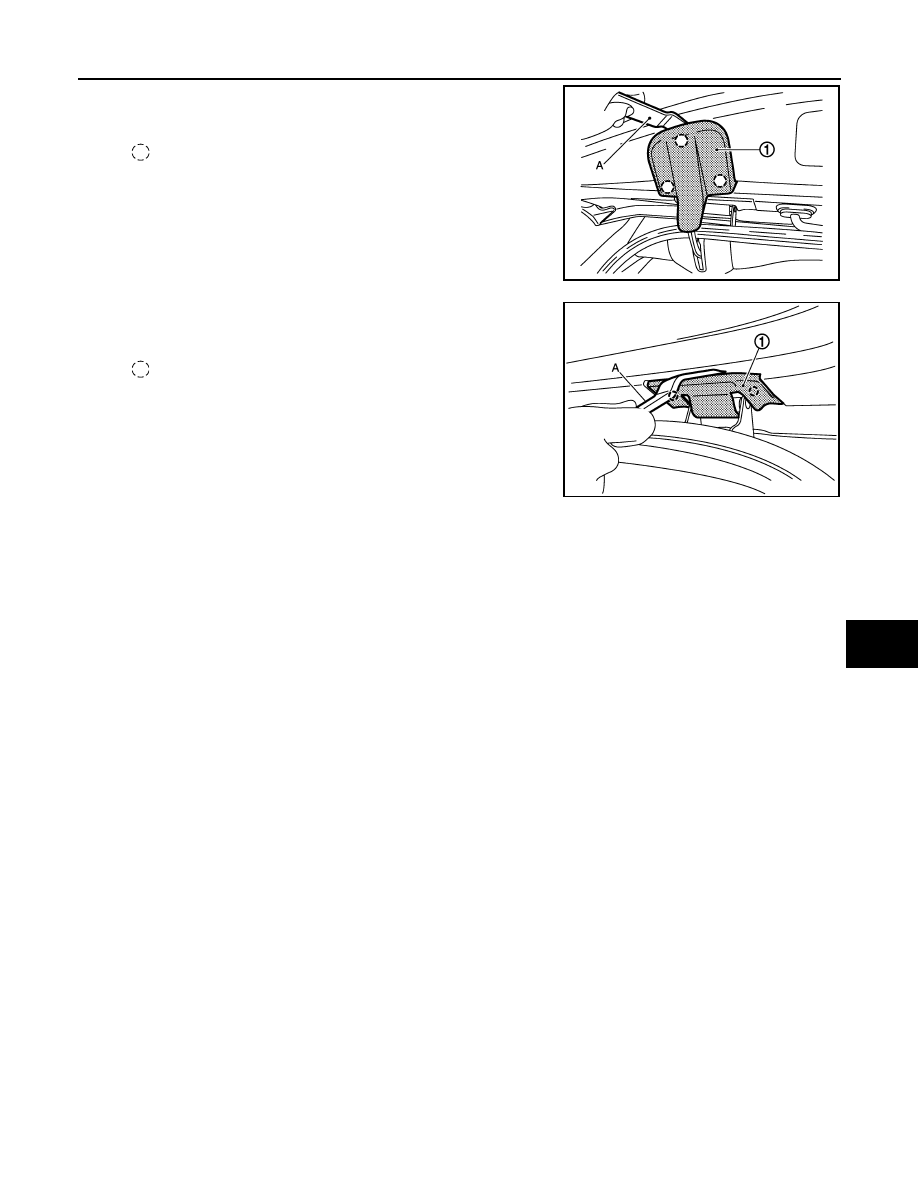
10. Disengage back door upper cover (1) fixing clips with remover

tool (A) and then remove back door upper cover (LH and RH).

11. Disengage back door hinge cover (1) fixing clips with remover

tool (A) and then remove back door hinge cover (LH and RH).

INSTALLATION

Note the following item, and then install in the reverse order of removal.

CAUTION:

When installing back door trim, check that clips are securely fitted in panel holes on body, and then
press them in.

: Clip

JMJIA2567ZZ

: Clip

JMJIA1692ZZ

IP-1

BODY INTERIOR

C

D

E

F

G

H

I

K

L

M

SECTION 

IP

A

B

IP

N

O

P

CONTENTS

INSTRUMENT PANEL

SYMPTOM DIAGNOSIS  ...............................

2

SQUEAK AND RATTLE TROUBLE DIAG-
NOSES ................................................................

2

Work Flow  .................................................................

2

Inspection Procedure  ................................................

4

Diagnostic Worksheet  ...............................................

6

PRECAUTION ...............................................

8

PRECAUTIONS ...................................................

8

FOR USA AND CANADA ............................................

8

FOR USA AND CANADA : Precaution for Supple-
mental Restraint System (SRS) "AIR BAG" and 
"SEAT BELT PRE-TENSIONER" ............................
..

8

FOR USA AND CANADA : Precaution for Proce-
dure without Cowl Top Cover ..................................
..

8

FOR USA AND CANADA : Precautions for Re-
moving of Battery Terminal  .....................................
..

9

FOR USA AND CANADA : Precaution  .....................

9

FOR MEXICO  ..............................................................

9

FOR MEXICO : Precaution for Supplemental Re-
straint System (SRS) "AIR BAG" and "SEAT BELT 
PRE-TENSIONER" .................................................
..

9

FOR MEXICO : Precaution for Procedure without 
Cowl Top Cover .......................................................

10

FOR MEXICO : Precautions for Removing of Bat-
tery Terminal ............................................................

10

FOR MEXICO : Precaution ......................................

10

PREPARATION ...........................................

12

PREPARATION .................................................

12

Special Service Tools ............................................

12

Commercial Service Tools .....................................

12

CLIP LIST ..........................................................

13

Clip List ....................................................................

13

REMOVAL AND INSTALLATION  ...............

14

INSTRUMENT PANEL ASSEMBLY  .................

14

Exploded View .........................................................

14

Removal and Installation  .........................................

15

CENTER CONSOLE ASSEMBLY  ....................

22

Exploded View .........................................................

22

Removal and Installation  .........................................

23

IP-2

< SYMPTOM DIAGNOSIS >

SQUEAK AND RATTLE TROUBLE DIAGNOSES

SYMPTOM DIAGNOSIS

SQUEAK AND RATTLE TROUBLE DIAGNOSES

Work Flow

INFOID:0000000009719629

CUSTOMER INTERVIEW

Interview the customer if possible, to determine the conditions that exist when the noise occurs. Use the Diag-
nostic Worksheet during the interview to document the facts and conditions when the noise occurs and any
customer comments. Refer to 

IP-6, "Diagnostic Worksheet"

. This information is necessary to duplicate the

conditions that exist when the noise occurs.
• The customer may not be able to provide a detailed description or the location of the noise. Attempt to obtain

all the facts and conditions that exist when the noise occurs (or does not occur).

• If there is more than one noise in the vehicle, perform a diagnosis and repair the noise that the customer is

concerned about. This can be accomplished by performing a test drive with the customer.

• After identifying the type of noise, isolate the noise in terms of its characteristics. The noise characteristics

are provided so that the customer, service adviser, and technician use the same language when describing
the noise.

• Squeak – (Like tennis shoes on a clean floor)

Squeak characteristics include the light contact / fast movement / brought on by road conditions / hard sur-
faces = high-pitched noise / softer surfaces = low-pitched noises / edge to surface = chirping

• Creak – (Like walking on an old wooden floor)

Creak characteristics include firm contact / slow movement/twisting with a rotational movement / pitch
dependent on materials / often brought on by activity.

• Rattle – (Like shaking a baby rattle)

Rattle characteristics include fast repeated contact / vibration or similar movement / loose parts/missing clip
or fastener / incorrect clearance.

• Knock – (Like a knock on a door)

Knock characteristics include hollow sounds / sometimes repeating / often brought on by driver action.

• Tick – (Like a clock second hand)

Tick characteristics include gentle contacting of light materials / loose components / can be caused by driver
action or road conditions.

• Thump – (Heavy, muffled knock noise)

Thump characteristics include softer knock / dull sounds often brought on by activity.

• Buzz – (Like a bumblebee)

Buzz characteristics include high frequency rattle / firm contact.

• Often the degree of acceptable noise level varies depending upon the person. A noise that a technician may

judge as acceptable may be very irritating to a customer.

• Weather conditions, especially humidity and temperature, may have a great effect on noise level.

DUPLICATE THE NOISE AND TEST DRIVE

SBT842

SQUEAK AND RATTLE TROUBLE DIAGNOSES

IP-3

< SYMPTOM DIAGNOSIS >

C

D

E

F

G

H

I

K

L

M

A

B

IP

N

O

P

If possible, drive the vehicle with the customer until the noise is duplicated. Note any additional information on
the Diagnostic Worksheet regarding the conditions or location of the noise. This information can be used to
duplicate the same conditions when the repair is reconfirmed.
If the noise can be duplicated easily during the test drive, to help identify the source of the noise, try to dupli-
cate the noise with the vehicle stopped by doing one or all of the following items:
1) Close a door.
2) Tap or push/pull around the area where the noise appears to be coming from.
3) Rev the engine.
4) Use a floor jack to recreate vehicle “twist”.
5) At idle, apply engine load (electrical load, half-clutch on M/T models, drive position on A/T models).
6) Raise the vehicle on a hoist and hit a tire with a rubber hammer.
• Drive the vehicle and attempt to duplicate the conditions the customer states exist when the noise occurs.
• If it is difficult to duplicate the noise, drive the vehicle slowly on an undulating or rough road to stress the

vehicle body.

CHECK RELATED SERVICE BULLETINS

After verifying the customer concern or symptom, check ASIST for Technical Service Bulletins (TSBs) related
to the concern or symptom.
If a TSB relates to the symptom, follow the procedure to repair the noise.

LOCATE THE NOISE AND IDENTIFY THE ROOT CAUSE

1.

Narrow down the noise to a general area. To help pinpoint the source of the noise, use a listening tool
(Chassis ear: J-39570, engine ear, and mechanics stethoscope).

2.

Narrow down the noise to a more specific area and identify the cause of the noise by:

• Removing the component(s) in the area that is / are suspected to be the cause of the noise.

Do not use too much force when removing clips and fasteners, otherwise clips and fasteners can be broken
or lost during the repair, resulting in the creation of new noise.

• Tapping or pushing/pulling the component(s) that is / are suspected to be the cause of the noise.

Do not tap or push/pull the component(s) with excessive force, otherwise the noise is eliminated only tempo-
rarily.

• Feeling for a vibration by hand by touching the component(s) that is / are suspected to be the cause of the

noise.

• Placing a piece of paper between components that are suspected to be the cause of the noise.
• Looking for loose components and contact marks.

Refer to 

IP-4, "Inspection Procedure"

.

REPAIR THE CAUSE

• If the cause is a loose component, tighten the component securely.
• If the cause is insufficient clearance between components:
- Separate components by repositioning or loosening and retightening the components, if possible.
- Insulate components with a suitable insulator such as urethane pads, foam blocks, felt cloth tape, or ure-

thane tape. A NISSAN Squeak and Rattle Kit (J-50397) is available through the authorized NISSAN Parts
Department.

CAUTION:

Never use excessive force as many components are constructed of plastic and may be damaged.
NOTE:
Always check with the Parts Department for the latest parts information.
The following materials are contained in the NISSAN Squeak and Rattle Kit (J-50397) are listed on the inside
cover of the kit; and can each be ordered separately as needed.
URETHANE PADS [1.5 mm (0.059 in) thick]
Insulates connectors, harness, etc.
• 76268-9E005: 100

×

135 mm (3.937

×

5.315 in)

• 76884-71L01: 60

×

85 mm (2.362

×

3.346 in)

• 76884-71L02: 15

×

25 mm (0.591

×

0.984 in)

INSULATOR (Foam blocks)
Insulates components from contact. Can be used to fill space behind a panel.
• 73982-9E000: 45 mm (1.772 in) thick, 50

×

50 mm (1.969

×

1.969 in)

• 73982-50Y00: 10 mm (0.394 in) thick, 50

×

50 mm (1.969

×

1.969 in)

INSULATOR (Light foam block)
80845-71L00: 30 mm (1.18 in) thick, 30

×

50 mm (1.181

×

1.969in)

FELT CLOTHTAPE


содержание   ..  914  915  916  917   ..