Nissan X-Trail 32. Manual - part 696


  Главная      Nissan     Nissan X-Trail 32 - Service Manual


поиск по сайту            


содержание   ..  694  695  696  697   ..


Nissan X-Trail 32. Manual - part 696


DRIVE PINION

DLN-195

< UNIT DISASSEMBLY AND ASSEMBLY >

[TRANSFER: TY30A]

C

E

F

G

H

I

J

K

L

M

A

B

DLN

N

O

P

7.

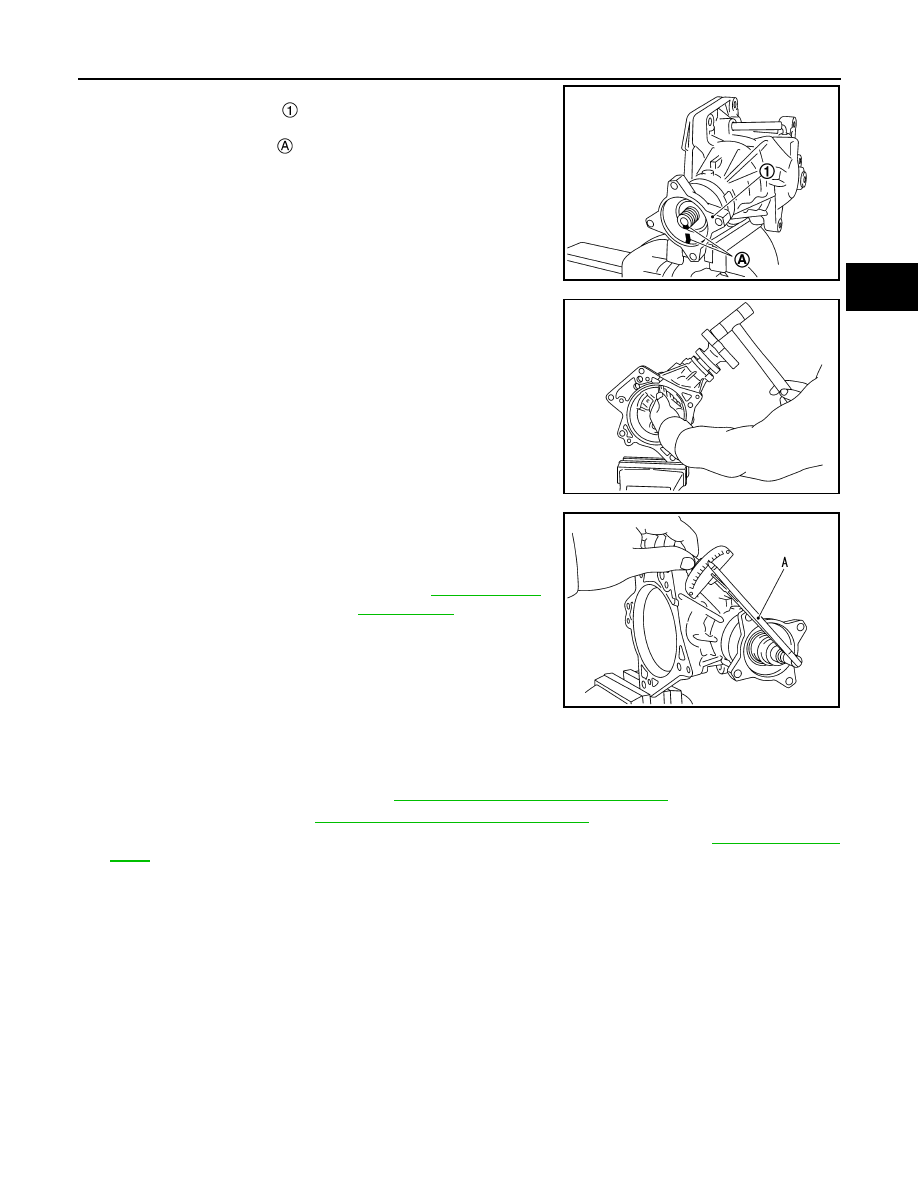
Assemble drive pinion assembly into the transfer case, and then
install companion flange 

 to drive pinion.

NOTE:
Align matching marks 

 on the thread edge of companion

flange and drive pinion and install companion flange if drive pin-
ion is reused.

8.

Tap the companion flange with a plastic hammer as far as the
lock nut can be tightened.

CAUTION:

Never damage drive pinion oil seal.

9.

Apply anti-corrosive oil to the thread and seat of the lock nut,
and temporarily tighten lock nut to the drive pinion.

CAUTION:

Never reuse lock nut.

10. Tighten lock nut within the specified torque range with a preload

gauge (A) (SST: ST3127S000) so that the drive pinion bearing
preload is within standard.

CAUTION:

• Start the tightening of lock nut from lower limit of the

specified torque. Check the preload every 5

°

 to 10

°

 while

tightening the lock nut.

• Replace the collapsible spacer and tighten it again to

adjust if preload exceeds the specified value. Never
loosen lock nut to adjust preload.

• After adjustment, rotate the drive pinion back and forth from 2 to 3 times to check for unusual

noise, sticking, binding, and so on.

11. Install ring gear shaft assembly. Refer to 

DLN-188, "Disassembly and Assembly"

.

12. Install adapter case. Refer to 

DLN-185, "Disassembly and Assembly"

.

13. Check backlash, tooth contact, total preload and companion flange runout. Refer to 

DLN-195, "Adjust-

ment"

.

CAUTION:

Measure the total preload without the adapter case oil seal.

Adjustment

INFOID:0000000011005062

BACKLASH

1.

Install the bolt to the companion flange.

SDIA3084J

SDIA3095J

Drive pinion bearing preload

: Refer to 

DLN-208, "Pre-

load Torque"

.

SDIA3072J

DLN-196

< UNIT DISASSEMBLY AND ASSEMBLY >

[TRANSFER: TY30A]

DRIVE PINION

2.

Fit a dial indicator onto the bolt 

.

3.

Measure the circumference backlash of the companion flange.

Disassemble the transfer assembly to check and adjust each
part if outside the standard.

TOOTH CONTACT

1.

Remove adapter case. Refer to 

DLN-185, "Disassembly and Assembly"

.

2.

Remove ring gear shaft assembly from transfer case. Then
apply red lead or equivalent onto the ring gear.

CAUTION:

Apply red lead or equivalent to both faces of 3 to 4 gears at
4 locations evenly spaced on the ring gear.

3.

Assemble the ring gear shaft assembly to the transfer case.

4.

Install adapter case. Refer to 

DLN-185, "Disassembly and

Assembly"

.

5.

Remove plug on the lower side of the transfer case.

6.

Rotate the companion flange back and forth several times. Then
check drive pinion to ring gear tooth contact by viewing from the
tooth contact test hole.

Backlash

: Refer to 

DLN-208, "Backlash"

.

JSDIA0321ZZ

JSDIA0255ZZ

: Drive side

: Reverse side

SDIA3067J

DRIVE PINION

DLN-197

< UNIT DISASSEMBLY AND ASSEMBLY >

[TRANSFER: TY30A]

C

E

F

G

H

I

J

K

L

M

A

B

DLN

N

O

P

Tooth Contact Judgment Guide

7.

Follow the procedure below to adjust pinion height (dimension
X) if tooth contact is improper.
For selecting adjusting shims, refer to the latest parts informa-
tion.

CAUTION:

If no adjusting shim with the calculated value is available,
select the thicker and closest one.

• Thicken the drive pinion adjusting shim to move the drive pin-

ion closer to the ring gear in case of face contact or heel con-
tact.

CAUTION:

Only one adjusting shim can be selected.

JSDIA0213GB

SDIA3158J

PDIA0440E

DLN-198

< UNIT DISASSEMBLY AND ASSEMBLY >

[TRANSFER: TY30A]

DRIVE PINION

• Thin the drive pinion adjusting shim to move the drive pinion

farther from the ring gear in case of flank contact or toe con-
tact.

CAUTION:

Only one adjusting shim can be selected.

8.

Assemble the plug to the transfer case.

CAUTION:

• Remove old gasket on mounting surface, then remove

any moisture, oil, and foreign material on the application
and mounting surfaces.

• Apply liquid gasket to the thread, and tighten to the speci-

fied torque when installing plug.

DRIVE PINION BEARING PRELOAD

1.

Remove adapter case. Refer to 

DLN-185, "Disassembly and Assembly"

.

2.

Remove ring gear shaft assembly from the transfer case.

3.

Rotate the companion flange back and forth from 2 to 3 times to check for unusual noise, binding, sticking,
and so on.

4.

Rotate the companion flange at least 20 times to check for smooth operation of the bearing.

5.

Measure the drive pinion bearing preload with a preload gauge
(A) (SST: ST3127S000).

CAUTION:

Each rotational part should rotate smoothly with the speci-
fied gear oil.
• Disassemble the drive pinion assembly to check and adjust

each part if outside the standard.

TOTAL PRELOAD

1.

Measure drive pinion bearing preload (P

1

). Refer to “DRIVE PINION BEARING PRELOAD”.

CAUTION:

Check that the drive pinion bearing preload is within the standard.

2.

Assemble the ring gear shaft assembly to the transfer case.

3.

Install adapter case. Refer to 

DLN-185, "Disassembly and Assembly"

.

4.

Rotate the companion flange at least 20 times to check for smooth operation of the bearing.

5.

Measure the total preload with a preload gauge (A) (SST:
ST3127S000).

CAUTION:

• Each rotational part should rotate smoothly with the spec-

ified gear oil.

• Disassemble the transfer assembly to check and adjust each part if outside the standard. Mea-

sure it with the adapter case oil seals removed when measuring total preload after disassembly.
Then install adapter case oil seals.

COMPANION FLANGE RUNOUT

PDIA0441E

Drive pinion bearing preload

: Refer to 

DLN-208, "Pre-

load Torque"

.

SDIA3072J

Total preload

All oil seals are installed

: Refer to 

DLN-208, 

"Preload Torque"

.

Without adapter case oil seals

: Refer to 

DLN-208, 

"Preload Torque"

.

JSDIA0322ZZ


содержание   ..  694  695  696  697   ..