Nissan X-Trail 32. Manual - part 666


  Главная      Nissan     Nissan X-Trail 32 - Service Manual


поиск по сайту            


содержание   ..  664  665  666  667   ..


Nissan X-Trail 32. Manual - part 666


TRANSFER OIL

DLN-75

< PERIODIC MAINTENANCE >

[TRANSFER: TY21C]

C

E

F

G

H

I

J

K

L

M

A

B

DLN

N

O

P

QR25DE : Inspection

INFOID:0000000011001971

OIL LEAKAGE

Check transfer surrounding area (oil seal, drain plug, and filler plug etc.) for oil leakage.
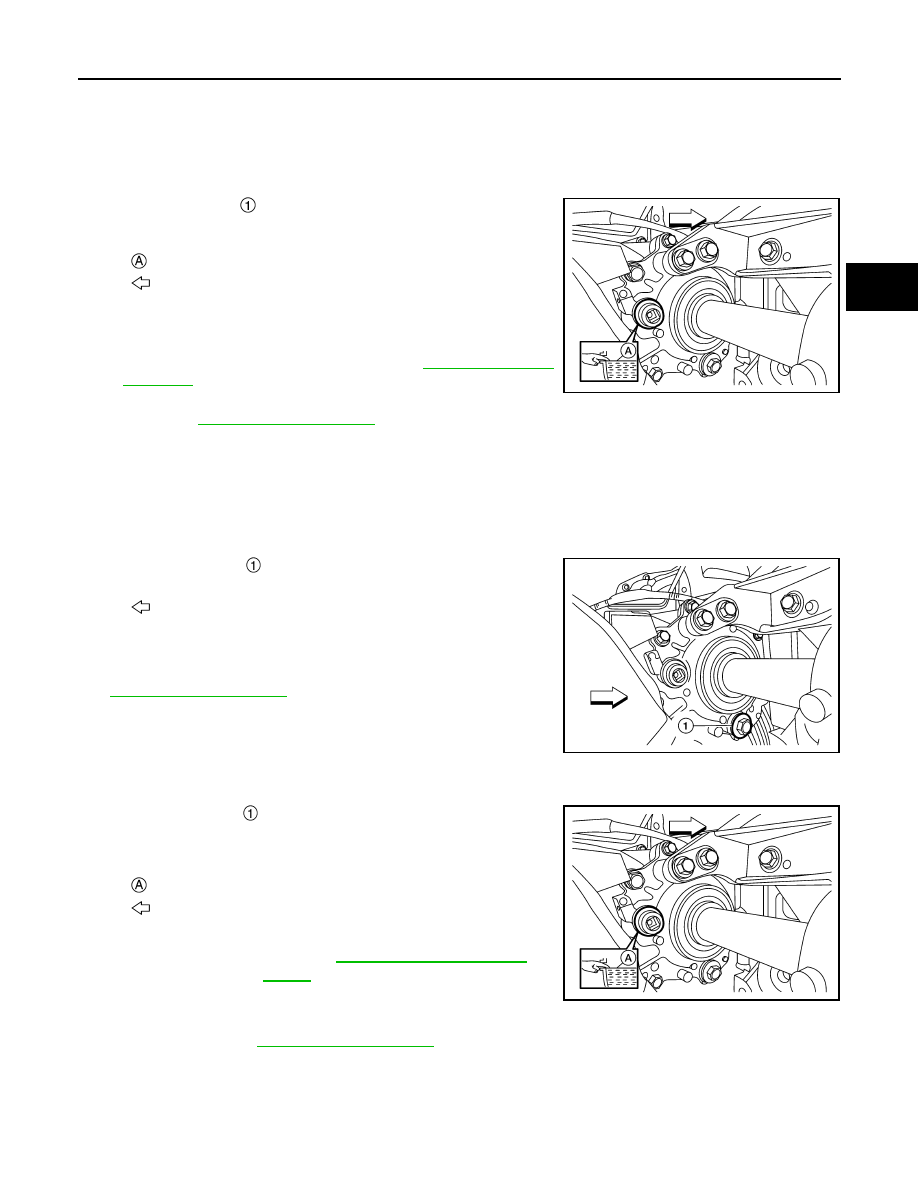
OIL LEVEL

1.

Remove filler plug 

 and gasket. Then check that oil is filled up

from mounting hole for filler plug.

CAUTION:

Turn the ignition switch OFF while checking oil level.
• Oil level should be level with bottom of filler plug mounting

hole. Add transfer oil if necessary. Refer to 

DLN-75, "QR25DE

: Refilling"

.

2.

Set a new gasket on filler plug and install it on transfer assem-
bly. Refer to 

DLN-83, "Exploded View"

.

CAUTION:

Never reuse gasket.

QR25DE : Draining

INFOID:0000000011001972

1.

Run the vehicle to warm up the transfer unit sufficiently.

2.

Turn the ignition switch OFF.

3.

Remove drain plug 

 and gasket.

4.

Drain transfer oil.

5.

Before installing drain plug, set a new gasket. Install drain plug
to transfer assembly and tighten to the specified torque. Refer to

DLN-83, "Exploded View"

.

CAUTION:

Never reuse gasket.

QR25DE : Refilling

INFOID:0000000011001973

1.

Remove filler plug 

 and gasket. Then fill with new transfer oil

until oil level reaches the specified level near filler plug mounting
hole.

2.

Leave the vehicle for 3 minutes, and check the oil level again.

3.

Before installing filler plug, set a new gasket. Install filler plug to transfer assembly and tighten to the spec-
ified torque. Refer to 

DLN-83, "Exploded View"

.

CAUTION:

Never reuse gasket.

: Oil level

: Vehicle front

ALDIA0503ZZ

: Vehicle front

AWDIA1153ZZ

: Oil level

: Vehicle front

Recommended 
oil and capacity

: Refer to 

MA-23, "Fluids and Lubri-

cants"

.

ALDIA0503ZZ

DLN-76

< REMOVAL AND INSTALLATION >

[TRANSFER: TY21C]

4WD CONTROL UNIT

REMOVAL AND INSTALLATION

4WD CONTROL UNIT

Exploded View

INFOID:0000000010992028

Removal and Installation

INFOID:0000000010992029

REMOVAL

1.

Turn the ignition switch OFF.

2.

Remove luggage side lower finisher LH. Refer to 

INT-43, "LUGGAGE SIDE LOWER FINISHER :

Removal and Installation"

.

3.

Disconnect 4WD control unit harness connector.

4.

Remove 4WD control unit mounting nuts 

 and remove 4WD

control unit 

.

NOTE:
4WD control unit is located on the back side of the rear wheel
house outer panel LH.

INSTALLATION

Note the following, and install in the reverse order of removal.
• Perform adjustment after installation. Refer to 

DLN-76, "Adjustment"

.

Adjustment

INFOID:0000000010992030

ADJUSTMENT AFTER INSTALLATION

When replaced 4WD control unit, perform writing unit characteristics. Refer to 

DLN-41, "Work Procedure"

.

4WD control unit

: Vehicle front

: N·m (kg-m, in-lb)

JSDIA5368GB

: Vehicle front

AWDIA1154ZZ

4WD MODE SWITCH

DLN-77

< REMOVAL AND INSTALLATION >

[TRANSFER: TY21C]

C

E

F

G

H

I

J

K

L

M

A

B

DLN

N

O

P

4WD MODE SWITCH

Exploded View

INFOID:0000000010992031

Removal and Installation

INFOID:0000000010992032

REMOVAL

1.

Remove console switch panel from center console assembly. Refer to 

IP-25, "Removal and Installation"

(LHD models), 

IP-52, "Removal and Installation"

 (RHD models).

2.

Disconnect 4WD mode switch harness connector.

3.

Remove 4WD mode switch from console switch panel.

INSTALLATION

Install in the reverse order of removal.

4WD mode switch

Console switch panel

JSDIA5457ZZ

DLN-78

< REMOVAL AND INSTALLATION >

[TRANSFER: TY21C]

TRANSFER COVER OIL SEAL

TRANSFER COVER OIL SEAL

MR20DD

MR20DD : Exploded View

INFOID:0000000010992033

MR20DD : Removal and Installation

INFOID:0000000010992034

REMOVAL

1.

Drain the transfer oil. Refer to 

DLN-74, "MR20DD : Draining"

.

2.

Remove front drive shaft (right side). Refer to 

FAX-101, "MR20DD : Removal and Installation"

.

CAUTION:

Oil may leak from the opening. Use cap and/or plug to prevent leakage.

3.

Remove transfer cover oil seal (outer/inner), using oil seal remover (commercial service tool).

CAUTION:

Never damage transfer cover.

INSTALLATION

1.

Using drift (commercial service tool), install transfer cover oil
seal (outer/inner) with the directions below.

CAUTION:

• Never reuse oil seal.
• When installing, never incline oil seal.
• Apply multi-purpose grease onto oil seal lips, and transfer oil onto the circumference of oil seal.

2.

Install front drive shaft (right side). Refer to 

FAX-101, "MR20DD : Removal and Installation"

.

3.

Refill the transfer oil to transfer assembly. Refer to 

DLN-74, "MR20DD : Refilling"

.

Transfer assembly

Transfer cover oil seal (inner)

Transfer cover oil seal (outer)

Oil seal lip

: Always replace after every disassembly.

: Apply transfer oil.

: Apply multi-purpose grease.

JSDIA5360ZZ

A

: Installation dimension for transfer cover oil seal (inner) 

B

: Installation dimension for transfer cover oil seal (outer) 

A

: 10.3 +0.6/-0 mm (0.406 +0.024/-0 in)

B

: 0 +0.6/-0 mm (0 +0.024/-0 in)

JSDIA3993ZZ


содержание   ..  664  665  666  667   ..