Nissan X-Trail 32. Manual - part 637


  Главная      Nissan     Nissan X-Trail 32 - Service Manual


поиск по сайту            


содержание   ..  635  636  637  638   ..


Nissan X-Trail 32. Manual - part 637


FRONT DOOR

DLK-889

< REMOVAL AND INSTALLATION >

[TYPE 4]

C

D

E

F

G

H

I

J

L

M

A

B

DLK

N

O

P

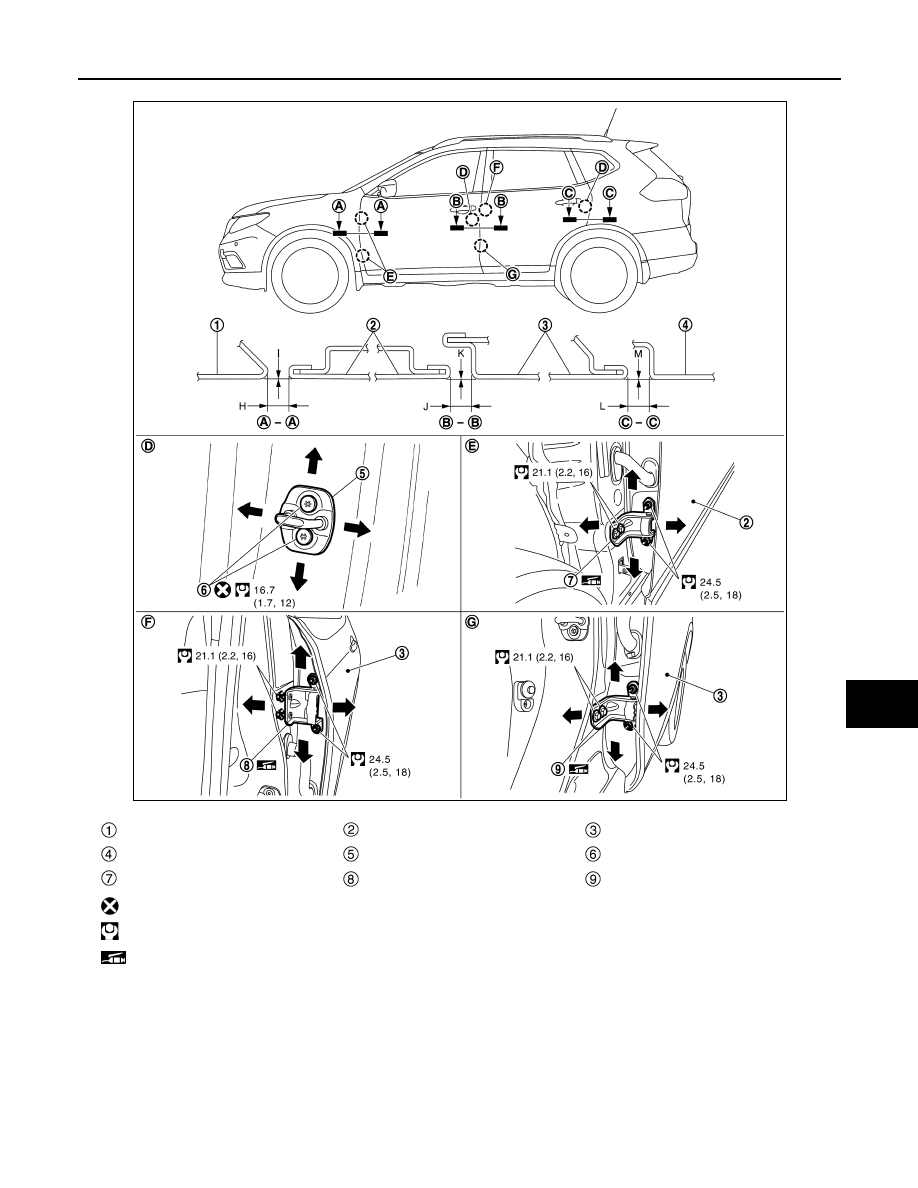
Fitting Adjustment Standard

Check the clearance and surface height between front door and each part by visually and touching. 
If the clearance and the surface height are out of specification, adjust them according to the procedures
shown below.

Front fender

Front door 

Rear door

Body side outer

Door striker

TORX bolt

Front door hinge

Rear door hinge (upper)

Rear door hinge (lower)

: Always replace after every disassembly.

: N·m (kg-m, ft-lb)

: Body grease

JMKIB3479GB

DLK-890

< REMOVAL AND INSTALLATION >

[TYPE 4]

FRONT DOOR

Unit: mm [in]

Fitting Adjustment Procedure

1.

Remove front fender assembly. Refer to 

DLK-883, "FRONT FENDER : Removal and Installation"

.

2.

Loosen door hinge mounting nuts of door side.

3.

Adjust the surface height of front door according to the fitting standard dimension.

4.

Temporarily tighten door hinge mounting nuts on door side.

5.

Loosen door hinge mounting bolts of vehicle body side. 

6.

Raise front door at rear end to adjust clearance of the front door according to the fitting standard dimen-
sion.

7.

After adjustment, tighten bolts and nuts to the specified torque.

CAUTION:

After installation, apply touch-up paint (the body color) onto the head of hinge mounting bolts and
nuts.

8.

Install front fender assembly. Refer to refer to 

DLK-883, "FRONT FENDER : Removal and Installation"

.

DOOR STRIKER ADJUSTMENT

Adjust door striker so that it becomes parallel with door lock insertion direction.

DOOR STRIKER

DOOR STRIKER : Removal and Installation

INFOID:0000000010728638

REMOVAL

Remove TORX bolts, and then remove door striker.

INSTALLATION

Note the following items, and then install in the reverse order of removal.

CAUTION:

• Never reuse TORX bolt. Always replace it with a new one when it is removed.
• After installation, perform the fitting adjustment. Refer to 

DLK-888, "DOOR ASSEMBLY : Adjust-

ment"

.

• After installation, check that door opens and closes normally. Refer to 

DLK-888, "DOOR ASSEMBLY

: Inspection"

.

DOOR HINGE

DOOR HINGE : Removal and Installation

INFOID:0000000010728639

REMOVAL

CAUTION:

• Perform work with 2 workers, because of its heavy weight.
• When removing and installing front door assembly, support door with a jack and shop cloth to pro-

tect door and body.

1.

Remove front door assembly. Refer to 

DLK-887, "DOOR ASSEMBLY : Removal and Installation"

.

2.

Remove front fender assembly. Refer to 

DLK-883, "FRONT FENDER : Removal and Installation"

.

3.

Remove front door hinge mounting bolts of vehicle body side, and then remove front door hinge.

INSTALLATION

Portion

Standard

Front fender – Front door

 – 

H

Clearance

3.0 – 5.0

[0.118 – 0.197]

I

Surface height

(

1.0) – (+1.0)

[(

0.039) – (+0.039)]

Front door – Rear door

 – 

J

Clearance

3.3 – 5.3

[0.130 – 0.209]

K

Surface height

(

1.0) – (+1.0)

[(

0.039) – (+0.039)]

FRONT DOOR

DLK-891

< REMOVAL AND INSTALLATION >

[TYPE 4]

C

D

E

F

G

H

I

J

L

M

A

B

DLK

N

O

P

Note the following items, and then install in the reverse order of removal.

CAUTION:

• Apply anticorrosive agent onto the mounting surface.
• After installation, perform the fitting adjustment. Refer to 

DLK-888, "DOOR ASSEMBLY : Adjust-

ment"

.

• After installation, apply touch-up paint (the body color) onto the head of door hinge mounting bolts.
• After installation, check that door opens and closes normally. Refer to 

DLK-888, "DOOR ASSEMBLY

: Inspection"

.

DOOR CHECK LINK

DOOR CHECK LINK : Removal and Installation

INFOID:0000000010728640

REMOVAL

1.

Fully close front door glass.

2.

Remove front door finisher. Refer to 

INT-14, "Removal and Installation"

.

3.

Disconnect harness connector of front door speaker.

4.

Remove mounting bolts of front door speaker, and then remove front door speaker.

5.

Remove door check link mounting bolt of vehicle body side.

6.

Remove door check link mounting bolts of door panel, and then
take door check link 

 out from the hole of door panel 

.

INSTALLATION

Note the following item, and then install in the reverse order of removal.

CAUTION:

After installation, check that door opens and closes normally. Refer to 

DLK-888, "DOOR ASSEMBLY :

Inspection"

.

DOOR WEATHER-STRIP

DOOR WEATHER-STRIP : Removal and Installation

INFOID:0000000010728641

REMOVAL

1.

Apply protective tape (A) to front door panel 

 around front door

weather-strip 

 fixing clips for preventing damage.

JMKIB3505ZZ

JMKIB0401ZZ

DLK-892

< REMOVAL AND INSTALLATION >

[TYPE 4]

FRONT DOOR

2.

Disengage fixing clips on the reverse side of front door weather-
strip using a remover tool (A).

CAUTION:

• Never damage front door panel.
• When removing, never confuse the 2 types of front door weather-strip 

 fixing clips 

 and 

.

3.

Remove fixing clips on front upper end of front door weather-strip.

: Clip

JMKIB0402ZZ

: Vehicle front

JMKIB3506ZZ

JMKIB3507ZZ


содержание   ..  635  636  637  638   ..