Nissan X-Trail 32. Manual - part 1562


  Главная      Nissan     Nissan X-Trail 32 - Service Manual


поиск по сайту            


содержание   ..  1560  1561  1562  1563   ..


Nissan X-Trail 32. Manual - part 1562


MA-38

< PERIODIC MAINTENANCE >

ENGINE MAINTENANCE (QR25DE)

1.

Remove engine under cover. Refer to 

EXT-39, "ENGINE UNDER COVER : Exploded View"

.

2.

Open radiator drain plug 

 at the bottom of radiator, and then

remove radiator cap. 

CAUTION:

Perform this step when engine is cold.
• When draining all of engine coolant in the system, open water

drain plugs on cylinder block. Refer to 
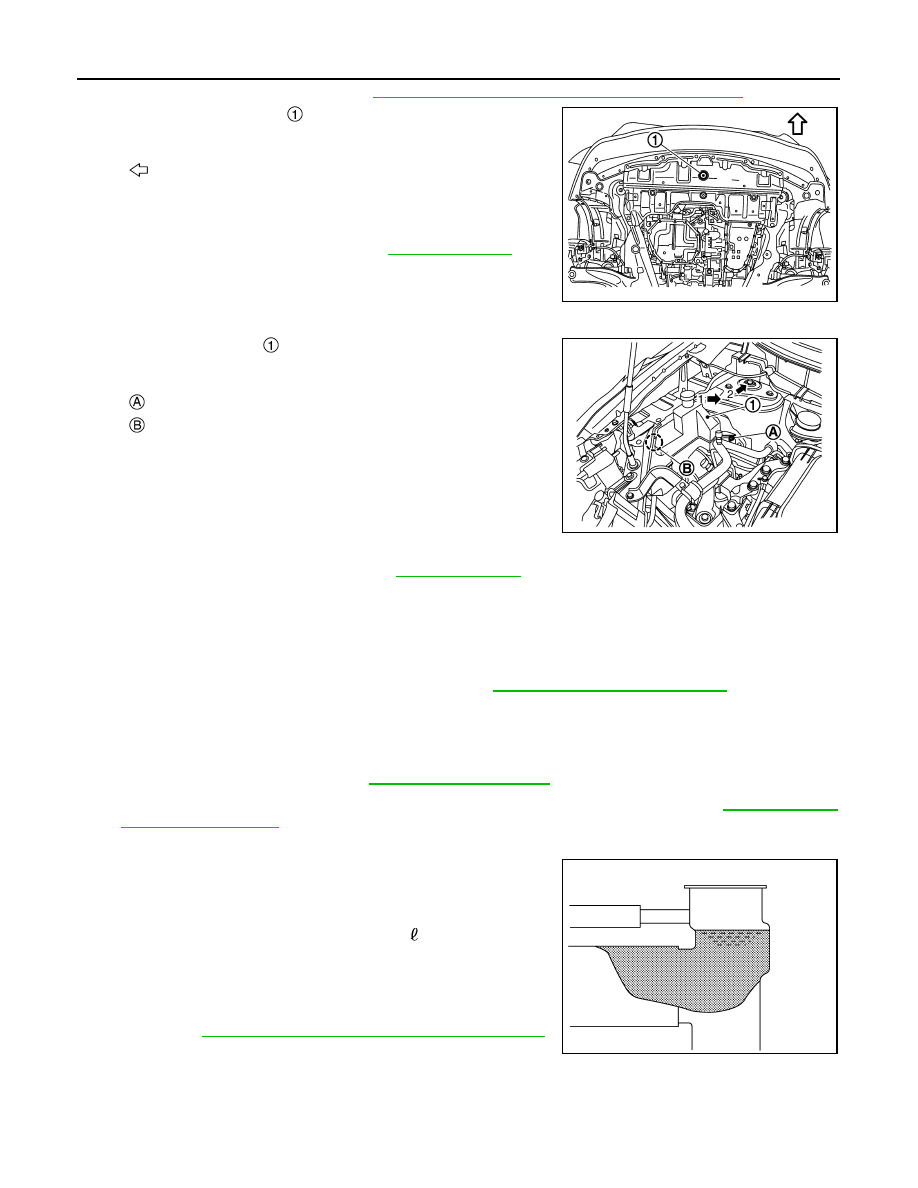
EM-207, "Setting"

.

3.

Remove reservoir tank if necessary, and drain engine coolant and clean reservoir tank before installing. 
• Move reservoir tank 

, and then remove it numerical order as

shown in the figure.

4.

Check drained engine coolant for contaminants such as rust, corrosion or discoloration. If contaminated,
flush the engine cooling system. Refer to 

CO-41, "Flushing"

.

ENGINE COOLANT : Refilling

INFOID:0000000011009191

CAUTION:

• Do not put additive such as waterleak preventive, since it may cause cooling waterway clogging.
• When refilling use Genuine NISSAN Long Life Antifreeze/Coolant (blue) or equivalent in its quality

mixed with water (distilled or demineralized). Refer to 

MA-23, "Fluids and Lubricants"

.

1.

Install reservoir tank if removed and radiator drain plug.

CAUTION:

Be sure to clean drain plug and install with new O-ring.

• If water drain plugs on cylinder block are removed, close and tighten them. Refer to 

EM-248, "Disas-

sembly and Assembly"

.

2.

Check that each hose clamp has been firmly tightened.

3.

 Fill radiator to specified level.

CAUTION:

Never adhere the engine coolant to electronic equipments
(alternator etc.).
• Pour coolant slowly of less than 2   (1-3/4 Imp qt) a

minute to allow air in system to escape.

: Vehicle front

JPBIA6838ZZ

: Nut

: Pawl

JPBIA6839ZZ

Radiator drain plug

Refer to 

CO-43, "Exploded View"

.

Engine coolant capacity
(With reservoir tank at “MAX” level)

 Refer to 

CO-55, "Periodical Maintenance Specification"

.

JPBIA0412ZZ

ENGINE MAINTENANCE (QR25DE)

MA-39

< PERIODIC MAINTENANCE >

C

D

E

F

G

H

I

J

K

L

M

B

MA

N

O

A

4.

Refill reservoir tank to “MAX” level line with engine coolant.

5.

Install radiator cap.

6.

Warm up engine until opening thermostat. Standard for warming-up time is approximately 10 minutes at
3,000 rpm.
• Check thermostat opening condition by touching radiator hose (lower) to see a flow of warm water.

CAUTION:

Watch water temperature gauge so as not to overheat engine.

7.

Stop the engine and cool down to less than approximately 50

°

C (122

°

F).

• Cool down using fan to reduce the time.
• If necessary, refill radiator up to filler neck with engine coolant.

CAUTION:

Never adhere the engine coolant to electronic equipments (alternator etc.).

8.

Refill reservoir tank to “MAX” level line with engine coolant.

9.

Repeat steps 5 through 8 two or more times with radiator cap installed until engine coolant level no longer
drops. 

10. Check cooling system for leakage with engine running.

11. Warm up the engine, and check for sound of engine coolant flow while running engine from idle up to

3,000 rpm with heater temperature controller set at several position between “COOL” and “WARM”.
• Sound may be noticeable at heater unit.

12. Repeat step 11 three times.
13. If sound is heard, bleed air from cooling system by repeating step 5 through 8 until reservoir tank level no

longer drops. 

ENGINE COOLANT : Flushing

INFOID:0000000011009192

1.

Install reservoir tank if removed and radiator drain plug.

CAUTION:

Be sure to clean drain plug and install with new O-ring.

• If water drain plugs on cylinder block are removed, close and tighten them. Refer to 

EM-248, "Disas-

sembly and Assembly"

.

2.

Fill radiator and reservoir tank with water and reinstall radiator cap.

3.

Run the engine and warm it up to normal operating temperature.

4.

Rev the engine two or three times under no-load.

5.

Stop the engine and wait until it cools down.

6.

Drain water from the system. Refer to 

CO-39, "Draining"

.

7.

Repeat steps 1 through 6 until clear water begins to drain from radiator.

RADIATOR CAP

: MAX

: MIN

Reservoir tank engine coolant capacity 
(At “MAX” level)

Refer to 

CO-55, "Periodical Maintenance Specification"

.

JPBIA0102ZZ

Radiator drain plug

: Refer to 

CO-43, "Exploded View"

.

MA-40

< PERIODIC MAINTENANCE >

ENGINE MAINTENANCE (QR25DE)

RADIATOR CAP : Inspection

INFOID:0000000011009193

• Check valve seat 

 of radiator cap. 

- Check that valve seat is swollen to the extent that the edge of the

plunger 

 cannot be seen when watching it vertically from the top.

- Check that valve seat has no soil and damage.
- Check that there is no dirt or damage on the valve seat of radiator

cap negative-pressure valve. 

- Check that there are no unusualness in the opening and closing

conditions of negative-pressure valve.

• Check radiator cap relief pressure.

- When connecting radiator cap to the radiator cap tester (commer-

cial service tool) (A) and the radiator cap tester adapter (commer-
cial service tool) (B), apply engine coolant to the cap seal surface. 

• Replace radiator cap if there is an unusualness related to the above three.

CAUTION:

When installing radiator cap, thoroughly wipe out the radiator filler neck to remove any waxy residue
or foreign material.

RADIATOR

RADIATOR : Inspection

INFOID:0000000011009194

Check radiator for mud or clogging. If necessary, clean radiator as follows.

CAUTION:

• Be careful not to bend or damage radiator fins.
• When radiator is cleaned without removal, remove all surrounding parts such as radiator cooling fan

assembly and horns. Then tape harness and harness connectors to prevent water from entering.

1.

Apply water by hose to the back side of the radiator core vertically downward.

2.

Apply water again to all radiator core surfaces once per minute.

3.

Stop washing if any stains no longer flow out from radiator.

4.

Blow air into the back side of radiator core vertically downward.
• Use compressed air lower than 490 kPa (4.9 bar, 5 kg/cm

2

, 71 psi) and keep distance more than 30 cm

(11.8 in). 

5.

Blow air again into all the radiator core surfaces once per minute until no water sprays out.

FUEL LINES

JPBIA1961ZZ

Standard and Limit

: Refer to 

CO-55, "Radiator"

.

PBIC5122J

ENGINE MAINTENANCE (QR25DE)

MA-41

< PERIODIC MAINTENANCE >

C

D

E

F

G

H

I

J

K

L

M

B

MA

N

O

A

FUEL LINES : Inspection

INFOID:0000000011009195

Inspect fuel lines, fuel filler cap, and fuel tank for improper attach-
ment, leakage, cracks, damage, loose connections, chafing or dete-
rioration.

If necessary, repair or replace damaged parts.

AIR CLEANER FILTER

AIR CLEANER FILTER : Removal and Installation

INFOID:0000000011009180

REMOVAL

1.

To remove air duct 2 

, pinch pawl 

 to unlock, move pawl 

frontward, and remove air duct 2 upward.

2.

Remove the clips 

 of air cleaner cover 

.

3.

Shift air cleaner cover 

 to car front side and remove air cleaner

element . 

INSTALLATION

Install in the reverse order of removal.

: Engine

: Fuel line

: Fuel tank

JPBIA0129ZZ

: Vehicle front

JSBIA4626ZZ

: Vehicle front

JPBIA6829ZZ

: Projection

JPBIA6830ZZ


содержание   ..  1560  1561  1562  1563   ..