Nissan X-Trail 32. Manual - part 1324


  Главная      Nissan     Nissan X-Trail 32 - Service Manual


поиск по сайту            


содержание   ..  1322  1323  1324  1325   ..


Nissan X-Trail 32. Manual - part 1324


GW-14

< REMOVAL AND INSTALLATION >

WINDSHIELD GLASS

*1

: With light & rain sensor

*2

: With front camera unit

*3

: If equipped

Unit: mm (in)

Removal and Installation

INFOID:0000000010755098

REMOVAL

Replacement Windshield Glass

CAUTION:

Never damage windshield glass and body panel.

1.

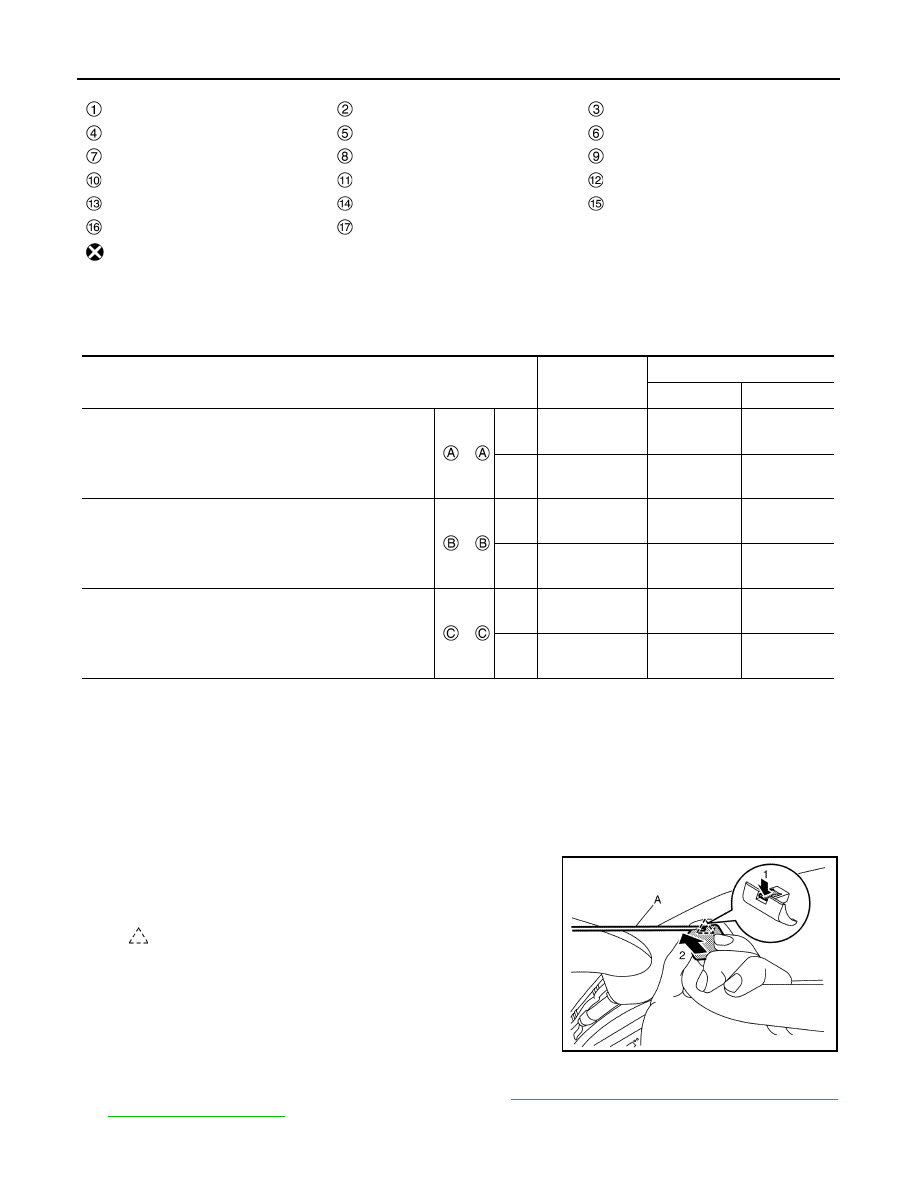
Remove all assist grips.

a.

Disengage assist grip cap fixing pawl using a remover tool (A),
and then slide assist grip cap and remove it according to numer-
ical order 1

2 indicated by the arrows as shown in the figure.

b.

Disengage assist grip fixing metal clips, and then remove assist grip.

2.

Remove center pillar upper garnish (LH and RH). Refer to 

INT-28, "CENTER PILLAR UPPER GARNISH :

Removal and Installation"

.

Windshield glass upper molding

Windshield glass upper spacer

Light & rain sensor bracket

*1

Inside mirror base

Camera/sensor cover bracket 1

*2

Front camera unit bracket 2

*2

Windshield glass

Windshield glass lower spacer RH

Windshield glass lower spacer LH

*3

Windshield glass lower molding

Dam sealant rubber

Roof panel

Glass primer

Adhesive

Painted surface primer

Cowl top cover

Body side outer panel

: Always replace after every disassembly.

Portion

Primer range

Adhesive range

J

K

Windshield glass – Roof panel

 – 

D

16.0

(0.630)

7.0

(0.276)

12.0

(0.472)

E

22.0

(0.866)

Windshield glass – Cowl top cover

 – 

F

16.0

(0.630)

7.0

(0.276)

12.0

(0.472)

G

22.0

(0.866)

Windshield glass – Body side outer panel

 – 

H

14.0

(0.551)

7.0

(0.276)

12.0

(0.472)

I

22.0

(0.866)

: Pawl

JMJIA8937ZZ

WINDSHIELD GLASS

GW-15

< REMOVAL AND INSTALLATION >

C

D

E

F

G

H

I

J

L

M

A

B

GW

N

O

P

3.

Remove front pillar garnish (LH and RH). Refer to 

INT-23, "FRONT PILLAR GARNISH : Removal and

Installation"

.

4.

Remove light & rain sensor. Refer to 

WW-109, "Removal and Installation"

. (With light & rain sensor)

5.

Remove front camera unit. Refer to 

DAS-149, "Removal and Installation"

.

6.

Remove inside mirror. Refer to 

MIR-25, "Removal and Installation"

.

7.

Remove map lamp assembly. Refer to 

INL-76, "MAP LAMP : Removal and Installation"

.

8.

Remove sun visor assembly (LH and RH).

a.

Disengage sun visor cover fixing pawls using a remover tool (A),
and then remove sun visor cover (LH and RH).

b.

Remove sun visor assembly fixing screws, and then disconnect vanity mirror lamp harness connector.
(With vanity mirror lamp)

c.

Remove sun visor assembly (LH and RH).

9.

Remove sun visor holder (LH and RH) using a remover tool (A)
according to numerical order 1

2 indicated by the arrows as

shown in the figure.

CAUTION:

Use a remover tool wrapped in tape.

10. Disengage dual lock fasteners 

 between headlining assembly

and roof panel. (With sunroof)

CAUTION:

Never bend headlining when removing.

11. Remove front portion of headlining assembly from roof panel.

CAUTION:

To prevent damage of the headlining assembly, hold it by
using a rope (A) or belt.

: Pawl

JMJIA4399ZZ

JMJIA9251ZZ

: Vehicle front

JMJIA9639ZZ

JMKIB2588ZZ

GW-16

< REMOVAL AND INSTALLATION >

WINDSHIELD GLASS

12. Remove roof side molding (LH and RH). Refer to 

EXT-46, "Removal and Installation"

.

13. Remove cowl top cover. Refer to 

EXT-25, "Removal and Installation"

14. Apply protective tape (A) on roof panel and body side outer

panel around windshield glass to protect painted surface from
damage.

15. Remove windshield glass molding 

.

CAUTION:

• Be careful not to cut hands by a cutter knife (A).
• Never scratch body panel by a cutter knife.
• Remove windshield glass molding left on vehicle using a pliers etc..
NOTE:
Use a cutter knife along the windshield glass 

 as shown in the figure, cut the bottom of windshield glass

molding.

JMKIB1944ZZ

JMKIB3178ZZ

WINDSHIELD GLASS

GW-17

< REMOVAL AND INSTALLATION >

C

D

E

F

G

H

I

J

L

M

A

B

GW

N

O

P

16. Insert a windshield cutter (A) between windshield glass 

 and

body panel 

. Remove adhesive 

 by pulling the windshield

cutter, keeping the tip parallel to the edge of windshield glass.

CAUTION:

Use piano wire to cut sealant if its difficult to use wind-
shield cutter.

17. Apply protective standish cover (A) on instrument panel to pro-

tect it from damage.

18. Remove adhesive using a piano wire.

a.

Pass the piano wire (B) from passenger room to bonded area of
glass using a wire pierce (A). 

CAUTION:

• Never use plane surface of wire pierce tip vertically.
• Never press piano wire excessively against edge of glass.
• Never damage surrounding parts.

JMKIB3121ZZ

JMKIB1267ZZ

JMKIB1452ZZ


содержание   ..  1322  1323  1324  1325   ..