Nissan X-Trail 32. Manual - part 1239


  Главная      Nissan     Nissan X-Trail 32 - Service Manual


поиск по сайту            


содержание   ..  1237  1238  1239  1240   ..


Nissan X-Trail 32. Manual - part 1239


FRONT BUMPER

EXT-15

< REMOVAL AND INSTALLATION >

C

D

E

F

G

H

I

J

L

M

A

B

EXT

N

O

P

Removal and Installation

INFOID:0000000010787437

CAUTION:

Bumper fascia is made of resin. Never apply strong force to it, and be careful to prevent contact with
oil.

REMOVAL

1.

Fully open hood assembly.

2.

Remove front grille. Refer to 

EXT-22, "Removal and Installation"

.

3.

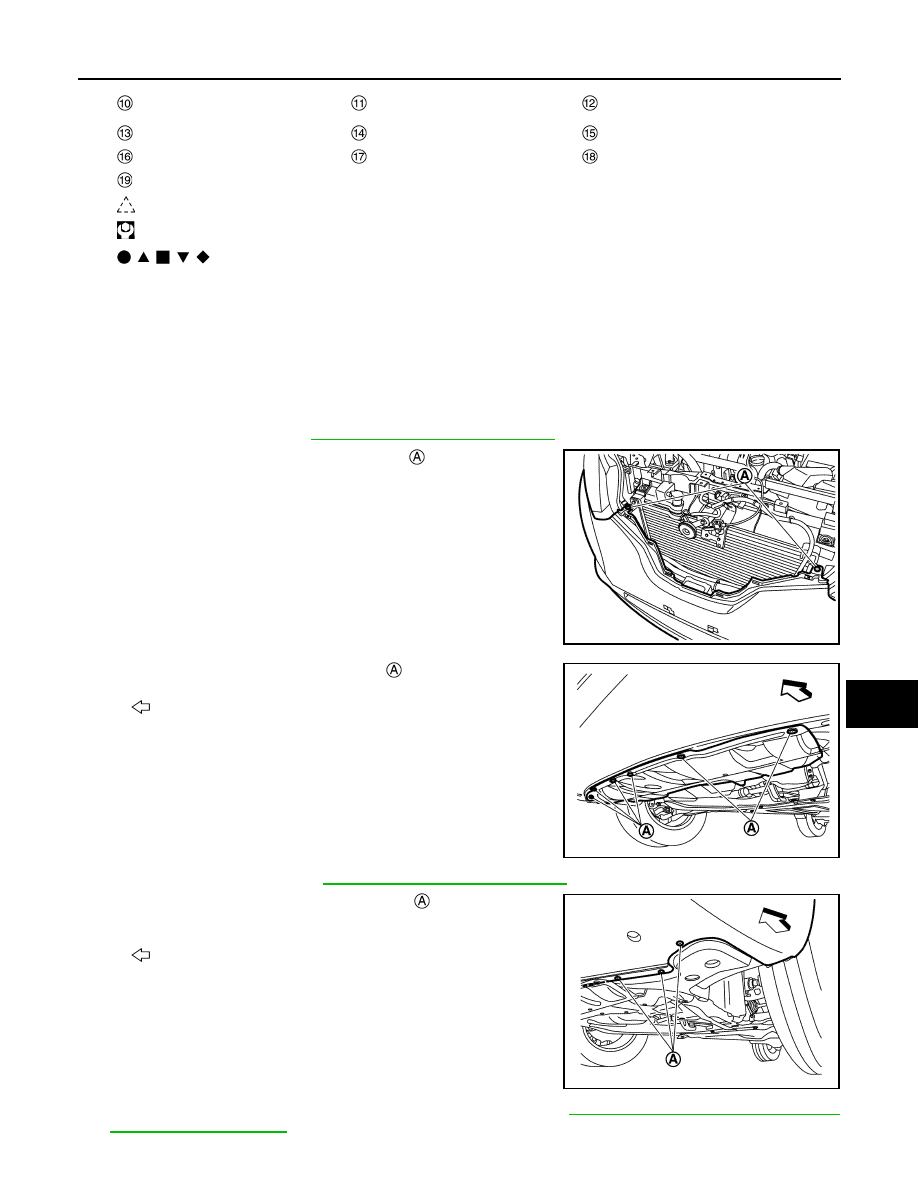
Remove front bumper fascia fixing clips 

 of bumper upper

side.

4.

Remove engine under cover fixing clips 

 of bumper lower side.

5.

Remove front spoiler. Refer to 

EXT-28, "Removal and Installation"

.

6.

Remove front bumper fascia fixing screws 

 lower side of the

bumper both end.

7.

Remove front side of front fillet molding (LH and RH). Refer to 

EXT-32, "FRONT FILLET MOLDING :

Removal and Installation"

.

Front bumper finisher LH
(without front fog lamp)

Bumper bracket cover

Headlamp washer cover LH

Front bumper fascia

Front fog lamp LH

Apron bracket

Front bumper side bracket LH

Front bumper stay LH

Front fog lamp RH

Front bumper grille

: Pawl

: N·m (kg-m, ft-lb)

: Indicates that the part is connected at points with same symbol in actual vehicle.

JMKIB2790ZZ

: Vehicle front

JMKIB2791ZZ

: Vehicle front

JMKIB3778ZZ

EXT-16

< REMOVAL AND INSTALLATION >

FRONT BUMPER

8.

Remove grommet 

 front side of fender protector (LH and RH).

9.

Remove front bumper fascia fixing screws 

 (LH and RH).

10. Apply protective tapes (A) on the part to protect it from damage.

11. Pull bumper fascia side toward the vehicle side to disengage the

fitting of bumper side bracket and bumper fascia side according
to the numerical order 1

2 as shown by the arrows in the fig-

ure.

CAUTION:

When removing bumper fascia assembly, 2 workers are
required so as to prevent it from dropping.

12. Disconnect front fog lamp harness connectors (LH and RH). (if equipped)
13. Disconnect front sonar sensor harness connectors (LH and RH). (if equipped)

14. Disconnect headlamp washer tube connector, and then remove headlamp washer tube from washer

pump. (if equipped)

15. Remove front bumper fascia assembly.

CAUTION:

When removing bumper fascia assembly, 2 workers are required so as to prevent it from dropping.

16. Remove the following parts after removing front bumper fascia assembly.

• Front fog lamp. Refer to the following. (if equipped)
- LED HAEDLAMP: Refer to 

EXL-193, "Removal and Installation"

.

- HALOGEN HEADLAMP: Refer to 

EXL-379, "Removal and Installation"

.

: Vehicle front

JMKIB2793ZZ

: Vehicle front

JMKIB2794ZZ

JMKIB2795ZZ

: Pawl

JMKIB2796ZZ

FRONT BUMPER

EXT-17

< REMOVAL AND INSTALLATION >

C

D

E

F

G

H

I

J

L

M

A

B

EXT

N

O

P

• Front sonar sensor. Refer to the following. (if equipped)
- WITH PARK ASSIST: Refer to 

SN-239, "FRONT : Removal and Installation"

.

- WITHOUT PARK ASSIST: Refer to 

SN-113, "FRONT : Removal and Installation"

.

• Headlamp washer tube. Refer to 

WW-107, "WASHER TUBE : Removal and Installation"

. (if equipped)

• Headlamp washer nozzle. Refer to 

WW-105, "WASHER NOZZLE : Removal and Installation"

. (if

equipped)

• Front bumper side bracket (LH and RH).
• Front bumper finisher (LH and RH).
• Front bumper grille.
• Front bumper molding.
• Bumper bracket cover.

17. Remove front bumper energy absorber.
18. Remove apron bracket mounting nuts and fixing clips, and then remove apron bracket.

19. Remove front bumper reinforcement.

a.

Remove harness clip.

b.

Disengage ambient sensor fixing pawl.

c.

Remove intelligent key warning buzzer mounting bolt. (with intelligent key system)

d.

Remove distance radar mounting bolts. (if equipped)

e.

Remove front bumper reinforcement mounting nuts, and then remove front bumper reinforcement.

20. Remove front bumper stay mounting bolts, and then remove front bumper stay (LH and RH).

INSTALLATION

Note the following items, and then install in the reverse order of removal.
NOTE:
• The following table shows the specified values for checking normal installation status.
• Fitting adjustment cannot be performed.

JMKIB2797ZZ

Portion Clearance

Surface 

height 

difference

Front bumper fascia – front grille

 – 

0.1 – 3.0 mm

(0.004 – 0.118 in)

 – 

0.1 – 3.0 mm

(0.004 – 0.118 in)

Front bumper fascia – Front 
combination lamp

 – 

0.1 – 3.0 mm

(0.004 – 0.118 in)

Front bumper fascia – Front 
fender panel

 – 

0.1 – 1.0 mm

(0.004 – 0.039 in)

(

0.3) – (+1.7) mm

[(

0.012) – (+0.067) in]

EXT-18

< REMOVAL AND INSTALLATION >

REAR BUMPER

REAR BUMPER

Exploded View

INFOID:0000000010787438

Removal and Installation

INFOID:0000000010787439

CAUTION:

Bumper fascia is made of resin. Never apply strong force to it, and be careful to prevent contact with
oil.

Rear bumper side bracket LH

Grommet

Rear bumper stay LH

Rear bumper fascia

Reflex reflector LH

Rear fog lamp (if equipped)

Rear bumper finisher
(if equipped)

Reflex reflector RH

Rear bumper reinforcement

Rear bumper stay RH

Rear bumper side bracket RH

: Pawl

: N·m (kg-m, in-lb)

: N·m (kg-m, ft-lb)

: Indicates that the part is connected at points with same symbol in actual vehicle.

JMKIB3753GB


содержание   ..  1237  1238  1239  1240   ..