Nissan X-Trail 32. Manual - part 1101


  Главная      Nissan     Nissan X-Trail 32 - Service Manual


поиск по сайту            


содержание   ..  1099  1100  1101  1102   ..


Nissan X-Trail 32. Manual - part 1101


DRIVE BELT

EM-301

< PERIODIC MAINTENANCE >

[R9M]

C

D

E

F

G

H

I

J

K

L

M

A

EM

N

P

O

3.

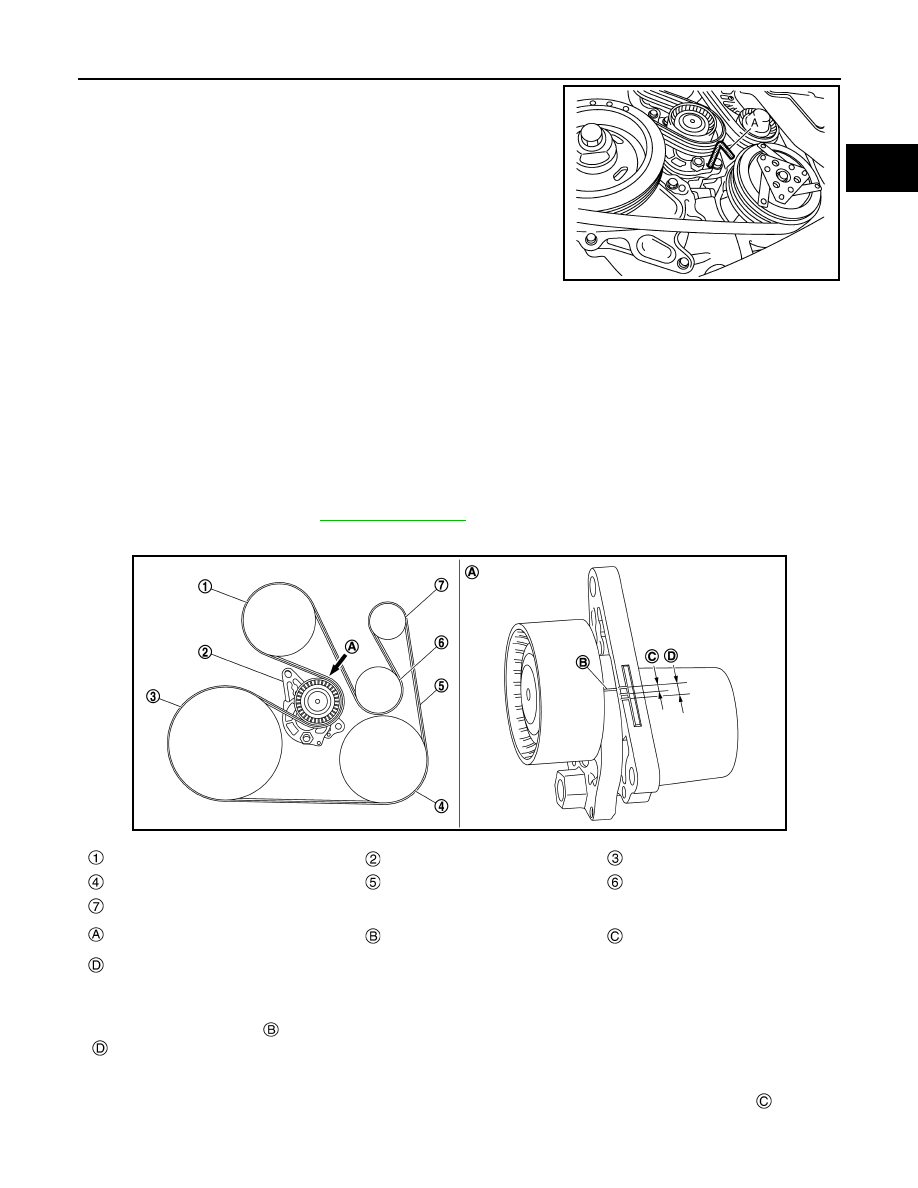
Insert a stopper pin (A) in diameter such as short-length screw-
driver into the hole of the retaining boss to fix drive belt auto-ten-
sioner pulley.
• Keep drive belt auto-tensioner pulley arm locked after drive

belt is removed.

NOTE:
Use approximately 3.0 mm (0.118 in) dia. hard metal pin as a
stopper pin.

4.

Remove drive belt. 

INSTALLATION

1.

Install drive belt.

CAUTION:

• Check that drive belt is completely set to pulleys.
• Check for engine oil, working fluid and engine coolant are not adhered to drive belt and each

pulley groove. 

2.

Release drive belt auto-tensioner, and apply tension to drive belt.

3.

Turn crankshaft pulley clockwise several times to equalize tension between each pulley.

4.

Check that the indicator (notch on fixed side) of drive belt auto-tensioner is within the range when new
drive belt is installed. Refer to 

EM-301, "Inspection"

.

Inspection

INFOID:0000000010784305

WARNING:

Be sure to perform this step when the engine is stopped.
• Check that the indicator 

 (notch on fixed side) of drive belt auto-tensioner is within the possible use range

.

NOTE:
• Check the drive belt auto-tensioner indication when the engine is cold.
• When new drive belt is installed, the indicator (notch on fixed side) should be within the range 

 in the fig-

ure.

• Visually check entire drive belt for wear, damage or cracks.

E1BIA0657ZZ

JPBIA6943ZZ

Water pump pulley

Drive belt auto-tensioner

Crankshaft pulley

A/C compressor

Drive belt

Idler pulley

Alternator

View

Indicator

Range when new drive belt is in-
stalled

Possible use range

EM-302

< PERIODIC MAINTENANCE >

[R9M]

DRIVE BELT

• If the indicator (notch on fixed side) is out of the possible use range or belt is damaged, replace drive belt.

CAUTION:

Drive belt auto-tensioner and idler pulley must be replaced with new ones when the drive belt is
replaced.

Adjustment

INFOID:0000000010784306

Refer to 

EM-414, "Drive Belts"

.

AIR CLEANER FILTER

EM-303

< PERIODIC MAINTENANCE >

[R9M]

C

D

E

F

G

H

I

J

K

L

M

A

EM

N

P

O

AIR CLEANER FILTER

Exploded View

INFOID:0000000011004806

Removal and Installation

INFOID:0000000010784308

REMOVAL

1.

To remove air duct 2 

, pinch pawl 

 to unlock, move pawl 

frontward, and remove air duct 2 upward.

JPBIA6926GB

Air duct

Mass air flow sensor

Collar

Grommet

Air cleaner body

Mounting rubber

Bracket

Air cleaner filter

Air cleaner cover

Air duct 2

Air duct 1

To turbochager

: N·m (kg-m, ft-lb)

: N·m (kg-m, in-lb)

: Vehicle front

JSBIA4626ZZ

EM-304

< PERIODIC MAINTENANCE >

[R9M]

AIR CLEANER FILTER

2.

Remove the clips 

 of air cleaner cover 

.

3.

Shift air cleaner cover 

 to vehicle front side and remove air

cleaner filter 

INSTALLATION

Install in the reverse order of removal.
• Insert the projection 

 of air cleaner filter 

 in such a way so that

it becomes the position (upper front side of car) of illustration.

• Verify that there is no looseness in air cleaner cover and has been fixed accurately.
• Check that pawls 

 and 

 (3 in total) of air duct 2 

 are engaged.

Inspection (Dry Paper Type)

INFOID:0000000011004807

INSPECTION AFTER REMOVAL

Examine with eyes that there is no stain, clogging, or damage on air cleaner element.
• Remove dusts (such as dead leafs) on air cleaner element surface and inside cleaner case.
• To clean air cleaner element, blow it from intake manifold side towards air intake side to remove trash or

dust.

• If clogging or damage is observed, replace the air cleaner element.

: Vehicle front

JPBIA6829ZZ

: Projection

JPBIA6830ZZ

: Air cleaner cover

JPBIA6830ZZ

: Vehicle front

JPBIA6828ZZ


содержание   ..  1099  1100  1101  1102   ..