Nissan Primera P12. Manual - part 703


  Главная      Nissan     Nissan Primera P12 - Service Manual


поиск по сайту            


содержание   ..  701  702  703  704   ..


Nissan Primera P12. Manual - part 703


WT-26

TROUBLE DIAGNOSIS FOR SYMPTOMS
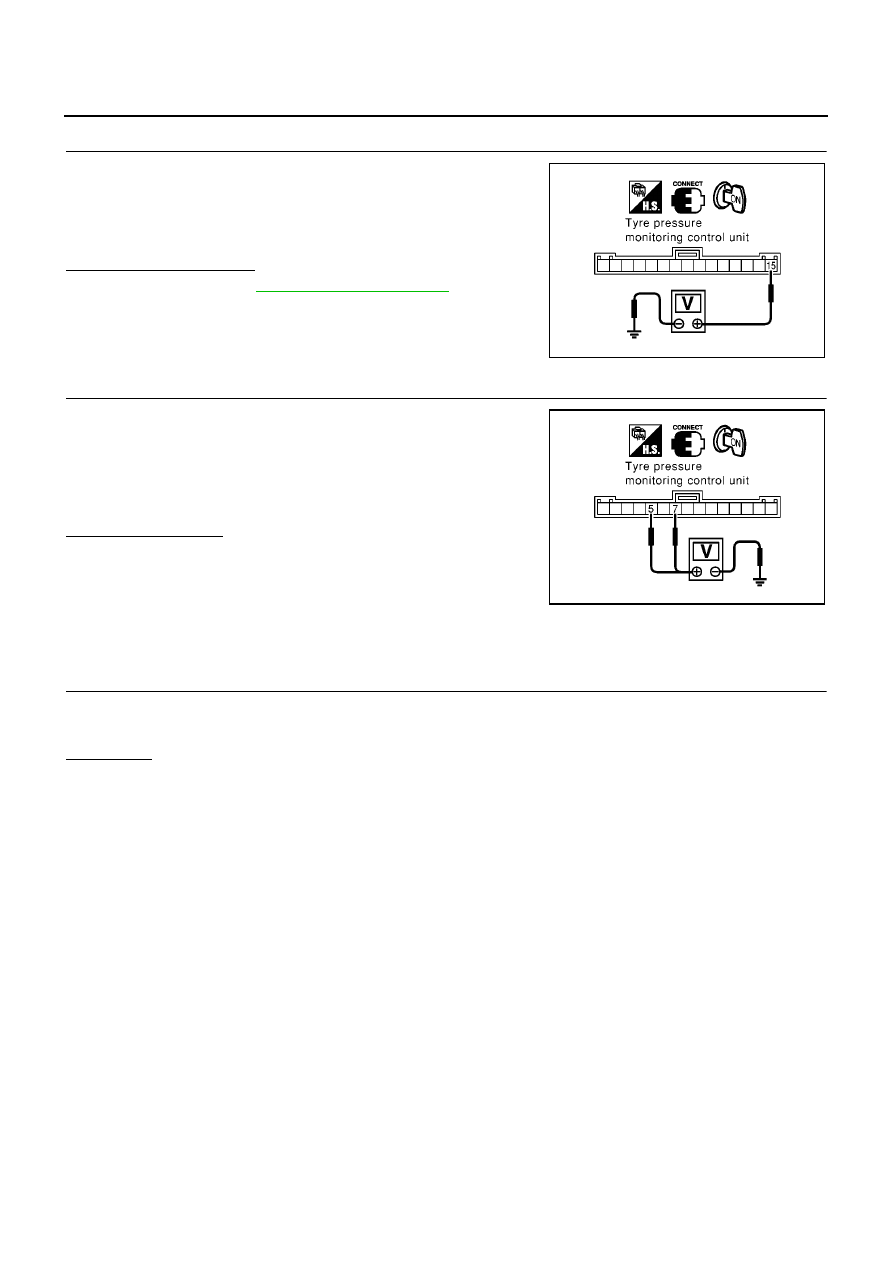
2.

CHECK CIRCUIT

Ignition switch is turned “ON”.

Check voltage between tyre pressure monitoring control unit
connector M96 terminal 15 and ground.

Does battery voltage exist?

YES

>> Check display.

DI-50, "System Description"

NO

>> GO TO 3.

3.

CHECK CONTROL UNIT INPUT SIGNAL

Ignition switch is turned “ON”.

Check voltage between tyre pressure monitoring control unit
terminal No. 5 or No. 7 and ground.

Inspection results OK?

OK

>> Check combination meter.

NG

>> Replace harness connector between tyre pressure mon-

itoring control unit and display.

Inspection 4: ID Registration Can Not Be Completed

EES001AR

DIAGNOSTIC PROCEDURE

1.

ID REGISTRATION (ALL)

Carry out ID registration of all tyre pressure monitoring sensor.

Can ID registration of all tyre pressure monitoring sensor be completed?

YES or NO?

YES

>> INSPECTION END.

NO

>> Go To Inspection 1: Tyre Pressure Monitoring Antenna in TROUBLE DIAGNOSIS FOR SELF-

DIAGNOSTIC ITEMS.

15- Ground

: Battery voltage

MDIA0026E

5, 7 -
Ground

: 0V (Min.) and 5V (Max.) are alternately
repeated

MDIA0027E

REMOVAL AND INSTALLATION

WT-27

C

D

F

G

H

I

J

K

L

M

A

B

WT

REMOVAL AND INSTALLATION

PFP:00000

Tyre Pressure Monitoring Sensor

EES001AS

REMOVAL

1.

Deflate tire. Unscrew transmitter retaining nut and allow transmitter to fall into tyre.

2.

Gently bounce tyre so that transmitter falls to bottom of tire.
Place on tyre changing machine and break both tire beads
ensuring that the transmitter remains at the bottom of the tyre.

3.

Turn tyre so that valve hole is at bottom and bounce so that tyre
pressure monitoring sensor is near valve hole. Carefully lift tyre
onto turntable and position valve hole (and transmitter) 270
degree from mounting/dismounting head.

4.

Lubricate tyre well and remove first side of the tyre. Reach
inside the tyre and remove the tyre pressure monitoring sensor.
Remove second side of tyre.

INSTALLATION

1.

Put first side of tyre onto rim.

2.

Mount tyre pressure monitoring sensor on rim and tighten nut.

MDIA0028E

MDIA0029E

MDIA0030E

MEIA0045E

WT-28

REMOVAL AND INSTALLATION

3.

Place wheel on turntable of tyre machine. Ensure that tyre pres-
sure monitoring sensor is 270 degree from mounting head when
second side of tyre is fitted.

NOTE:
Do not touch tyre pressure monitoring sensor at mounting head.

4.

Lubricate tyre well and fit second side of tyre as normal. Ensure that tyre does not rotate relative to rim.

5.

Inflate tyre and fit to appropriate wheel position.

MDIA0029E

SERVICE DATA

WT-29

C

D

F

G

H

I

J

K

L

M

A

B

WT

SERVICE DATA

PFP:00030

Road Wheel

EES001AT

Tyre

EES001AU

Unit: kPa (kg/cm

2

, psi)

Kind of wheel

Aluminum

Steel

Deflection limit

Lateral deflection

Less than 0.3 mm

(0.012 in)

Less than 0.5 mm

(0.020 in)

Vertical deflection

Less than 0.3 mm

(0.012 in)

Less than 0.8 mm

(0.031 in)

Allowable quantity of resid-
ual unbalance

Dynamic
(On the ear part)

Less than 10 g (0.35 oz) (per side)

Static (On the ear part)

Less than 20 g (0.70 oz)

Tyre size

Air pressure

Front wheel

Rear wheel

Sedan

Wagon

205/60R16
215/50R17

220 (2.2, 32)

200 (2.0, 29)

220 (2.2, 32)


содержание   ..  701  702  703  704   ..