Nissan Qashqai J11. Manual - part 354


  Index      Nissan     Nissan Qashqai J11 - Service and Repair Manual


Search            


Content   ..  352  353  354  355   ..


Nissan Qashqai J11. Manual - part 354


SENSOR POWER SUPPLY 2 CIRCUIT

ECM-393

< DTC/CIRCUIT DIAGNOSIS >

[MR20DD]

C

D

E

F

G

H

I

J

K

L

M

A

ECM

N

P

O

Is the inspection result normal?

YES

>> GO TO 4.

NO

>> Repair or replace malfunctioning part.

4.

CHECK COMPONENTS

Check the following.
• Refrigerant pressure sensor (Refer to 

ECM-394, "Diagnosis Procedure"

)

• Fuel rail pressure sensor (Refer to 

ECM-242, "Component Inspection"

)

• Engine oil pressure sensor (Refer to 

ECM-290, "Component Inspection"

)

• Barometric pressure sensor (Refer to 

ECM-187, "Component Inspection"

)

• CMP sensor (Refer to 

ECM-266, "Component Inspection"

)

• Exhaust valve timing control position sensor (Refer to 

ECM-315, "Component Inspection"

)

Is the inspection result normal?

YES

>> Proceed to 

GI-41, "Intermittent Incident"

.

NO

>> Replace malfunctioning part.
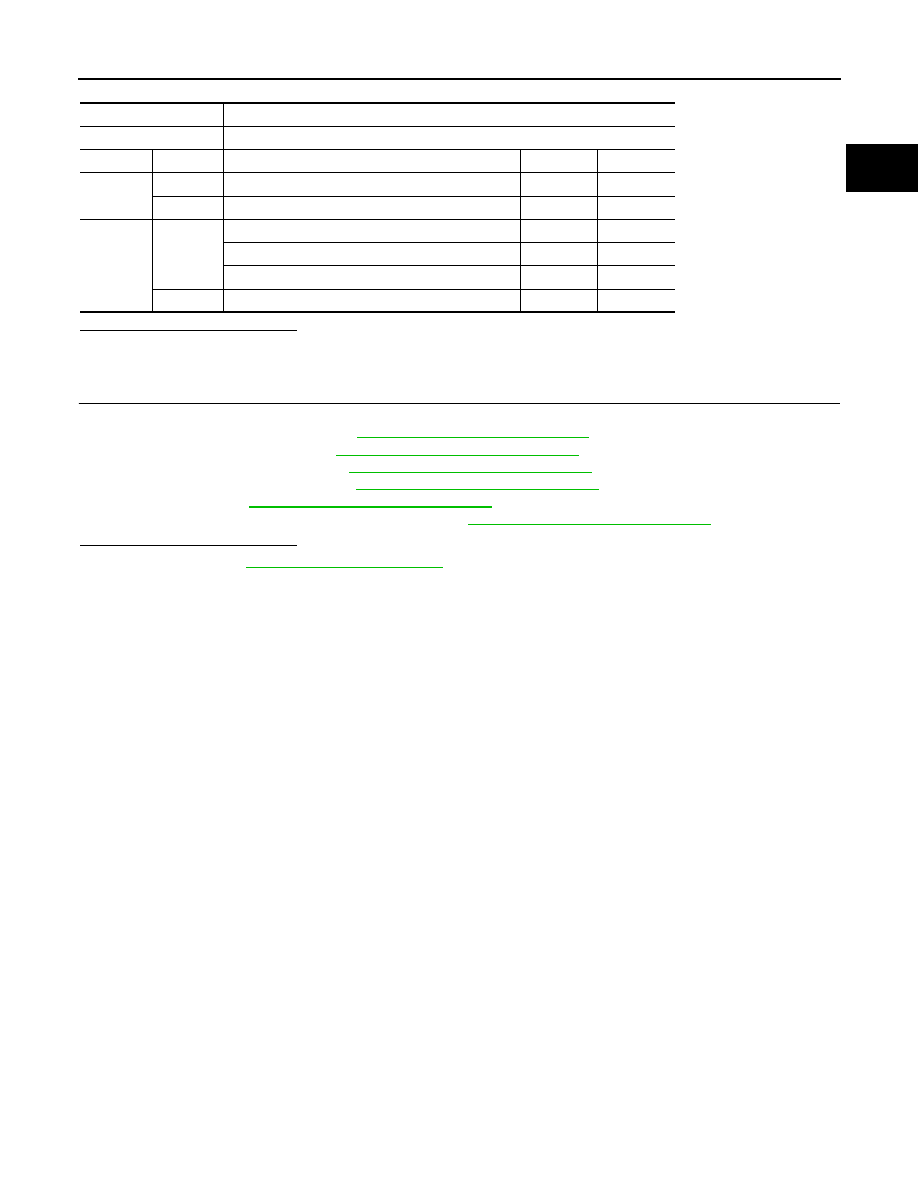
+

ECM

Sensor

Connector

Terminal

Name

Connector

Terminal

E57

101

Barometric pressure sensor

F144

1

118

APP sensor 2

E20

5

F15

23

Refrigerant pressure sensor

E41

3

Engine oil pressure sensor

F117

3

Fuel rail pressure sensor

F95

1

43

CMP sensor

F37

1

ECM-394

< DTC/CIRCUIT DIAGNOSIS >

[MR20DD]

REFRIGERANT PRESSURE SENSOR

REFRIGERANT PRESSURE SENSOR

Component Function Check

INFOID:0000000010703079

1.

CHECK REFRIGERANT PRESSURE SENSOR FUNCTION

1.

Start engine and warm it up to normal operating temperature.

2.

Turn A/C switch and blower fan switch ON.

3.

Check the voltage between ECM harness connector terminals under the following conditions.

Is the inspection result normal?

YES

>> INSPECTION END

NO

>> Proceed to 

ECM-394, "Diagnosis Procedure"

.

Diagnosis Procedure

INFOID:0000000010703080

1.

CHECK REFRIGERANT PRESSURE SENSOR POWER SUPPLY

1.

Turn ignition switch OFF.

2.

Disconnect refrigerant pressure sensor harness connector.

3.

Turn ignition switch ON.

4.

Check the voltage between refrigerant pressure sensor harness connector and ground.

Is the inspection result normal?

YES

>> GO TO 3.

NO

>> GO TO 2.

2.

CHECK REFRIGERANT PRESSURE SENSOR POWER SUPPLY CIRCUIT

1.

Turn ignition switch ON.

2.

Disconnect ECM harness connector.

3.

Check the continuity between refrigerant pressure sensor harness connector and ECM harness connec-
tor.

4.

Also check harness for short to power.

Is the inspection result normal?

YES

>> Perform trouble diagnosis for power supply circuit.

NO

>> Repair or replace malfunctioning part.

3.

CHECK REFRIGERANT PRESSURE SENSOR GROUND CIRCUIT

1.

Check the continuity between refrigerant pressure sensor harness connector and ECM harness connec-
tor.

ECM

Voltage

Connector

+

Terminal

F15

34

39

1.0 - 4.0 V

+

Voltage

(Approx.)

Refrigerant pressure sensor

Connector

Terminal

E41

3

Ground

5 V

+

Continuity

Refrigerant pressure sensor

ECM

Connector

Terminal

Connector

Terminal

E41

3

F15

23

Existed

REFRIGERANT PRESSURE SENSOR

ECM-395

< DTC/CIRCUIT DIAGNOSIS >

[MR20DD]

C

D

E

F

G

H

I

J

K

L

M

A

ECM

N

P

O

2.

Also check harness for short to power.

Is the inspection result normal?

YES

>> GO TO 4.

NO

>> Repair or replace malfunctioning part.

4.

CHECK REFRIGERANT PRESSURE SENSOR INPUT SIGNAL CIRCUIT

1.

Check the continuity between refrigerant pressure sensor harness connector and ECM harness connec-
tor.

2.

Also check harness for short to power.

Is the inspection result normal?

YES

>> GO TO 5.

NO

>> Repair or replace malfunctioning part.

5.

CHECK INTERMITTENT INCIDENT

Check intermittent incident. Refer to 

GI-41, "Intermittent Incident"

.

Is the inspection result normal?

YES

>> Replace refrigerant pressure sensor. Refer to 

HA-36, "REFRIGERANT PRESSURE SENSOR :

Removal and Installation"

.

NO

>> Repair or replace malfunctioning part.

+

Continuity

Refrigerant pressure sensor

ECM

Connector

Terminal

Connector

Terminal

E41

1

F15

39

Existed

+

Continuity

Refrigerant pressure sensor

ECM

Connector

Terminal

Connector

Terminal

E41

2

F15

34

Existed

ECM-396

< DTC/CIRCUIT DIAGNOSIS >

[MR20DD]

COOLING FAN

COOLING FAN

Component Function Check

INFOID:0000000010703081

1.

CHECK COOLING FAN FUNCTION

With CONSULT

1.

Turn ignition switch ON.

2.

Perform “COOLING FAN (DUAL)” in “ACTIVE TEST” mode of “IPDM E/R” using CONSULT.

3.

Touch “LOW”,  “HI” on the CONSULT screen.

4.

Check that cooling fan operates.

Is the inspection result normal?

YES

>> INSPECTION END

NO

>> Proceed to 

ECM-396, "Diagnosis Procedure"

.

Diagnosis Procedure

INFOID:0000000010703082

1.

CHECK COOLING FAN RELAY POWER SUPPLY CIRCUIT-1

1.

Turn ignition switch OFF.

2.

Disconnect cooling fan relay-2.

3.

Check the voltage between cooling fan relay-2 harness connector and ground.

Is the inspection result normal?

YES

>> GO TO 2.

NO

>> Perform trouble diagnosis for power supply circuit.

2.

CHECK COOLING FAN RELAY POWER SUPPLY CIRCUIT-2

Check the voltage between cooling fan relay-2 harness connector and ground.

Is the inspection result normal?

YES

>> GO TO 3.

NO

>> Perform trouble diagnosis for power supply circuit.

3.

CHECK COOLING FAN RELAY OUTPUT SIGNAL CIRCUIT

1.

Disconnect IPDM E/R harness connector.

2.

Check the continuity between cooling fan relay-2 harness connector and IPDM E/R harness connector.

3.

Also check harness for short to ground and to power.

Is the inspection result normal?

YES

>> GO TO 4.

NO

>> Repair or replace error-detected parts.

+

Voltage

Cooling fan relay-2

Connector

Terminal

F69

3

Ground

Battery voltage

+

Voltage

Cooling fan relay-2

Connector

Terminal

F69

1

Ground

Battery voltage

+

Continuity

Cooling fan relay-2

IPDM E/R

Connector

Terminal

Connector

Terminal

F69

4

F89

90

Existed


Content   ..  352  353  354  355   ..