Nissan Qashqai J11. Manual - part 1306


  Index      Nissan     Nissan Qashqai J11 - Service and Repair Manual


Search            


Content   ..  1304  1305  1306  1307   ..


Nissan Qashqai J11. Manual - part 1306


HOOD LOCK

DLK-493

< REMOVAL AND INSTALLATION >

[TYPE 3]

C

D

E

F

G

H

I

J

L

M

A

B

DLK

N

O

P

• Check hood lock assembly for poor lubrication. Refer to 

DLK-494, "Inspection"

.

• After installation, perform hood fitting adjustment. Refer to 

DLK-465, "HOOD ASSEMBLY : Adjust-

ment"

.

HOOD LOCK CONTROL HANDLE

HOOD LOCK CONTROL HANDLE : Removal and Installation

INFOID:0000000010479381

REMOVAL

1.

Remove hood lock control handle mounting bolts, and then remove hood lock control handle.

2.

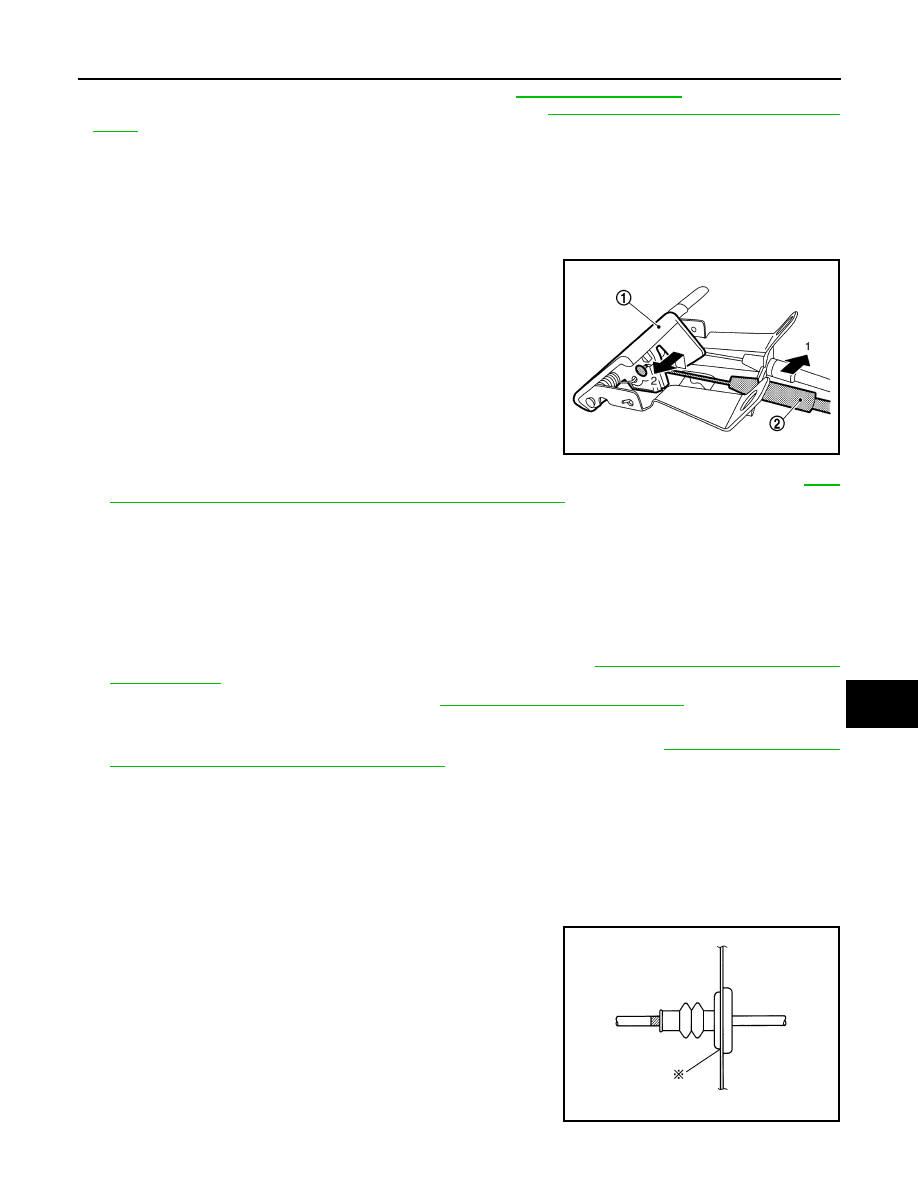
Disconnect hood lock control cable (2) from hood opener lever
(1) according to the numerical order 1

2 indicated by arrows as

shown in the figure.

3.

Disconnect fuel opener cable from fuel filler lid opener lever of hood lock control handle. Refer to 

DLK-

507, "FUEL FILLER OPENER CABLE : Removal and Installation"

.

INSTALLATION

Install in the reverse order of removal.

HOOD LOCK CONTROL CABLE

HOOD LOCK CONTROL CABLE : Removal and Installation

INFOID:0000000010479382

REMOVAL

1.

Disconnect hood lock control cable from hood lock assembly. Refer to 

DLK-492, "HOOD LOCK : Removal

and Installation"

.

2.

Remove fender protector (driver side). Refer to 

EXT-33, "Removal and Installation"

.

3.

Remove hood lock control cable fixing clips.

4.

Disconnect hood lock control cable from hood lock control handle. Refer to 

DLK-493, "HOOD LOCK

CONTROL HANDLE : Removal and Installation"

.

5.

Remove grommet on the lower dash, and pull the hood lock control cable toward the passenger compart-
ment.

CAUTION:

While pulling, never damage (peeling) the outside of hood lock control cable.

INSTALLATION

Note the following items, and install in the reverse order of removal.

CAUTION:

• Never bend cable too much, keeping the radius 100 mm (3.937 in) or more.
• Check that cable is not offset from the positioning grommet,

and apply the sealant to the grommet (at * mark) properly.

JMKIB0327ZZ

PIIB5801E

DLK-494

< REMOVAL AND INSTALLATION >

[TYPE 3]

HOOD LOCK

• After installation, perform hood fitting adjustment. Refer to 

DLK-465, "HOOD ASSEMBLY : Adjust-

ment"

.

• After installation, perform hood lock control inspection. Refer to 

DLK-494, "Inspection"

.

HOOD SAFETY HOOK

HOOD SAFETY HOOK : Removal and Installation

INFOID:0000000010497983

REMOVAL

Remove mounting nuts, and then remove hood lock secondary assembly.

INSTALLATION

Note the following item, and install in the reverse order of removal.

CAUTION:

After installation, perform hood lock control inspection. Refer to 

DLK-494, "Inspection"

.

Inspection

INFOID:0000000010479384

NOTE:
If the hood lock cable is bent or deformed, replace it.

1.

Check that hood opener operating is condition 49 N (5.0 kg, 11.0 lb) or below.

2.

Check that secondary latch is securely engaged with secondary striker from the dead load of the hood
assembly.

3.

Check that primary latch is securely engaged with primary striker when hood assembly is closed [free-fall
from approximately 200 mm (7.874 in) height].

CAUTION:

Never free-fall hood assembly from a height of 300 (11.811 in) mm or more.

4.

While operating hood opener, carefully check that the front end of hood is raised by approximately 20.0
mm (0.787 in). Also check that hood opener returns to the original position.

5.

Check that secondary latch is properly engaged with secondary striker [4.0 mm (0.157 in)].

6.

Check the hood lock lubrication condition. If necessary, apply
body grease to hood lock assembly.

: Body grease

JMKIB1164ZZ

FRONT DOOR LOCK

DLK-495

< REMOVAL AND INSTALLATION >

[TYPE 3]

C

D

E

F

G

H

I

J

L

M

A

B

DLK

N

O

P

FRONT DOOR LOCK

Exploded View

INFOID:0000000010479385

*

1

: Driver side only

1.

Outside handle escutcheon

2.

Outside handle grip

3.

Front gasket

4.

Inside handle

5.

cable clip

6.

Door lock assembly

7.

Key rod protector*

1

8.

Key rod*

1

9.

TORX bolt

10. Outside handle bracket

11. Rear gasket

: Pawl

: Vehicle front

: Always replace after every disassembly.

: N·m (kg-m, in-lb)

: Body grease

JMKIB3252GB

DLK-496

< REMOVAL AND INSTALLATION >

[TYPE 3]

FRONT DOOR LOCK

DOOR LOCK

DOOR LOCK : Removal and Installation

INFOID:0000000010479386

REMOVAL

1.

Disconnect inside handle cable from inside handle. Refer to 

DLK-496, "INSIDE HANDLE : Removal and

Installation"

.

2.

Disconnect outside handle cable from outside handle bracket. Refer to 

DLK-496, "OUTSIDE HANDLE :

Removal and Installation"

.

3.

Disconnect door lock assembly harness connector.

4.

Remove door lock assembly screws, and then remove door lock assembly.

INSTALLATION

Note the following items, and install in the reverse order of removal.

CAUTION:

• Never reuse door lock assembly screw. Always replace it with a new one when it is removed.
• Check door lock cable is properly engaged with outside handle bracket.
• When installing key rod, rotate key rod holder until a click is felt.
• Check door lock assembly for poor lubrication. Refer to 

DLK-496, "DOOR LOCK : Inspection"

• Check door open/close, lock/unlock operation after installation. 

DOOR LOCK : Inspection

INFOID:0000000010479387

Check door lock assembly for poor lubrication. Apply body grease if
necessary.

INSIDE HANDLE

INSIDE HANDLE : Removal and Installation

INFOID:0000000010479388

REMOVAL

1.

Remove front door finisher. Refer to 

INT-12, "FRONT DOOR FINISHER : Removal and Installation"

.

2.

Remove inside handle mounting bolt.

3.

Disengage inside handle from door panel while sliding inside handle toward vehicle rear, and then sepa-
rate inside handle.

4.

Disconnect inside handle cable, and then remove inside handle.

INSTALLATION

Note the following item, and install in the reverse order of removal.

CAUTION:

Check door open/close, lock/unlock operation after installation.

OUTSIDE HANDLE

OUTSIDE HANDLE : Removal and Installation

INFOID:0000000010479389

REMOVAL

1.

Fully close the front door glass.

2.

Remove front door finisher. Refer to 

INT-12, "FRONT DOOR FINISHER : Removal and Installation"

.

3.

Remove sealing screen.

: Body grease

JMKIA8534ZZ


Content   ..  1304  1305  1306  1307   ..