Nissan Qashqai J11. Manual - part 1170


  Index      Nissan     Nissan Qashqai J11 - Service and Repair Manual


Search            


Content   ..  1168  1169  1170  1171   ..


Nissan Qashqai J11. Manual - part 1170


DOOR FINISHER

INT-15

< REMOVAL AND INSTALLATION >

C

D

E

F

G

H

I

K

L

M

A

B

INT

N

O

P

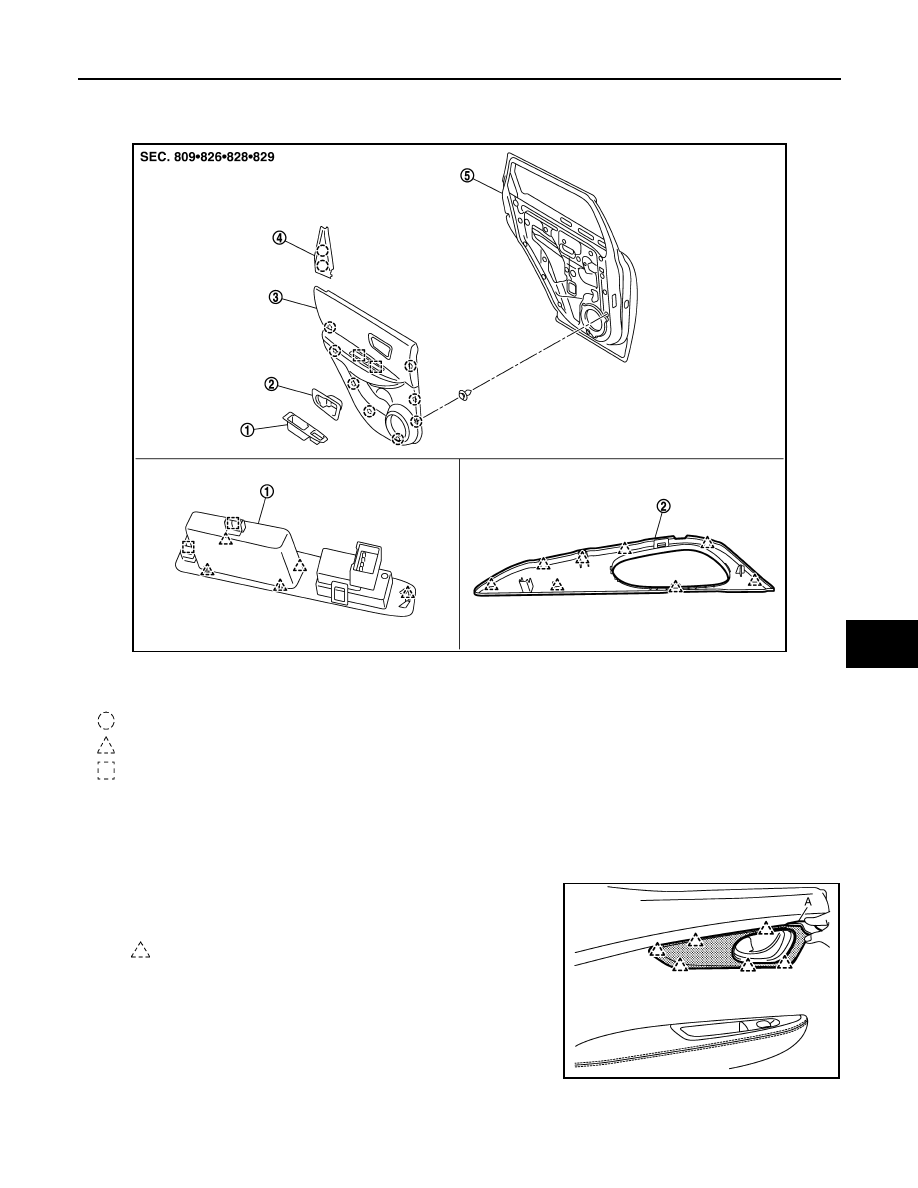
REAR DOOR FINISHER : Exploded View

INFOID:0000000010350937

REAR DOOR FINISHER : Removal and Installation

INFOID:0000000010350938

REMOVAL

1.

Fully open door window.

2.

Insert remover tool (A) to disengage the escutcheon retaining
pawls to door finisher.

3.

Remove inside handle finisher.

E1JIA0256ZZ

1.

Power window switch rear (LH)

2.

Inside handle finisher (rear LH)

3.

Rear door finisher (LH)

4.

Cover rear door inner (LH)

5.

Rear door panel

: Clip

: Pawl

: Metal clip

: Pawl

E1JIA0263ZZ

INT-16

< REMOVAL AND INSTALLATION >

DOOR FINISHER

4.

Insert remover tool (A) to disengage power window switch. 

5.

Disconnect harness connectors (A) for power window switch. 

6.

Remove power window switch.

7.

Remove bolt (A).

8.

Insert remover tool (A) between door finisher and door panel to
disengage door finisher mounting clips, starting from the bottom
and working to the top.

9.

Remove rear door finisher.

10. Remove the following parts after removing door finisher.

• Power window switch rear. Refer to 

INT-15, "REAR DOOR FINISHER : Removal and Installation"

.

• Seal assembly rear door inside.
• Cover rear door inner.

INSTALLATION

Install in the reverse order of removal.

CAUTION:

E1JIA0264ZZ

E1JIA0265ZZ

E1JIA0266ZZ

JMJIA0256ZZ

DOOR FINISHER

INT-17

< REMOVAL AND INSTALLATION >

C

D

E

F

G

H

I

K

L

M

A

B

INT

N

O

P

When installing door finisher, check that clips are securely fitted in panel holes on body, and then
press them in.

INT-18

< REMOVAL AND INSTALLATION >

BODY SIDE TRIM

BODY SIDE TRIM

Exploded View

INFOID:0000000010350939

Removal and Installation

INFOID:0000000010350940

CAUTION:

• Wrap the tip of flat-bladed screwdriver with a cloth when removing metal clips from garnishes.
• Be careful not to damage the body while removing side trim.

REMOVAL

FRONT PILLAR GARNISH

1.

Release front pillar garnish portion from front body side welt.

2.

Disengage front pillar garnish fixing anchor clips using remover tool (A).

CAUTION:

1.

Front pillar garnish

2.

Dash side finisher

3.

Welt body side front (RH)

4.

Front kicking plate inner

5.

Rear kicking plate inner

6.

Center pillar lower garnish

7.

Luggage side lower finisher (front)

8.

Welt body side rear (RH)

9.

Center pillar upper garnish

10. Rear pillar finisher (RH)

11. Rear seat belt escutcheon

12. Trim clip

: Clip

: Pawl

: Metal clip

E1JIA0272ZZ


Content   ..  1168  1169  1170  1171   ..