Nissan Tiida C11. Manual - part 832


  Главная      Nissan     Nissan Tiida C11 - Service Manual


поиск по сайту            


содержание   ..  830  831  832  833   ..


Nissan Tiida C11. Manual - part 832


HIGH-PRESSURE PIPE

HA-43

< ON-VEHICLE REPAIR >

C

D

E

F

G

H

J

K

L

M

A

B

HA

N

O

P

HIGH-PRESSURE PIPE

Removal and Installation of High-Pressure Pipe - MR18DE, HR16DE

INFOID:0000000001404219

REMOVAL

1.

Remove low-pressure flexible hose. Refer to 

HA-38, "Removal and Installation of Low-Pressure Flexible

Hose - MR18DE, HR16DE"

.

2.

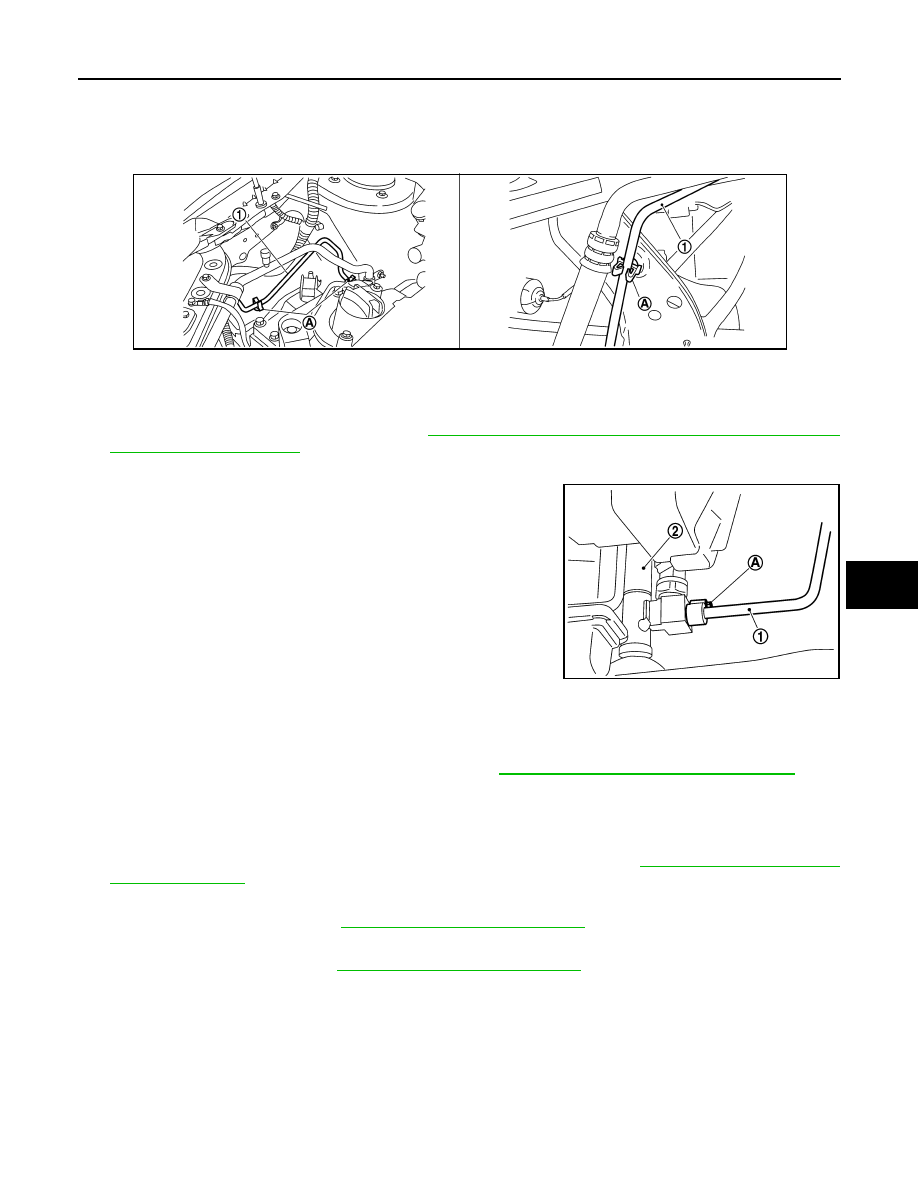
Remove high-pressure pipe from the clips.

3.

Remove high-pressure pipe bolt (A), and then remove high-
pressure pipe (1) from condenser (2).

CAUTION:

Cap or wrap the joint of the pipe with suitable material such
as vinyl tape to avoid the entry of air.

INSTALLATION

Installation is in the reverse order of removal.

CAUTION:

• Replace O-rings of high-pressure pipe with a new ones, and apply compressor oil when installing.
• When recharging refrigerant, check for leaks. Refer to 

HA-22, "Checking of Refrigerant Leaks"

.

Removal and Installation of High-Pressure Pipe - K9K

INFOID:0000000001527625

REMOVAL

1.

Use the recovery/recycling equipment to evacuate the refrigerant. Refer to 

HA-21, "HFC-134a (R-134a)

Service Procedure"

.

2.

Remove engine cover.

3.

Remove cowl top cover. Refer to 

EXT-20, "Removal and Installation"

.

4.

Reposition the lower dash insulator out of the way.

5.

Remove the front grille. Refer to 

EXT-19, "Removal and Installation"

.

6.

Reposition the RH air guide out of the way.

1.

High-pressure pipe

A.

High-pressure pipe clips

SJIA0679E

SJIA0680E

HA-44

< ON-VEHICLE REPAIR >

HIGH-PRESSURE PIPE

7.

Remove bolt (A), and then disconnect the low-pressure pipe (1)
and high-pressure pipe (2) from the expansion valve.

CAUTION:

Cap or wrap the joint of the pipe with suitable material such
as vinyl tape to avoid the entry of air.

8.

Disconnect the high-pressure pipe from the condenser.

CAUTION:

Cap or wrap the joint of the pipe with suitable material such as vinyl tape to avoid the entry of air.

9.

Remove the upper torque rod. Refer to 

FSU-9, "Component"

.

10. Disconnect the high-pressure pipe from the clips.

11. Remove the high-pressure pipe.

INSTALLATION

Installation is in the reverse order of removal.

CAUTION:

• Replace O-rings for A/C piping with new ones, and apply compressor oil when installing.
• When charging the refrigerant, check for leaks. Refer to 

HA-22, "Checking of Refrigerant Leaks"

.

SJIA0644E

CONDENSER

HA-45

< ON-VEHICLE REPAIR >

C

D

E

F

G

H

J

K

L

M

A

B

HA

N

O

P

CONDENSER

Removal and Installation of Condenser - MR18DE, HR16DE

INFOID:0000000001527646

REMOVAL

1.

Use the recovery/recycling equipment to evacuate the refrigerant. Refer to 

HA-21, "HFC-134a (R-134a)

Service Procedure"

.

2.

Remove the three upper headlamp bolts to reposition the headlamps out of the way

3.

Remove the radiator core support upper.

4.

Disconnect the high-pressure flexible hose and high-pressure pipe from condenser.

CAUTION:

Cap or wrap the joint of the pipe with suitable material such as vinyl tape to avoid the entry of air.

5.

Disconnect refrigerant pressure sensor connector.

6.

Tilt radiator toward rear of vehicle, and then remove condenser
(1) from between radiator and radiator core support upper.

CAUTION:

Be careful not to damage the core surface of condenser and
radiator.

INSTALLATION

Installation is in the reverse order of removal.

CAUTION:

• Replace O-rings for A/C piping with new ones, and apply compressor oil when installing.
• When recharging refrigerant, check for leaks. Refer to 

HA-22, "Checking of Refrigerant Leaks"

.

Removal and Installation for Condenser - K9K

INFOID:0000000001527627

REMOVAL

1.

Use the recovery/recycling equipment to evacuate the refrigerant. Refer to 

HA-21, "HFC-134a (R-134a)

Service Procedure"

.

2.

Remove the air duct (front).

3.

Remove the radiator core support finisher.

4.

Remove the front grille. Refer to 

EXT-19, "Removal and Installation"

.

5.

Remove the lower splash shield.

6.

Remove the radiator core support upper.

7.

Disconnect the high-pressure pipe from the condenser.

CAUTION:

Cap or wrap the joint of the pipe with suitable material such as vinyl tape to avoid the entry of con-
taminants.

8.

Disconnect the high-pressure flexible hose from the condenser.

CAUTION:

Cap or wrap the joint of the pipe with suitable material such as vinyl tape to avoid the entry of con-
taminants.

9.

Disconnect the refrigerant pressure sensor connector and remove the refrigerant pressure sensor.

10. Remove the four condenser bolts.

11. Remove the condenser.

CAUTION:

Do not damage the condenser fins

SJIA0682E

HA-46

< ON-VEHICLE REPAIR >

CONDENSER

INSTALLATION

Installation is in the reverse order of removal.

CAUTION:

• Do not damage the condenser fins.
• Replace O-rings of the high-pressure pipe, high-pressure flexible hose and refrigerant pressure sen-

sor with new ones, and apply compressor oil when installing.

• When charging the refrigerant, check for leaks. Refer to 

HA-22, "Checking of Refrigerant Leaks"

.


содержание   ..  830  831  832  833   ..