Nissan Tiida C11. Manual - part 772


  Главная      Nissan     Nissan Tiida C11 - Service Manual


поиск по сайту            


содержание   ..  770  771  772  773   ..


Nissan Tiida C11. Manual - part 772


EXL-86

< ON-VEHICLE REPAIR >

HEADLAMP

Disassembly and Assembly - Xenon

INFOID:0000000001530430
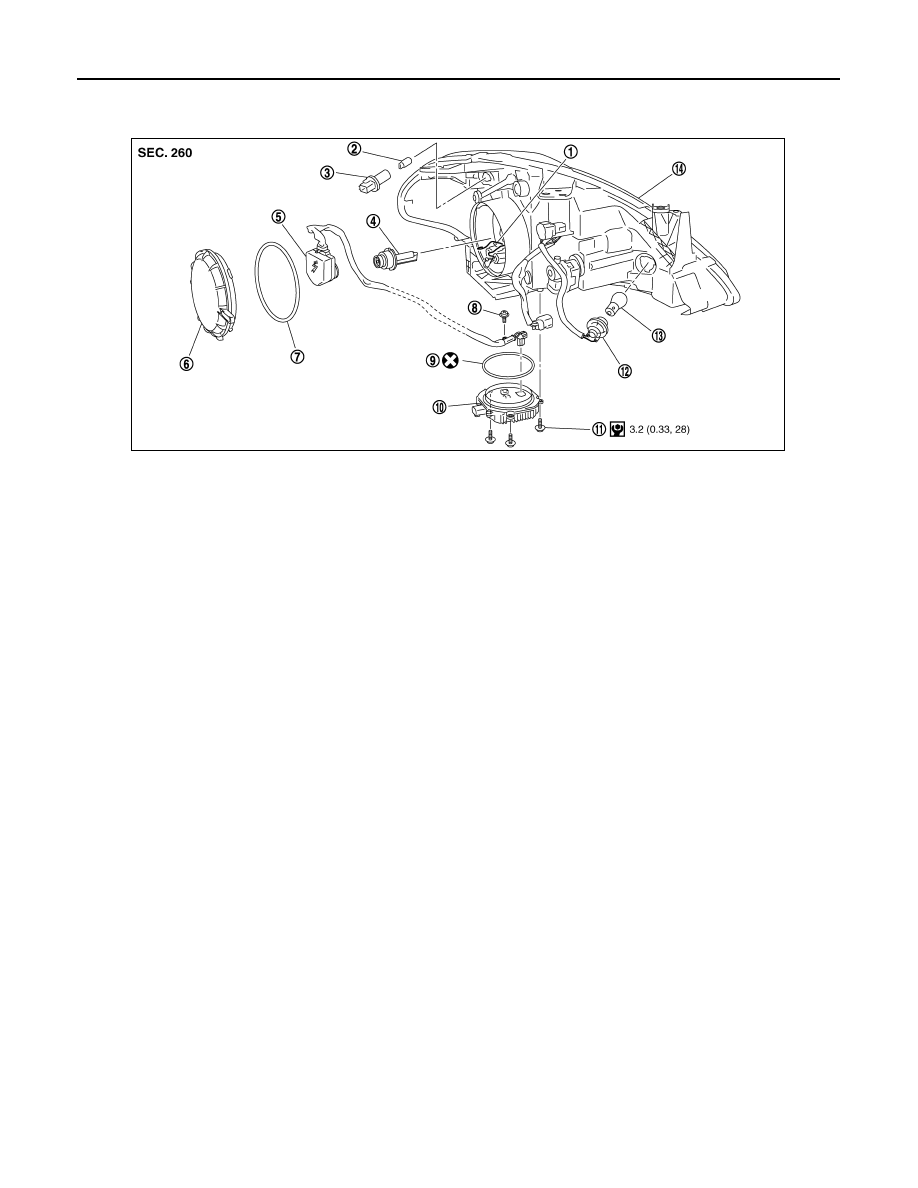
DISASSEMBLY

1.

Turn the plastic cap counterclockwise and remove it.

2.

Turn the xenon bulb socket counterclockwise to unlock it.

3.

Unlock the retaining spring and remove the xenon bulb (high/low).

4.

Remove the mounting screws from the HID control unit.

5.

Disconnect the HID control unit connector and remove the screw from the HID control unit.

6.

Turn the parking (clearance) lamp bulb socket counter clockwise and remove it.

7.

Remove the parking lamp bulb from the socket.

8.

Turn the front turn signal lamp bulb socket counterclockwise and remove it.

9.

Remove the front turn signal lamp bulb from the socket.

ASSEMBLY

Assembly is the reverse order of disassembly.

CAUTION:

• If the HID control unit is removed, reinstall it securely.
• After installing the Xenon bulb, install the plastic cap and bulb socket securely to insure it is water

tight.

1.

Retaining spring

2.

Parking (clearance) lamp bulb

3.

Parking (clearance) lamp bulb socket

4.

Xenon bulb (High/Low)

5.

Xenon bulb socket

6.

Plastic cap

7.

Seal packing

8.

Screw

9.

Seal packing

10. HID control unit

11. Screw

12.

Front turn signal lamp bulb socket

13. Front turns signal lamp bulb 

14. Headlamp housing assembly

PKIC0913E

FRONT FOG LAMP

EXL-87

< ON-VEHICLE REPAIR >

C

D

E

F

G

H

I

J

K

M

A

B

EXL

N

O

P

FRONT FOG LAMP

Bulb Replacement

INFOID:0000000001529284

1.

Turn the lighting switch OFF.

2.

Reposition the fender protector (front) out of the way to access the front fog lamp.

3.

Disconnect the front fog lamp connector (1).

4.

Turn the bulb socket (2) counterclockwise to unlock it.

5.

Remove the socket and bulb from the fog lamp.

6.

Remove the bulb from the socket.

Removal and Installation

INFOID:0000000001529285

REMOVAL

1.

Reposition the fender protector (front) out of the way to access the front fog lamp.

2.

Disconnect the front fog lamp connector.

3.

Release the pawl and remove the front bumper finisher from the front bumper.

4.

Remove front fog lamp bolt and remove the front fog lamp from the front bumper finisher.

INSTALLATION

Installation is in the reverse order of removal.

PKIC1071E

1.

Front fog lamp

2.

Front bumper finisher

3.

Front fog lamp bolt

WKIA5420E

EXL-88

< ON-VEHICLE REPAIR >

HEADLAMP AIMING CONTROL

HEADLAMP AIMING CONTROL

Removal and Installation of Headlamp Aiming Switch

INFOID:0000000001530404

REMOVAL

1.

Remove the instrument lower finisher. Refer to 

IP-11, "Removal and Installation"

.

2.

Spread the switch panel finisher pawls to remove the headlamp aiming switch.

INSTALLATION

Installation is in the reverse order of removal.

HEADLAMP AIMING CONTROL

EXL-89

< ON-VEHICLE REPAIR >

C

D

E

F

G

H

I

J

K

M

A

B

EXL

N

O

P

Removal and Installation of Height Sensor

INFOID:0000000001530540

REMOVAL

1.

Disconnect the height sensor connector.

2.

Disconnect the height sensor arm from the height sensor arm bracket.

3.

Remove the height sensor bolts and remove the height sensor.

1.

Tightening order

2.

Tightening order

3.

Height sensor

4.

Height sensor arm

5.

Height sensor arm bracket

A.

Height sensor bolt

B.

Height sensor arm nut

C.

Height sensor arm bracket

Front

ALLIA0367ZZ


содержание   ..  770  771  772  773   ..