Nissan Tiida C11. Manual - part 135


  Главная      Nissan     Nissan Tiida C11 - Service Manual


поиск по сайту            


содержание   ..  133  134  135  136   ..


Nissan Tiida C11. Manual - part 135


CO-58

< ON-VEHICLE MAINTENANCE >

[K9K]

ENGINE COOLANT

ON-VEHICLE MAINTENANCE

ENGINE COOLANT

Inspection

INFOID:0000000001381585
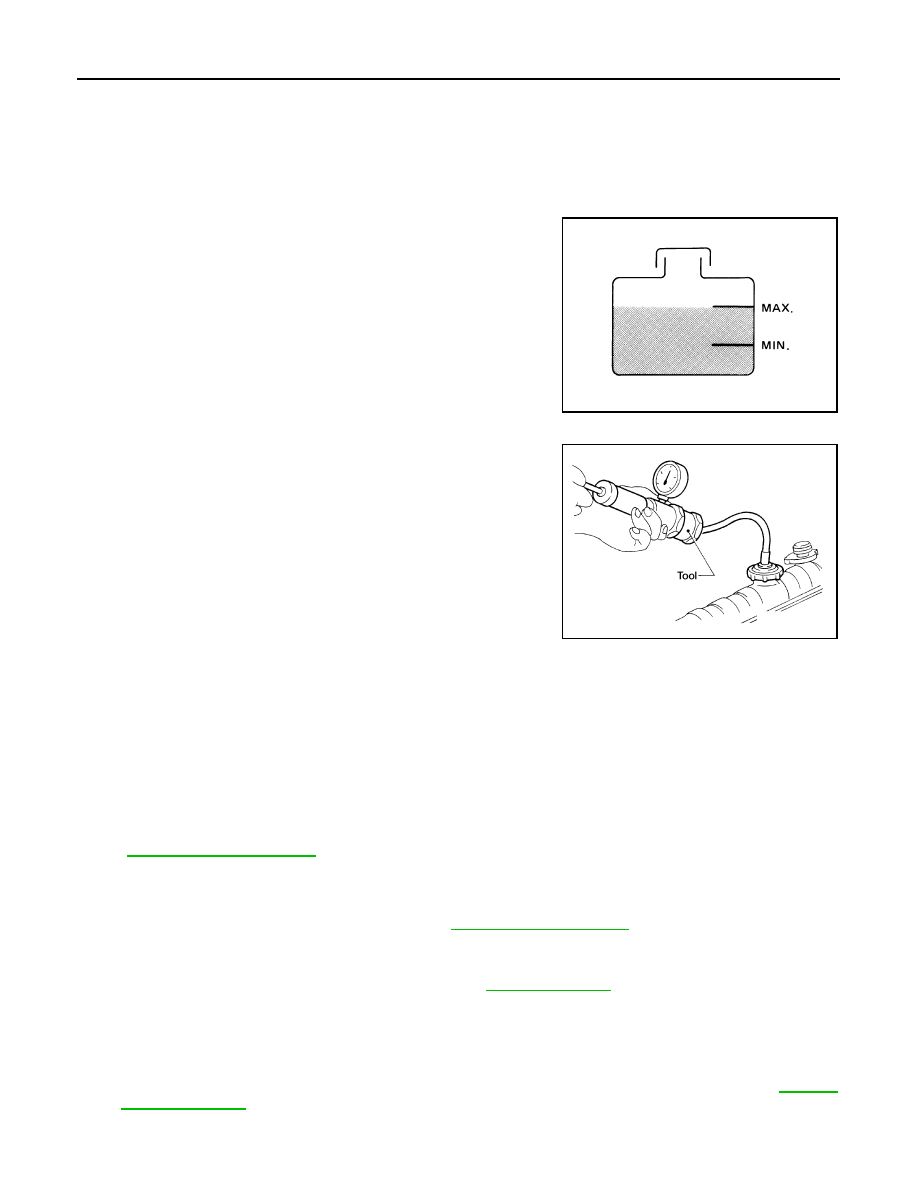
LEVEL CHECK

• Check if the reservoir tank engine coolant level is within the “MIN”

to “MAX” range when engine is cool.

• Adjust the engine coolant level as necessary.

CHECKING COOLING SYSTEM FOR LEAKS

To check for leaks, apply pressure to the cooling system using suit-
able tool.

WARNING:

Never remove the radiator cap when the engine is hot. Serious
burns could occur from high pressure coolant escaping from
the radiator.

CAUTION:

Higher pressure than specified may cause radiator damage.

Draining

INFOID:0000000001381586

WARNING:

• To avoid being scalded, do not change engine coolant when engine is hot.
• Wrap a thick cloth around radiator cap and carefully remove the cap. First, turn the cap a quarter of a

turn to release built-up pressure. Then turn the cap all the way.

• Be careful not to allow engine coolant to contact drive belt. 

1.

Remove engine undercover using power tool.

2.

Disconnect radiator hose (lower) from radiator and remove reservoir tank cap.
When draining all of engine coolant in the system, open water drain plug on cylinder block. Refer
to 

EM-314, "Exploded View"

.

CAUTION:

• Perform this step when engine is cold. 
• Do not spill engine coolant on drive belt.

3.

Remove air relief plug from water outlet. Refer to 

EM-302, "Exploded View"

.

4.

Remove reservoir tank as necessary, and drain engine coolant and clean reservoir tank before installing.

5.

Check drained coolant for contaminants such as rust, corrosion or discoloration.
If contaminated, flush engine cooling system. Refer to 

CO-59, "Flushing"

.

Refilling

INFOID:0000000001381587

• Before starting work, turn off the automatic air conditioner and the blower motor.

1.

Install reservoir tank if removed, lower radiator hose and air relief plug.
• If water drain plug on cylinder block is removed, install and tighten it. Refer to 

EM-314,

"Exploded View"

.

2.

Fill reservoir tank slowly with coolant until coolant spills from the air relief hole.

SMA412B

Testing pressure

: 157 kPa (1.6 kg/cm

2

, 23 psi)

WBIA0568E

ENGINE COOLANT

CO-59

< ON-VEHICLE MAINTENANCE >

[K9K]

C

D

E

F

G

H

I

J

K

L

M

A

CO

N

P

O

• Put a cloth under the air relief plug to prevent engine coolant from dampening the crankshaft

position sensor.

• Pour coolant to the MAX level line of the reservoir tank at

a rate of 2 liter (1-3/4 lamp qt.)/min. or lower.

3.

Close the air relief plug.

CAUTION:

If the filling rate is too fast, this could lead to air being
mixed in the coolant. Be sure to fill the coolant slowly
according to the rate indicated above.
Use Insane Genuine Engine Coolant or equivalent mixed
with water (distilled or demineralized). Refer to 

MA-21,

"Engine Coolant Mixture Ratio"

.

4.

Start engine without closing reservoir tank cap and keep engine racing at 1,500 rpm for about 2-3 minutes.
If necessary, pour engine coolant up to MAX level.
• If coolant overflows reservoir tank hole, install filler cap.
• Watch engine coolant temperature gauge so as not overheat the engine.

WARNING:

• Be careful not to be scaled with hot engine coolant or vacuum pump when operating.
• Radiator fan blade can start at any time and cause personal injuries.

5.

Turn off the engine and loosen air relief plug until coolant spills from air relief hole.

6.

Close the air relief plug and run the engine at 2,000 rpm until the upper hose becomes hot and radiator
fan operates. Leave the engine running approximately 5 minutes at idle speed and check for sound of
coolant flow while running engine from idle up to 3,000 rpm.
• Sound may be noticeable at heater water cock.

7.

If sound is heard, bleed air from cooling system by repeating steps 4 to 6 until coolant level no longer
drops.
• Check the radiator lower hose for any signs of leakage.

8.

Turn off the engine and let it cool down.
• Cool down using a fan to reduce the time.

9.

After cooling period, loosen the air relief plug and check if coolant spills from the air relief hole. if not,
remove the air relief plug until the coolant spills, and then close the relief air plug. Bleed air from cooling
system by repeating steps 6 to 10 until the coolant spills immediately.

10. Check the engine coolant level when engine is cool and refill to MAX level line if the level is lower.

• Clean excess coolant from engine.

11. Check that the reservoir tank cap is tightened.

Flushing

INFOID:0000000001381588

1.

Install reservoir tank if removed.
• If water drain plug on cylinder block is removed, close and tighten it. Refer to 

EM-314, "Exploded

View"

.

2.

Fill reservoir tank with water until water spills from the air relief hole, then close air relief plug. Reinstall
reservoir tank cap.

3.

Run engine and warm it up to normal operating temperature.

4.

Rev engine two or three times under no-load.

5.

Stop engine and wait until it cools down.

6.

Drain water.

7.

Repeat steps 1 through 6 until clear water begins to drain from radiator.

8.

Blow compressed air into cooling circuit through the reservoir tank valve hole to drain all the water.

JPBIA0306ZZ

Engine coolant capacity
(With reservoir tank at MAX)

: Refer to 

MA-19, "Fluids and Lubricants"

.

Reservoir tank capacity

: Refer to 

MA-19, "Fluids and Lubricants"

.

CO-60

< ON-VEHICLE MAINTENANCE >

[K9K]

RADIATOR

RADIATOR

Checking Radiator Cap

INFOID:0000000001538671

• Check valve seat of radiator cap. 
- Check if valve seat is swollen to the extent that the edge of the

plunger cannot be seen when watching it vertically from the top.

- Check if valve seat has no soil and damage.

• Pull negative-pressure valve to open it, and make sure that it is

completely closed when released.

- Make sure that there is no dirt or damage on the valve seat of radi-

ator cap negative-pressure valve. 

- Make sure that the valve operates properly in the opening and

closing conditions.

• Check radiator cap relief pressure using suitable tool.

- When connecting the radiator cap to the tester, apply water or

coolant to the cap seal surface. 

- Replace the radiator cap if there is an abnormality in the negative-

pressure valve, or if the open-valve pressure is outside of the stan-
dard values.

• Replace radiator cap if there it does not comply to specifications to the above three checks.

CAUTION:

When installing radiator cap, thoroughly wipe out the radiator filler neck to remove any waxy residue
or foreign material.

Checking Radiator

INFOID:0000000001538672

Check radiator for mud or clogging. If necessary, clean radiator as follows.
• Be careful not to bend or damage radiator fins.
• When radiator is cleaned without removal, remove all surrounding parts such as cooling fan, radiator shroud

and horns. Then tape harness and connectors to prevent water from entering.

1.

Apply water by hose to the back side of the radiator core vertically downward.

2.

Apply water again to all radiator core surface once per minute.

3.

Stop washing if any stains no longer flow out from radiator.

4.

Blow air into the back side of radiator core vertically downward.
• Use compressed air lower than 490 kPa (4.9 bar, 5 kg/cm

2

, 71 psi) and keep distance more than 30 cm

(11.8 in). 

PBIC2816E

SMA967B

Standard: 78 – 98 kPa (0.78 - 0.98 bar, 0.8 – 1.0 kg/cm

2

, 11 

– 14 psi)

Limit: 59 kPa (0.59 bar, 0.6 kg/cm

2

, 9 psi)

WBIA0570E

RADIATOR

CO-61

< ON-VEHICLE MAINTENANCE >

[K9K]

C

D

E

F

G

H

I

J

K

L

M

A

CO

N

P

O

5.

 Blow air again into all the radiator core surfaces once per minute until no water sprays out.


содержание   ..  133  134  135  136   ..