Nissan Tiida C11. Manual - part 131


  Главная      Nissan     Nissan Tiida C11 - Service Manual


поиск по сайту            


содержание   ..  129  130  131  132   ..


Nissan Tiida C11. Manual - part 131


CO-42

< ON-VEHICLE REPAIR >

[MR18DE]

COOLING FAN

COOLING FAN

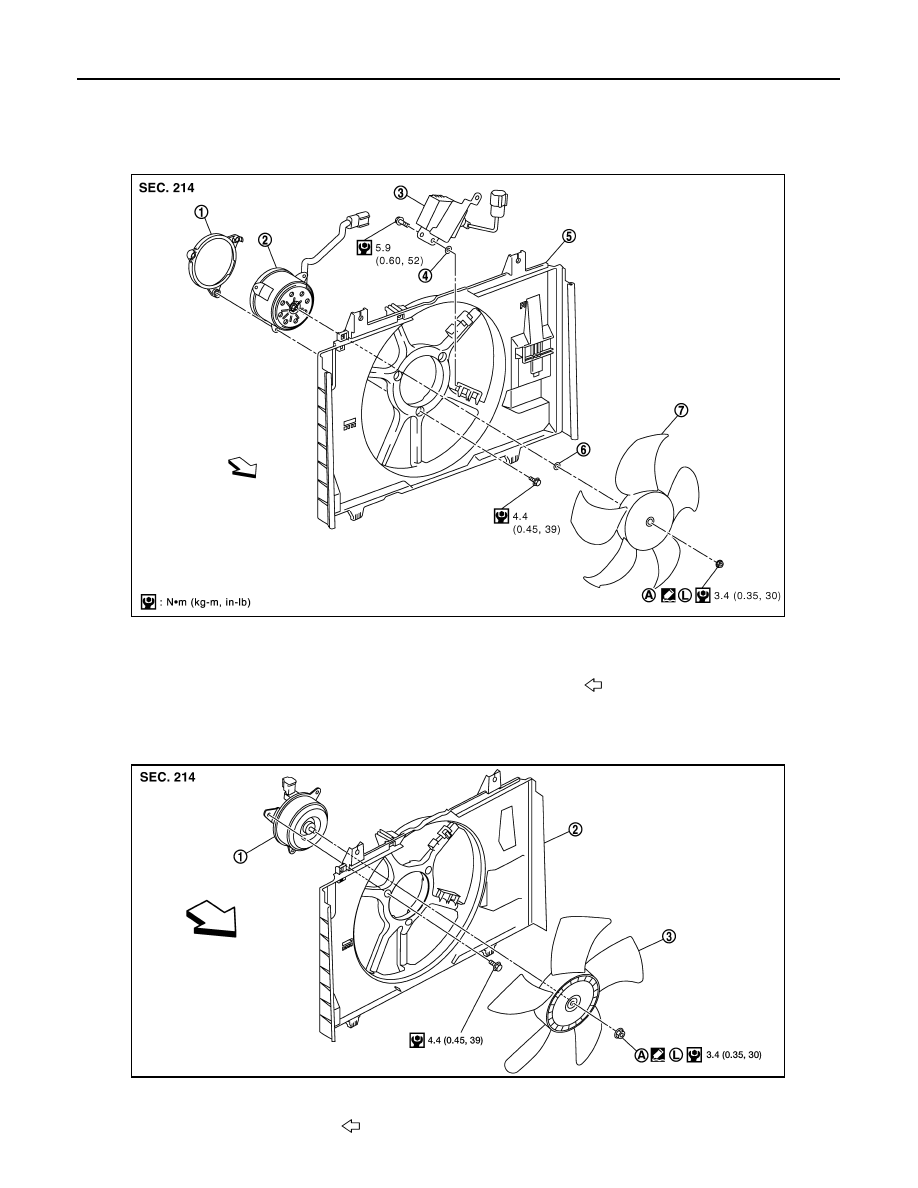
Component (Models with A/C)

INFOID:0000000001337844

Component (Models without A/C)

INFOID:0000000001337845

1.

Fan motor cover

2.

Fan motor

3.

Cooling fan control module

4.

Washer

5.

Fan shroud

6.

Washer

7.

Cooling fan

A.

Apply on fan motor shaft

Front

PBIC4538E

1.

Fan motor 

2.

Fan shroud

3.

Cooling fan 

A.

Apply on fan motor shaft

Front

WBIA0786E

COOLING FAN

CO-43

< ON-VEHICLE REPAIR >

[MR18DE]

C

D

E

F

G

H

I

J

K

L

M

A

CO

N

P

O

Removal and Installation

INFOID:0000000001337846

REMOVAL

1.

Drain engine coolant from radiator. Refer to 

CO-35, "Changing Engine Coolant"

.

CAUTION:

• Perform this step when engine is cold.
• Do not spill engine coolant on drive belt.

2.

Remove air duct (inlet). Refer to 

EM-154, "Component"

.

3.

Remove reservoir tank.

4.

Disconnect radiator hose (upper) at radiator side. Refer to 

CO-40, "Component"

.

5.

Disconnect harness connectors from fan motor, and move harness to aside.

6.

Remove cooling fan assembly.

CAUTION:

Be careful not to damage or scratch the radiator core.

INSTALLATION

Installation is the reverse order of removal.
• Cooling fans are controlled by ECM. For details, refer to 

CO-28, "Cooling Circuit"

.

CAUTION:

Be careful not to damage or scratch the radiator core.

CO-44

< ON-VEHICLE REPAIR >

[MR18DE]

WATER PUMP

WATER PUMP

Component

INFOID:0000000001337848

Removal and Installation

INFOID:0000000001337849

REMOVAL

1.

Drain engine coolant. Refer to 

CO-35, "Changing Engine Coolant"

.

CAUTION:

Perform this step when the engine is cold.

2.

Remove drive belt auto-tensioner. Refer to 

EM-153, "Removal and Installation of Drive Belt Auto Ten-

sioner"

.

3.

Remove water pump.

CAUTION:

• Handle water pump vane so that it does not contact any other parts.
• Water pump cannot be disassembled and should be replaced as a unit.

INSPECTION AFTER REMOVAL

• Visually check that there is no significant dirt or rusting on water

pump body and vane (A).

• Make sure that there is no looseness in vane shaft, and that it turns

smoothly when rotated by hand.

• Replace water pump, if necessary.

INSTALLATION

Installation is in the reverse order of removal.

INSPECTION AFTER INSTALLATION

• Check for leaks of engine coolant. Refer to 

CO-35, "Inspection"

.

• Start and warm up the engine. Visually check if there is no leaks of engine coolant.

1.

Gasket

2.

 Water pump

PBIC3921E

PBIC3313J

THERMOSTAT

CO-45

< ON-VEHICLE REPAIR >

[MR18DE]

C

D

E

F

G

H

I

J

K

L

M

A

CO

N

P

O

THERMOSTAT

Component

INFOID:0000000001337850

Removal and Installation

INFOID:0000000001337851

REMOVAL

1.

Drain engine coolant. Refer to 

CO-35, "Changing Engine Coolant"

.

2.

Remove water inlet.

3.

Remove thermostat.

4.

Remove water pump. Refer to 

CO-44, "Removal and Installation"

.

5.

Remove thermostat housing.

INSPECTION AFTER REMOVAL

• Place a thread (A) so that it is caught in the valves of thermostat

(1). Immerse fully in a container (B) filled with water. Heat while
stirring.

• The valve opening temperature is the temperature at which the

valve opens and falls from the thread.

• Continue heating. Check the full open valve lift amount.
• After checking the maximum valve lift amount, lower the water

temperature and check the valve closing temperature. 

1.

Thermostat housing

2.

Water hose 

3.

Radiator hose (lower)

4.

Water inlet

5.

Thermostat

6.

Rubber ring

7.

Gasket

A.

To oil cooler

B.

To radiator

Engine front

PBIC4485E

PBIC3314J


содержание   ..  129  130  131  132   ..