Mitsubishi Eclipse Cross (2023 year). Manual in english - page 13

Combination headlights and dimmer switch
The daytime running lights illumi-
Headlights and other lights turn on
OFF
NOTE
nated
AUTO
and off automatically in accor-
This function is to prevent blinding people
dance with outside light level.
The daytime running lights illumi-
who are in the vicinity of the vehicle at night
nated (when it is light outside the
Parking, tail, front and rear side-
or at other times.
vehicle)
marker lights, license plate and
The lights will be illuminated when the park-
AUTO
ing brake is released, when the selector lever
Headlights and other lights turn on
instrument panel lights on
is shifted to a position other than
“P”
and off automatically in accor-
Headlights and other lights on
(PARK) or when the vehicle starts moving. If
5
dance with outside light level.
you want to turn off the lights again when the
The daytime running lights illumi-
vehicle is stationary, apply the parking
nated
NOTE
brake, put the selector lever in the
“P”
z
On vehicles with an “OFF” position on the
(PARK) position, and then stop and restart
Tail, front and rear side-marker
light switch, the sensitivity of the automatic
the engine.
lights, license plate and instrument
on/off control can be adjusted.
This function can be deactivated.
panel lights on
For further information, please contact your
For further information, please contact your
Headlights and other lights on
authorized Mitsubishi Motors dealer or a
authorized Mitsubishi Motors dealer or a
repair facility of your choice.
repair facility of your choice.
On vehicles equipped with the Smartphone-
z
Do not cover the sensor (A) for the automatic
NOTE
link Display Audio
(SDA) or the Smart-
on/off control by affixing a sticker or label to
z
Once the daytime running light come on,
phone-link Display Audio (SDA) navigation
the windshield.
system, screen operations can be used to
they do not go out until the ignition switch is
make the adjustment.
turned to the “OFF” or “ACC” position or
Refer to the separate owner’s manual for
the operation mode is changed to OFF or
details.
ACC.
z
On vehicles without an “OFF” position on
the light switch, when the engine is started
[When the engine is not running, or when the
while the light switch is in the “AUTO” posi-
engine is running but the parking brake is not
tion, the headlights and other vehicle exterior
released]
lights will remain off until the parking brake
is released, the selector lever is shifted to a
z
If the lights do not turn on or off with the
The engine starts when the lights are off.
position other than “P” (PARK), or the vehi-
switch in the
“AUTO” position, manually
cle starts moving, even if it is dark outside
operate the switch. Have the system checked
OFF
All lights off
the vehicle.
by an authorized Mitsubishi Motors dealer or
a repair facility of your choice.
5-196
Features and controls
Combination headlights and dimmer switch
[For vehicles equipped with the F.A.S.T.-
Light auto-cutout function
Headlight reminder buzzer
key]
(headlights and other lights)
N00549801278
The operation mode is changed to OFF or
N00532601708
ACC and the driver’s door is not opened.
[When using a key to start the engine]
z
If the following operation is performed
If the driver’s door is opened with the key in
with the combination headlights and dim-
the “OFF” or “ACC” position or removed
NOTE
mer switch in the “
” or “
” position,
from the ignition switch while the lights are
z The light auto-cutout function can be deacti-
the lights automatically turn off.
on, the tone will sound to remind you to turn
vated.
5
off the lights.
See your authorized Mitsubishi Motors
[Except for vehicles equipped with the
dealer for details.
F.A.S.T.-key]
[When using the F.A.S.T.-key to start the
On vehicles equipped with the SDA or the
The ignition switch is turned to the “OFF”
engine]
SDA navigation system, screen operations
or “ACC” position or the key is removed
If the driver’s door is opened when the opera-
can be used to make the adjustment.
from the ignition switch and the driver’s
Refer to the separate owner’s manual for
tion mode is put in OFF or ACC, or if the
door is opened.
details.
operation mode is changed to OFF while the
lights are on, the tone will sound to remind
[For vehicles equipped with the F.A.S.T.-
you to turn off the lights.
key]
When you want to keep the lights
The operation mode is changed to OFF or
In either case, the lights will turn off automat-
on:
ACC and the driver’s door is opened.
ically and so will the tone. You can also turn
the light switch to the “OFF” position (if so
z
If the following operation is performed
If the combination headlights and dimmer
equipped) or
“AUTO” position
(if so
with the combination headlights and dim-
switch is turned to the “
” or “
” posi-
equipped) to stop the tone.
mer switch in the “
” or “
” position,
tion again after the engine is turned off, the
the lights automatically turn off after
approximately 3-minute auto-cutout function
Dimmer (high/low beam
approximately 3 minutes.
described above will not work. The lights (the
change)
parking lights, tail lights and license plate
N00549901178
[Except for vehicles equipped with the
lights) will stay on and will not turn off auto-
F.A.S.T.-key]
matically.
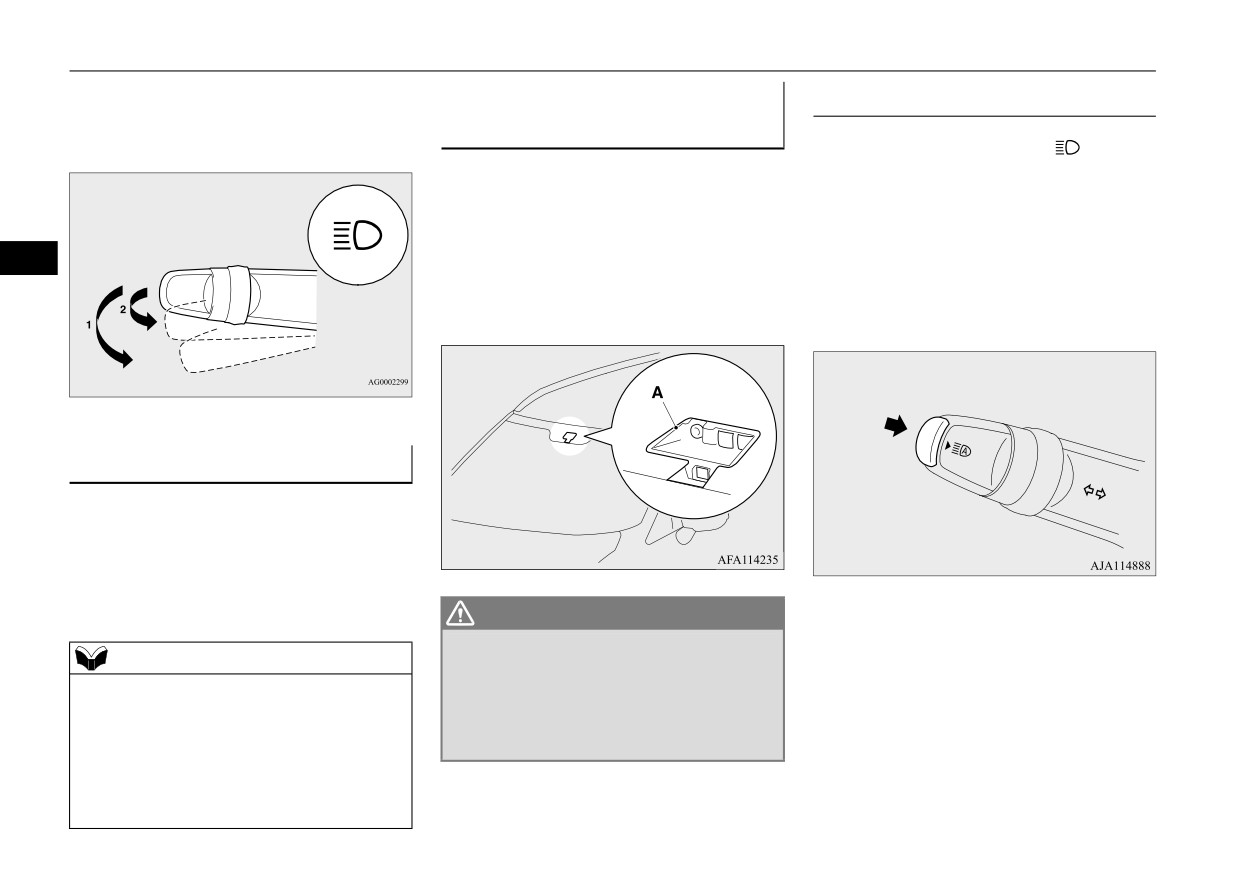
To change the headlights from high beam to
The ignition switch is turned to the “OFF”
low beam and vice versa, pull the turn signal
or “ACC” position or the key is removed
lever to
(1). Switch the headlights to low
from the ignition switch and the driver’s
beam as a courtesy whenever there are
door is not opened.
oncoming vehicles, or when there is traffic
Features and controls
5-197
Combination headlights and dimmer switch
moving ahead of you. An illuminated blue
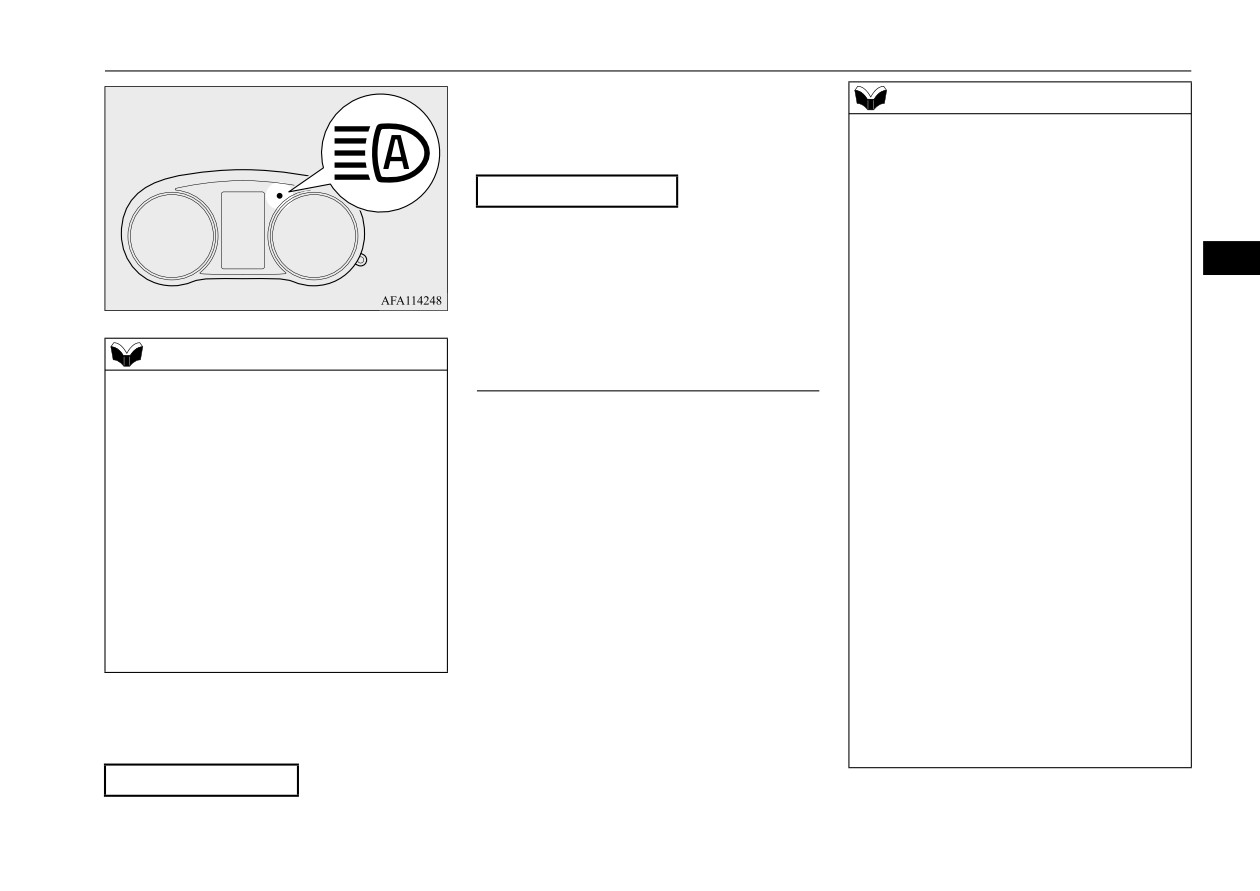
Automatic High Beam (AHB) (if
How to use the AHB
light in the instrument cluster indicates when
N00593600100
the headlights are on high beam.
so equipped)
1. Rotate the light switch to “
” position
N00591300060
or “AUTO” position when the engine is
The Automatic High Beam (AHB) turns the
running.
high beam light on or off automatically
2. Press the AHB switch.
according to surrounding light conditions.
The AHB is activated and the indicator is
5
The sensor (A) detects lights, such as the
illuminated.
lights of an oncoming vehicle, a vehicle
If the AHB switch is pressed again, the
ahead or street lights.
AHB will be deactivated and AHB indica-
tor will go off.
Headlight flasher
N00550001225
You can flash the high beams by pulling the
lever gently toward you (2). The lights will
go back to normal when you let go. While the
high beam is on, you will see a blue light on
the instrument panel.
WARNING
z
Do not rely solely on the AHB. Always
NOTE
observe surrounding traffic and light con-
z You can flash the high beams by pulling the
ditions. If necessary, manually turn the
lever toward you, even if the light switch is
high beams on or off.
off.
Refer to
“Dimmer
(high/low beam
change)” on page 5-197.
z If you turn the lights off with the head lights
set to high beam illumination, the headlights
are automatically returned to their low beam
setting.
5-198
Features and controls
Combination headlights and dimmer switch
2. The AHB indicator will go off.
NOTE
3. The AHB switch is pressed again, the
z
The headlights may not be switched from
AHB will be activated.
high beam to low beam under the following
circumstances.
Switching to high beam
• A vehicle in front or oncoming vehicle is
hindered by any object such as continuous
1. Pull the turn signal lever toward you.
bends, elevated median/island, traffic signs,
2. The AHB indicator will go off and the
roadside trees.
5
high beam indicator illuminates.
• Your vehicle passes an oncoming vehicle
3. The AHB switch is pressed again, the
suddenly on a bend with poor visibility.
AHB will be activated.
• Another vehicle crosses ahead of your vehi-
cle.
NOTE
z
The headlights may remain at low beam (or
Automatic switching conditions
z
If the headlights are on when the light switch
be switched from high beam to low beam)
N00593700055
is in the “AUTO” position, the AHB works.
when a reflective object
(e.g. street light,
z
You can switch the headlight beams
The high beam headlights illuminate when all
traffic signal, noticeboard and signboard)
(high/low) manually by operating the lever
of the following conditions are met:
reflects light.
even if the AHB is working.
z
Any of the following factors may influence
Refer to “Dimmer (high/low beam change)”
z Your vehicle speed exceeds approxi-
the headlight beam switching timing:
on page 5-197.
mately 33 mph (53 km/h).
• How brightly the exterior lights of a vehicle
If the lever is operated manually, the AHB
z It is dark ahead of your vehicle.
in front or oncoming vehicle illuminate.
indicator will go off and the AHB will be
z There are no vehicles in front or oncom-
• Movement or direction of a vehicle in front
deactivated.
ing vehicles, or none of their exterior
or oncoming vehicle.
Refer to “Manual switching” on page 5-199.
lights are illuminating.
• Only right or left exterior light of a vehicle
z
The AHB is not deactivated when you pull
in front or oncoming vehicle is illuminat-
the lever slightly (operation of the headlight
ing.
The low beam headlights illuminate when
flasher).
any of the following conditions occur:
• A vehicle in front or oncoming vehicle is a
motorcycle.
z Your vehicle speed does not exceed
• Road conditions (gradient, bends and road
Manual switching
surface).
approximately 28 mph (45 km/h).
z It is bright ahead of your vehicle.
• The number of occupants and luggage load.
Switching to low beam
z An exterior light of a vehicle in front or
oncoming vehicle is illuminating.
1. Pull the turn signal lever toward you.
Features and controls
5-199

Combination headlights and dimmer switch
2. Press the AHB switch more than 15 times
NOTE
NOTE
within 5 seconds after operation mode is
z
The AHB recognizes environmental condi-
• When lights of the vehicle in front or head-
turned on.
tions by sensing a light source ahead of your
lights of an oncoming vehicle blend into the
vehicle. Therefore, you may feel like some-
other lights.
thing is not quite right when the headlight
• The rear end of a vehicle in front (such as a
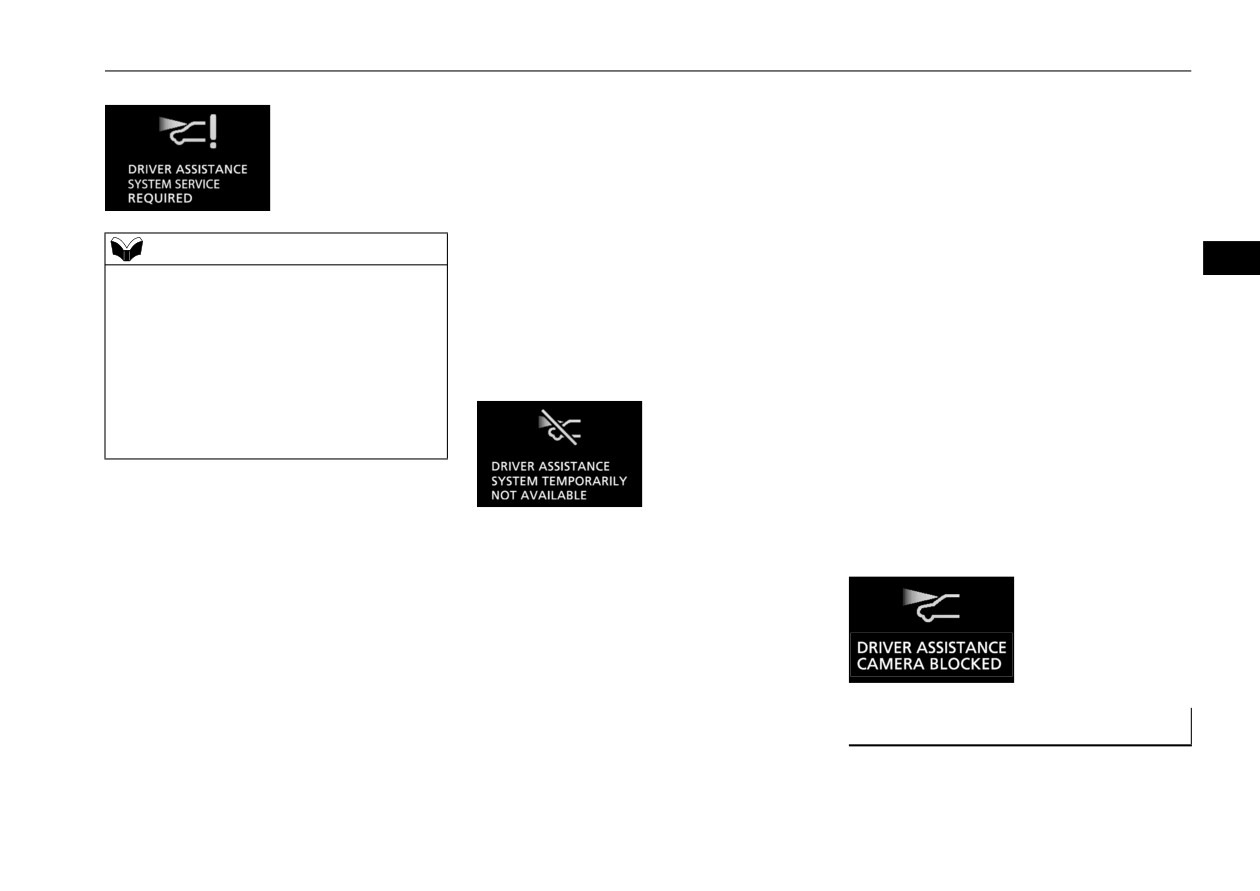
System problem warning
beams are switched automatically.
container truck) reflect a strong light.
N00593800102
z
The system may not detect a light vehicle
• Your vehicle's headlight is broken or dirty.
If a problem occurs with the system, the fol-
such as a bicycle.
• Your vehicle is inclined due to a flat tire or
5
lowing warning display will appear to the
z
The system may not detect an ambient
towing.
type of the problem.
brightness precisely. This causes the traffic
• The warning display appears.
to be dazzled by high beam or the low beam
(Refer to
“System problem warning” on
to be maintained. In such cases, you should
page 5-200.)
The AHB deactivation due to fault
switch the headlight beams manually.
z
Observe the precautions below to maintain
• In bad weather (heavy rain, fog, snow or
good usage conditions:
If a failure is detected in the system, the fol-
sandstorm).
• Do not attempt to disassemble the sensor.
lowing warning display will appear and the
• The windshield is dirty or fogged up.
• Do not affix a sticker or label on the wind-
AHB will automatically be turned off.
• The windshield is cracked or broken.
shield near the sensor.
If the warning display remains even after the
• The sensor is deformed or dirty.
• Avoid overload.
ignition switch is turned to the “OFF” posi-
• A light, which is similar to the headlights or
• Do not modify your vehicle.
tion or the operation mode is put in OFF and
tail lights, is shining around your vehicle.
• When the windshield is replaced, use the
then turned back to ON, please contact an
• A vehicle in front or oncoming vehicle is
Mitsubishi Motors genuine parts.
authorized Mitsubishi Motors dealer.
driven without lights, the exterior lights are
dirty or discolored, or the direction of the
To adjust the sensitivity of the sensor
[When the AHB is malfunctioning]
headlight beams is adjusted improperly.
• It becomes dark and bright suddenly and
The sensitivity of the sensor can be temporar-
continuously around your vehicle.
ily lowering in the following ways.
• Your vehicle is driven on uneven surfaces.
• Your vehicle is driven on a winding road.
1. Park your vehicle in a safe place and the
• A reflective object such as a noticeboard or
ignition switch is turned to the
“OFF”
a mirror reflects a light ahead of your vehi-
position or the operation mode is put in
cle.
OFF.
5-200
Features and controls
Combination headlights and dimmer switch
[When the sensor is malfunctioning]
Sensor is too hot or cold
Windshield is dirty
If the system becomes temporarily unavail-
If the AHB determines that its performance
able due to the high or low temperature of the
has been degraded, the warning display will
sensor, the following warning display will
appear.
appear.
This can occur when:
After the temperature of the sensor has been
z Foreign objects, such as dirt, snow or ice,
NOTE
in range, the system will automatically return
adhere to the windshield of the sensor
5
to operation.
z
If the sensor or its surrounding area becomes
portion.
extremely high temperature when parking
If the warning display does not disappear
z In adverse weather conditions, such as
the vehicle under a blazing sun, the “AHB
after waiting for a while, there is a possibility
rain, snow, sandstorms, etc.
SERVICE REQUIRED” warning display
that the AHB has a malfunction. Contact an
may appear.
authorized Mitsubishi Motors dealer for
z A front vehicle or an oncoming vehicle is
If the message remains even after the tem-
splashing water, snow or dirt.
inspection of the system.
perature of the sensor or its surrounding area
has been in range, please contact an autho-
When the sensor performance returns, the
rized Mitsubishi Motors dealer.
AHB will resume operation.
If the warning display does not disappear
after waiting for a while, there is a possibility
that the sensor has a malfunction. Contact an
authorized Mitsubishi Motors dealer for
inspection of the sensor.
Welcome light
N00563201322
This function turns on the front side-marker
and parking lights for approximately 30 sec-
Features and controls
5-201

Combination headlights and dimmer switch
onds after the UNLOCK button on the key is
4. The headlights will come on in the low
Coming home light
pressed when the combination headlights and
beam setting for approximately 30 sec-
N00547301253
dimmer switch is in the “OFF” position (if so
onds. After the headlights go off, the
equipped) or
“AUTO” position
(if so
This function turns on the headlights in the
headlights can be turned on again in the
equipped). The welcome light function will
low beam setting for approximately 30 sec-
low beam setting for approximately
operate only when it is dark outside the vehi-
onds after the ignition switch is turned to the
30 seconds by pulling the turn signal lever
cle.
“OFF” position or the operation mode is put
toward you within 60 seconds of turning
in OFF.
the ignition switch to the “OFF” position
5
or putting the operation mode in OFF. To
NOTE
1. Turn the combination headlights and dim-
turn on the headlights again after 60 sec-
z
While the welcome light function is operat-
mer switch to the “OFF” position (if so
onds of turning the ignition switch to the
ing, perform one of the following operations
equipped) or
“AUTO” position
(if so
“OFF” position or putting the operation
to cancel the function.
equipped).
mode in OFF, repeat the process from step
• Press the LOCK button on the key.
2. Turn the ignition switch to the
“OFF”
1.
• Turn the combination headlights and dim-
position or put the operation mode in
mer switch to the “
” or “
” position.
OFF. Also, if a key was used to start the
• Turn the ignition switch to the “ON” posi-
engine, remove the key from the ignition
NOTE
tion or put the operation mode in ON.
switch.
z
While the coming home light function is
z
It is possible to modify functions as follows:
operating, perform one of the following
3. Within 60 seconds of turning the ignition
• The headlights can be set to come on in the
operations to cancel the function.
switch to the “OFF” position or putting
low beam setting.
• Pull the turn signal lever toward you.
the operation mode in OFF, pull the turn
• The welcome light function can be deacti-
• Turn the combination headlights and dim-
signal lever toward you.
vated.
mer switch to the “
” or “
” position
For details, consult a Mitsubishi Motors
or put the operation mode in ON.
dealer.
• Turn the ignition switch to the “ON” posi-
On vehicles equipped with the SDA or the
tion or put the operation mode in ON.
SDA navigation system, screen operations
z
It is possible to modify functions as follows:
can be used to make the adjustment.
• The time that the headlights remain on can
Refer to the separate owner’s manual for
be changed.
details.
• The coming home light function can be
deactivated.
5-202
Features and controls

Turn signal lever
NOTE
NOTE
For details, consult a Mitsubishi Motors
See your authorized Mitsubishi Motors
dealer.
dealer for details.
On vehicles equipped with the SDA or the
On vehicles equipped with the Smartphone-
SDA navigation system, screen operations
link Display Audio
(SDA) or the Smart-
can be used to make the adjustment.
phone-link Display Audio (SDA) navigation
Refer to separate owner’s manual for details.
system, screen operations can be used to
make the adjustment.
5
Refer to the separate owner’s manual for
Turn signal lever
details.
N00522601659
z
It is possible to change the tone of a sound-
When changing lanes, or to making a gradual
ing buzzer as the turn signal lights flash.
NOTE
Refer to “Changing the turn signal sound” on
turn, hold the lever in the “lane change” posi-
page 5-161.
tion (1). It will return to the neutral position
z
A light in the instrument panel flashes to
when you let go. Use the full position (2)
show when the front and rear turn signal
lights are working properly.
when making a normal turn. The lever will
If this light flashes faster than usual, check
return to the neutral position when the turn is
for a burned out turn signal light bulb or mal-
complete. There may be times when the lever
functioning connection in the signal.
does not return to the neutral position. This
If the panel light does not come on when the
usually happens when the steering wheel is
lever is moved, check for a blown fuse or a
turned only slightly. You can easily return the
burned out bulb in the panel.
lever by hand.
Have the system inspected by your autho-
Also, when you move the lever to (1) slightly
rized Mitsubishi Motors dealer or a repair
then release it, the turn signal lights and the
facility of your choice.
indicator light in the instrument cluster will
z
It is possible to modify functions as follows:
flash three times.
• Deactivate the turn signal light
3-flash
function for lane changes.
• Adjust the time required to operate the
lever for the 3-flash function.
Features and controls
5-203

Hazard warning flasher switch
Hazard warning flasher
ECO mode switch
NOTE
N00579300099
z Even if the ECO mode is operating, you can
switch
select normal operation of the air condition-
N00522701344
ECO mode is an eco-driving support system
ing.
which automatically controls the engine and
For further information, please contact your
air conditioning system to improve fuel effi-
authorized Mitsubishi Motors dealer.
ciency.
5
The ECO mode starts working by pressing
Front fog light switch (if so
the ECO mode switch when the ignition
equipped)
switch or operation mode is in ON.
N00522801550
Push the switch again and the ECO mode will
cancel.
The front fog lights illuminate only when the
While the ECO mode is working, an ECO
headlights are on low beam.
mode indicator will be turned on.
Turning the knob in the direction of the “ON”
If you press the flasher switch, the front and
position turns on the front fog lights as well
rear turn signals will flash intermittently, and
as the indicator in the instrument cluster. To
so will the hazard warning lights. This is an
turn them off, turn the knob in the direction of
emergency warning system and should not be
the “OFF” position.
used when the vehicle is in motion, except for
The knob will return to the neutral position
emergencies.
when it is released.
If you need to leave your vehicle, the flashers
will keep working after the ignition switch is
removed or the operation mode is put in OFF.
NOTE
z If the flashers are used for several hours, the
battery will run down. This could make it
NOTE
difficult or impossible to restart your vehicle.
z Since the air conditioning operation is con-
trolled while the ECO mode is operating,
you may feel that effectiveness of the air
conditioning is weak.
5-204
Features and controls

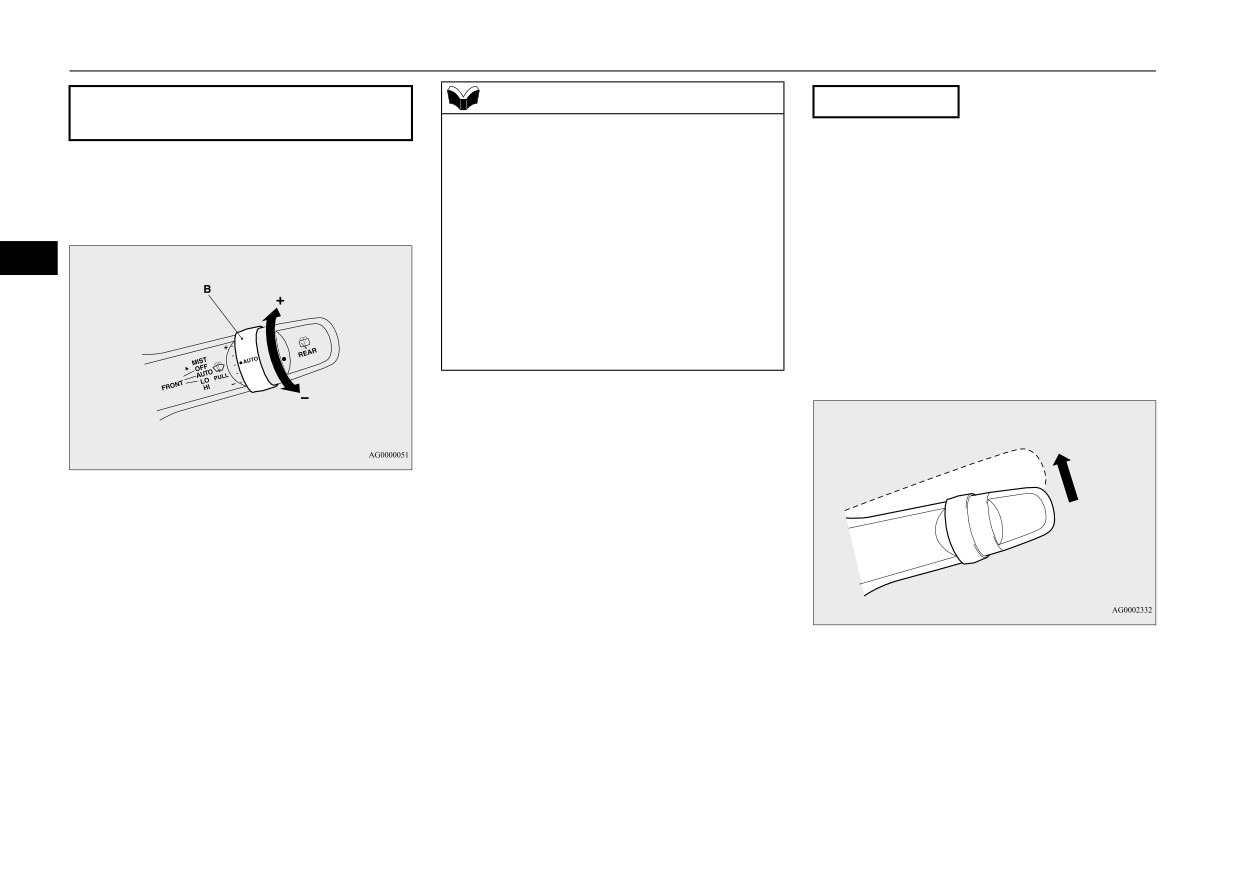
Wiper and washer switch
NOTE
Windshield wipers
Except for vehicles with rain sen-
z
If the headlights are switched to high beam,
sor
the front fog lights will go out; they will illu-
minate again when the headlights are
NOTE
The windshield wiper and washer can be
switched back to low beam.
z
To ensure a clear rearward view, the rear
operated when the ignition switch or the
z
If the light switch is rotated to the “OFF”
window wiper will automatically perform
operation mode is in ON or ACC.
position (if so equipped), “AUTO” position
several continuous operations if the selector
If the blades are frozen to the windshield, do
(when the headlights are off) (if so equipped)
lever is put in the “R” (REVERSE) position
not operate the wipers until the ice has melted
5
while the windshield wipers are operating.
or “
” position while the front fog lights
and the blades are freed, otherwise the wiper
Refer to “Rear window wiper and washer”
are illuminated, they will automatically turn
motor may be damaged.
on page 5-209.
off. They can be turned back on again by
rotating the combination headlights and dim-
mer switch back to the “
” position or the
“AUTO” position when the headlights are on
low beam, and turning the knob in the direc-
tion of the “ON” position.
z
Do not use fog lights except in conditions of
fog, otherwise excessive light glare may
temporarily blind oncoming vehicle drivers.
Wiper and washer switch
N00523001836
MIST- Misting function
The wipers will operate once.
CAUTION
OFF- Off
z If the washer is used in cold weather, the
INT- Intermittent (Speed sensitive)
washer fluid sprayed against the glass may
LO- Slow
freeze, which may hinder visibility. Warm
HI-
Fast
the glass with the defroster before using the
washer.
Features and controls
5-205

Wiper and washer switch
To adjust intermittent intervals
Misting function
Vehicles with rain sensor
With the lever in the “INT” (speed sensitive
The misting function can be used when the
The windshield wipers can be operated when
intermittent operation) position, the intermit-
ignition switch or the operation mode is in
the ignition switch or the operation mode is in
tent intervals can be adjusted by turning the
ON or ACC.
ON or ACC.
knob (A).
If the blades are frozen to the windshield or
The wipers will operate once if the wiper
rear window, do not operate the wipers until
lever is raised to the “MIST” position and
the ice has melted and the blades are freed,
5
released. This operation is useful when it is
otherwise the wiper motor may be damaged.
drizzling, etc. The wipers will continue to
operate while the lever is held in the “MIST”
position.
1- Fast
2- Slow
MIST- Misting function
NOTE
The wipers will operate once.
z The speed-sensitive-operation function of
OFF- Off
the windshield wipers can be deactivated.
AUTO- Auto-wiper control
For further information, please contact your
Rain sensor
authorized Mitsubishi Motors dealer or a
The wipers will automatically
repair facility of your choice. On vehicles
operate depending on the degree of
equipped with the Smartphone-link Display
wetness on the windshield.
Audio (SDA) or the Smartphone-link Dis-
LO-
Slow
play Audio (SDA) navigation system, screen
operations can be used to make the adjust-
HI-
Fast
ment.
Refer to separate owner’s manual for details.
5-206
Features and controls

Wiper and washer switch
Rain sensor
CAUTION
NOTE
• When cleaning the outside surface of the
z
In the following cases, the rain sensor may
Can only be used when the ignition switch or
windshield, if you touch the rain sensor.
be malfunctioning. Have the vehicle checked
the operation mode is in ON.
• When cleaning the outside surface of the
at an authorized Mitsubishi Motors dealer or
windshield, if you wipe with a cloth the rain
a repair facility of your choice.
If the lever is put in the “AUTO” position, the
sensor.
• When the wipers operate at a constant inter-
rain sensor (A) will detect the extent of rain
• When using an automatic car wash.
val despite changes in the extent of rain.
(or snow, other moisture, dust, etc.) and the
• A physical shock is applied to the wind-
• When the wipers do not operate even
5
wipers will operate automatically.
screen or the rain sensor.
though it is raining.
Keep the lever in the “OFF” position if the
z
The wipers may automatically operate when
windshield is dirty and the weather is dry.
If your hands get trapped, you could suffer
things such as insects or foreign objects are
Wiper operation under these conditions can
injuries or the wipers could malfunction. Be
affixed to the windshield on top of the rain
scratch the windshield and damage the wip-
sure to turn the ignition switch to the “OFF”
sensor or when the windshield is frozen.
ers.
position or put the operation mode in OFF, or
Objects affixed to the windshield will stop
move the lever to the “OFF” position to deac-
the wipers when the wipers cannot remove
tivate the rain sensor.
them. To operate the wipers again, move the
lever to the “LO” or “HI” position.
Also, the wipers may operate automatically
NOTE
due to strong direct sunlight or electromag-
z
To protect the rubber parts of the wipers, this
netic wave. To stop the wipers, move the
operation of the wipers does not take place
lever to the “OFF” position.
even if the lever is put in the “AUTO” posi-
z
Contact an authorized Mitsubishi Motors
tion when the vehicle is stationary and the
dealer or a repair facility of your choice
ambient temperature is approximately 32 °F
when replacing the windshield glass.
(0 °C) or lower.
z
Do not cover the sensor by affixing a sticker
or label to the windshield. Also, do not put
any water-repellent coating on the wind-
CAUTION
shield. The rain sensor would not be able to
detect the extent of rain, and the wipers
z
With the ignition switch
or the
operation
might stop working normally.
mode in ON and the lever in the “AUTO”
position, the wipers may automatically oper-
ate in the situations described below.
Features and controls
5-207
Wiper and washer switch
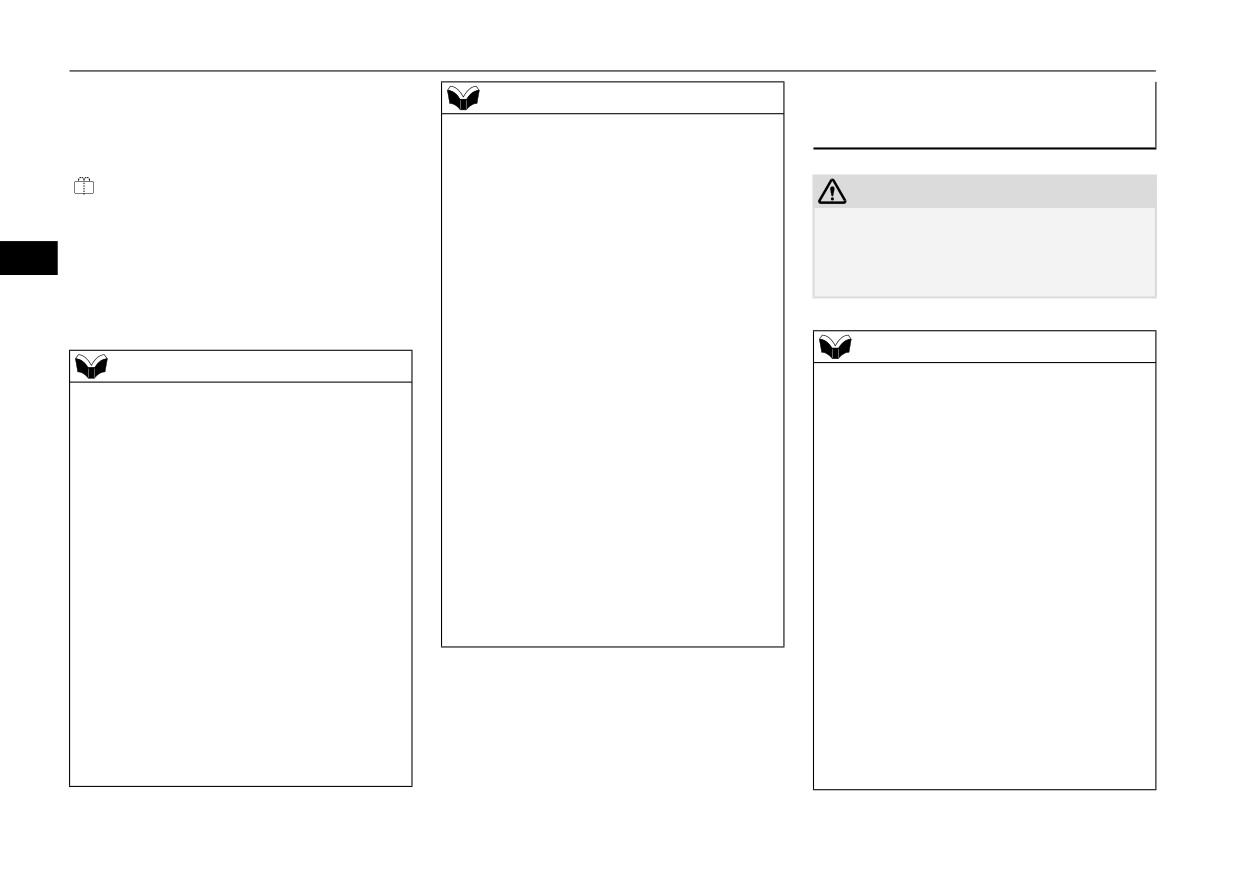
To adjust the sensitivity of the rain sen-
NOTE
Misting function
sor
z Automatic wiper operation (rain sensitive)
Move the lever in the direction of the arrow
can be changed to intermittent operation,
With the lever in the “AUTO” position, it is
and release, to operate the wipers once.
either vehicle speed sensitive or not vehicle
possible to adjust the sensitivity of the rain
speed sensitive.
sensor by turning the knob (B).
For further information, please contact your
Use this function when you are driving in
authorized Mitsubishi Motors dealer or a
mist or drizzle.
repair facility of your choice.
The wipers will operate once if the lever is
5
On vehicles equipped with the SDA or the
raised to the “MIST” position and released
SDA navigation system, screen operations
when the ignition switch or the operation
can be used to make the adjustment.
mode is in ON or ACC. The wipers will con-
Refer to the separate owner’s manual for
tinue to operate while the lever is held in the
details.
“MIST” position.
“+”- Higher sensitivity to rain
“-”- Lower sensitivity to rain
5-208
Features and controls

Wiper and washer switch
The wipers will operate once if the lever is
Intelligent washer
moved to the “AUTO” position and the knob
(C) is turned in the “+” direction when the
By releasing the lever soon after pulling it
ignition switch or the operation mode is in
toward you, the washer fluid will be sprayed
ON.
several times while the wipers are operating
several times.
Intelligent washer will stop operating with
any operation of the lever.
5
Rear window wiper and washer
N00523201535
NOTE
The rear window wiper and washer can be
z
It is possible to modify functions as follows:
operated when the ignition switch or the
• Intelligent washer can be deactivated.
operation mode is in ON or ACC.
Refer to
“Intelligent washer” on page
5-209.
Turn the knob
to operate the rear
window
• The wipers can be set to operate again after
wiper.
approximately 6 seconds.
Windshield washer
These functions are not activated when the
N00504601471
vehicle is shipped from the factory.
The windshield washer can be operated with
To activate or deactivate these functions,
the ignition switch or the operation mode in
please contact your authorized Mitsubishi
ON or ACC.
Motors dealer.
The washer fluid will be sprayed onto the
On vehicles equipped with the SDA or the
windshield by pulling the lever toward you.
SDA navigation system, screen operations
can be used to make the adjustment.
When the wipers are not in operation or in
Refer to the separate owner’s manual for
intermittent operation, by pulling the lever
details.
toward you, the wipers will operate several
times while the washer fluid is being sprayed.
OFF- Off
Features and controls
5-209
Wiper and washer switch
INT- The wiper operates continuously for
NOTE
Precautions to observe when
several seconds then operates inter-
On vehicles equipped with the SDA or the
using wipers and washers
mittently at intervals of approxi-
SDA navigation system, screen operations
mately 8 seconds.
N00523501277
can be used to make the adjustment.
-
Washer fluid will be sprayed onto
Refer to the separate owner’s manual for
CAUTION
the rear window glass while the
details.
z
If the washer is used in cold weather, the
knob is turned fully in either direc-
z
If the knob is in the “OFF” position, turn the
washer fluid sprayed onto the glass might
tion.
knob to the “INT” position twice quickly to
5
freeze, blocking your view. Heat the glass
When the washer fluid is sprayed,
operate the rear window wiper continuously.
with the defroster before using the washer.
the wiper will automatically operate
(continuous operation mode)
two or three times.
Turn the knob to the “OFF” position to stop
the rear window wiper continuous operation.
NOTE
z
The wiper intermittent operation time can be
NOTE
z
Do not use the wipers when the windshield is
adjusted.
z
The rear window wiper will automatically
dry. This could scratch the glass and wear the
See your authorized Mitsubishi Motors
perform several continuous operations if the
wiper blades prematurely.
dealer for details.
selector lever is put in the “R” (REVERSE)
On vehicles equipped with the SDA or the
z
Before using the wipers in cold weather,
position while the windshield wipers or the
SDA navigation system, screen operations
check to be sure that the wiper blades are not
rear window wiper is operating. (automatic
can be used to make the adjustment.
frozen to the windshield or rear window.
operation mode)
Refer to the separate owner’s manual for
Using the wipers while the blades are frozen
After the automatic operation, the rear win-
details.
could cause the wiper motor to burn out.
dow wiper will stop operating if the knob is
z
The washer fluid reservoir is located in the
z
If the moving wipers become blocked part-
in the “OFF” position. If the knob is in the
engine compartment.
way through a sweep by ice or other deposits
“INT” position, the rear window wiper will
Check the fluid level regularly and refill if
on the glass, the wipers may temporarily stop
return to the intermittent operation.
necessary. Refer to “Washer fluid” on page
operating to prevent the motor from over-
It is possible to set the rear window wiper to
9-9.
heating. In this case, park the vehicle in a
perform the automatic operation only if the
safe place, turn the ignition switch to the
selector lever is put in the “R” (REVERSE)
“OFF” position or put the operation mode in
position while the rear window wiper is
OFF, and then remove the ice or other depos-
operating with the knob in the “INT” posi-
its.
tion.
Because the wipers will start operating again
See your authorized Mitsubishi Motors
after the wiper motor cools down, check that
dealer for details.
the wipers operate before using them.
5-210
Features and controls
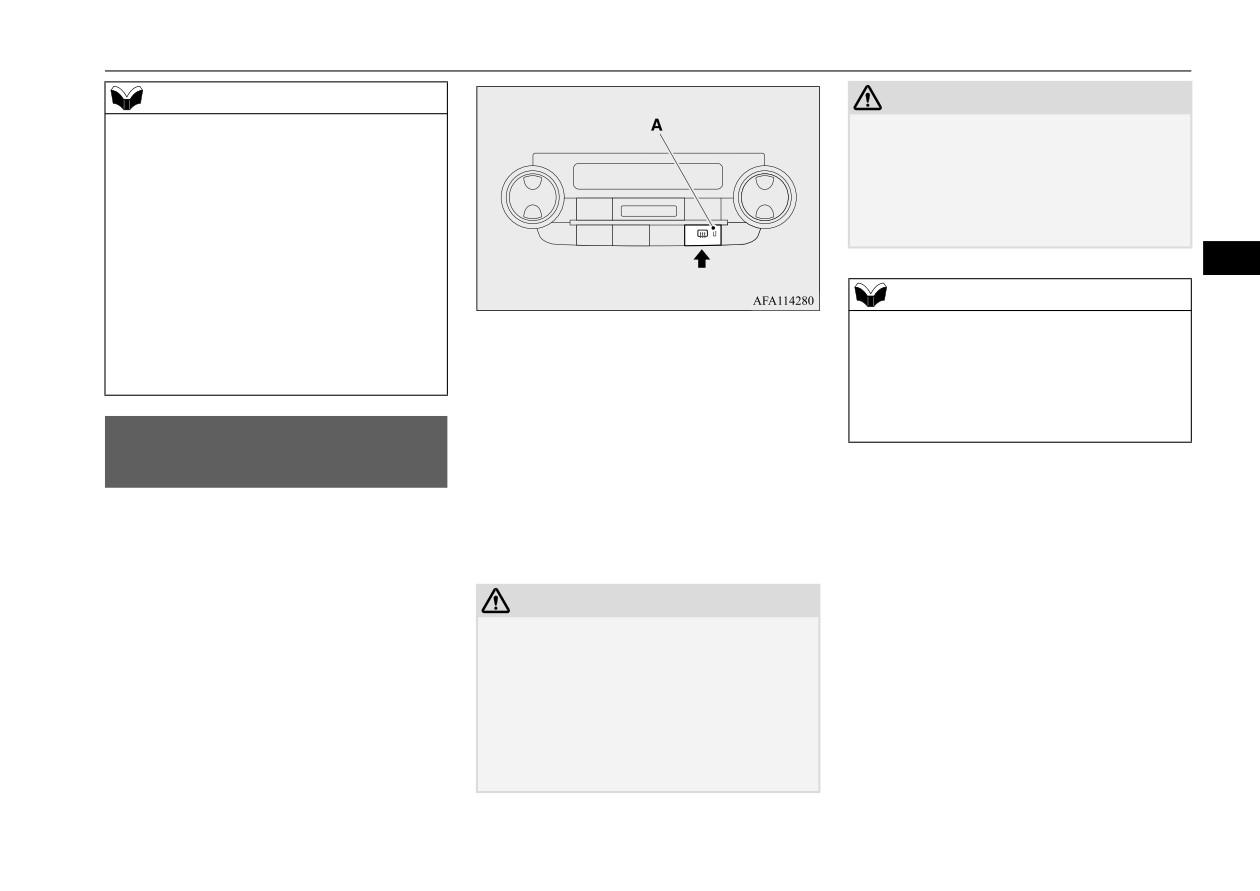
Electric rear window defogger switch
NOTE
CAUTION
z Avoid using the washer for more than 20 sec-
z
Do not place stickers, tape, or other items
onds at a time. Do not operate the washer
that are attached with adhesive over the grid
when the washer fluid reservoir is empty or
wires on the rear window.
the pump may fail.
z
When cleaning the inside rear window, use a
z During cold weather, add a recommended
soft cloth and wipe lightly over the grid
washer solution that will not freeze in the
wires.
washer fluid reservoir. Otherwise the washer
5
may not work or may be damaged.
z Replace the wiper blades when they are
NOTE
worn. Use the proper size replacement
z
If your vehicle is equipped with the heated
blades. For further information, please con-
After approximately
15 to
20 minutes of
outside rearview mirror, the mist can also be
tact your authorized Mitsubishi Motors
operation, the system will shut off automati-
removed from the outside rearview mirrors
dealer.
when the rear window defogger switch is
cally.
pressed. Refer to “Heated outside rearview
To switch the defogger OFF before 15 to
mirror” on page 5-60.
Electric rear window defog-
20 minutes have passed, press the switch
again. The indicator light will go out and the
ger switch
defogger will turn off.
N00523701598
If you need the defogger for more than 15 to
The rear window defogger can be used when
20 minutes, press the switch again. This will
the engine is running.
add 15 to 20 more minutes.
The indicator light (A) will come on when
you press the electric rear window defogger
CAUTION
switch. Electric current will flow through the
z The rear window defogger is not designed to
heating wires on the rear window to help
melt snow. Remove any snow manually
clear away moisture or frost.
before using the rear window defogger.
z Use the rear window defogger only after the
engine has started and is running. Be sure to
turn the defogger switch off immediately
after the window is clear to save on battery
power.
Features and controls
5-211

Heated steering wheel switch (if so equipped)
NOTE
Heated steering wheel
z
It is possible to change the setting to make
switch (if so equipped)
the rear window defogger operate automati-
N00589100087
cally when ambient temperature becomes
low while the engine is running, even if you
The heated steering wheel contains internal
do not push the rear window defogger
heaters in the rim. Heating areas are shown in
switch.
the illustration.
It operates automatically only once after
5
turning the ignition switch to the “ON” posi-
tion or putting the operation mode in ON.
If you choose this setting, the heated outside
rearview mirror (if so equipped) will also
operate automatically at the same time.
WARNING
For further information, please contact your
z
Persons who are unable to feel tempera-
authorized Mitsubishi Motors dealer.
ture change or skin pain due to age, ill-
On vehicles equipped with the Smartphone-
ness, injury, medication, fatigue or other
link Display Audio
(SDA) or the Smart-
physical conditions or who have sensitive
phone-link Display Audio (SDA) navigation
skin may suffer burns when using the
system, screen operations can be used to
heated steering wheel. To reduce the risk
make the adjustment.
of burns, people with such conditions must
Refer to the separate owner’s
manual for
: Heating area
use care when using the heated steering
details.
wheel.
The heated steering wheel can
be operated
when the operation mode is in ON.
CAUTION
To turn on the heated steering wheel, push the
z
If water or any other liquid is spilled on the
heated steering wheel switch. The heated
steering wheel, allow it to dry thoroughly
steering wheel will operate for approximately
before attempting to use the heated steering
30 minutes and then it will automatically turn
wheel. Turn the heated steering wheel off
off.
immediately if it appears to be malfunction-
The indicator light (A) will illuminate while
ing during use.
the heated steering wheel is operating.
z
Also be aware that using the heated steering
wheel with the engine off may run the bat-
tery down.
5-212
Features and controls

Horn switch
Horn switch
USB input terminal
How to connect a USB memory
N00523801195
N00566701269
device
You can connect your USB memory device
N00566801244
To honk the horn, press around the “
”
mark on the steering wheel.
or iPod* to play music files stored in the USB
1. Park your vehicle in a safe place and turn
memory device or iPod.
the ignition switch to the “OFF” position
or put the operation mode in OFF.
*: “iPod” is a registered trademark of Apple
Inc. in the United States and other countries.
2. Connect a commercially available USB
5
connector cable (B) to the USB memory
The USB input terminal (A) is located in the
device (A).
indicated position.
Type 1
Type 2
3. Connect the USB connector cable to the
USB input terminal.
This section explains how to connect and
remove a USB memory device or iPod.
NOTE
z Do not connect the USB memory device to
the USB input terminal directly.
The USB memory device may be damaged.
Features and controls
5-213

Sun visors
4. To remove the USB connector cable, turn
Display Audio (SDA)”, the “Smartphone-link
Sun visors
the ignition switch to the “OFF” position
Display Audio (SDA) navigation system” or
N00524601419
or put the operation mode in OFF first and
the “DISPLAY AUDIO”.
Pull the sun visor downward (1) to reduce
perform the installation steps in reverse.
front glare while driving. To reduce side
glare, turn the visor to the side (2).
How to connect an iPod
N00566901274
5
1. Park your vehicle in a safe place and turn
the ignition switch to the “OFF” position
or put the operation mode in OFF.
2. Connect the connector cable to the iPod.
NOTE
z Use a genuine connector cable from Apple
Inc.
3. Connect the connector cable to the USB
input terminal.
NOTE
z Pull the sun visor sideways to eliminate side
4. To remove the connector cable, turn the
glare farther to the rear. (if so equipped)
ignition switch to the “OFF” position or
put the operation mode in OFF first and
perform the installation steps in reverse.
Types of connectable devices
and supported file specifica-
tions
N00567001142
For details, please refer to the separated
owner’s manual for the
“Smartphone-link
5-214
Features and controls

12 V power outlets
Vanity mirror
Type 2
CAUTION
z Do not leave plastic cards in the ticket
A vanity mirror is fitted to the back of the sun
holder. Because the inside of the vehicle will
visor.
become hot if the vehicle is parked in strong
Type 1
sunlight, the cards could deform or crack.
A vanity mirror is fitted to the back of the sun
visor.
Operating the lid of the vanity mirror will
12 V power outlets
5
automatically turn on the mirror light (A).
N00525001771
CAUTION
z
Be sure to use a “plug-in” type accessory
operating at
12 V and at 120 W or less.
When using more than one socket at the
same time, make sure the total power con-
sumption of the electrical accessories does
not exceed 120 W at 12 V.
Ticket holder
z
Also be aware that using electronic equip-
ment with the engine off may run the battery
down.
The holder (B) is located on the back of the
z
When the power outlet is not in use, be sure
sun visor.
to close the power outlet cover or replace the
cap. This will prevent the power outlet from
CAUTION
becoming clogged and short circuiting.
z
If the lid of the vanity mirror with light is
kept open for prolonged periods of time, the
vehicle’s battery will be discharged.
To use a “plug-in” type accessory, open the
cover or remove the cap, and insert the plug
in the power outlet.
NOTE
z Two 12V power outlets can be used simulta-
neously.
Features and controls
5-215

HomeLink® Wireless Control System (if so equipped)
Type 1
Type 2
calling the toll-free HomeLink®-Hotline at 1-
Accessories can be operated when the igni-
Accessories can be operated in all ignition
800-355-3515.
tion switch or the operation mode is in ON or
switch positions or all operation modes.
ACC.
WARNING
Floor console
z
Do not use HomeLink® with any garage
Center console
door opener that lacks safety stop and
5
reverse features as required by U.S. Fed-
eral Regulations. A garage door opener
which cannot detect an object in the path
of a closing garage door and then auto-
matically stop and reverse, does not meet
current U.S. Federal Regulations. Using a
garage door opener without these features
increases the risk of serious injury or
death.
z
During programming, your garage door
or gate may open or close. Make sure that
HomeLink® Wireless Con-
people and objects are clear of the garage
trol System (if so equipped)
door or gate that you are programming.
N00554301095
HomeLink® and the HomeLink® house icon
NOTE
are registered trademarks of Gentex Corpora-
z
Once HomeLink® is programmed, retain the
tion.
original transmitter for future programming
procedures (for example, new vehicle pur-
HomeLink® provides a convenient way to
chases). Upon sale of the vehicle, the pro-
replace up to
3 hand-held radio-frequency
grammed HomeLink® buttons should be
(RF) transmitters used to activate devices
erased for security purposes. Refer to “Clear-
such as gate operators, garage door openers,
ing the programmed information” on page
entry door locks, security systems, even home
5-220.
lighting. Additional HomeLink® information
can be found at www.homelink.com,
5-216
Features and controls

HomeLink® Wireless Control System (if so equipped)
NOTE
Before programming Home-
z
You can program a maximum of 3 devices.
Link®
To change or replace any of the 3 devices
N00584600029
after it has been initially programmed, you
z
Some garage door openers manufactured
must first erase the current settings.
after 1995 have “rolling code protection”.
Refer to “Clearing the programmed informa-
To program a garage door opener
tion” on page 5-220 or “Reprogramming a
equipped with “rolling code protection”;
single HomeLink® button” on page 5-221.
you will need to access the garage door
5
opener motor to press the motor’s
“Learn” or “Smart” buttons. For conve-
nience, use a ladder and another person to
assist you.
NOTE
z
It is recommended that a new battery be
z
You do not need to continue holding the
placed in the hand-held transmitter of the
HomeLink® button.
device being programmed to HomeLink®
z
If the indicator light does not flash, refer to
for quicker training and accurate trans-
“Clearing the programmed information” on
page 5-220.
mission of the radio-frequency signal.
2. Position the end of your hand-held trans-
1-
HomeLink® button 1
Programming a new Home-
mitter (B) 1 to 3 inches (2 to 8 cm) away
2-
HomeLink® button 2
Link®
from the HomeLink® button while keep-
3-
N00584700046
HomeLink® button 3
ing the indicator light in view.
To program HomeLink® to operate a garage
door, gate, entry door opener, home or office
lighting, you need to be at the same location
as the device.
1. Press the HomeLink® button that you
would like to program. The indicator light
(A) will flash orange slowly.
Features and controls
5-217