Mitsubishi Outlander Sport (2022 year). Manual in english - page 12
Interior lights
z When the key was used to start the
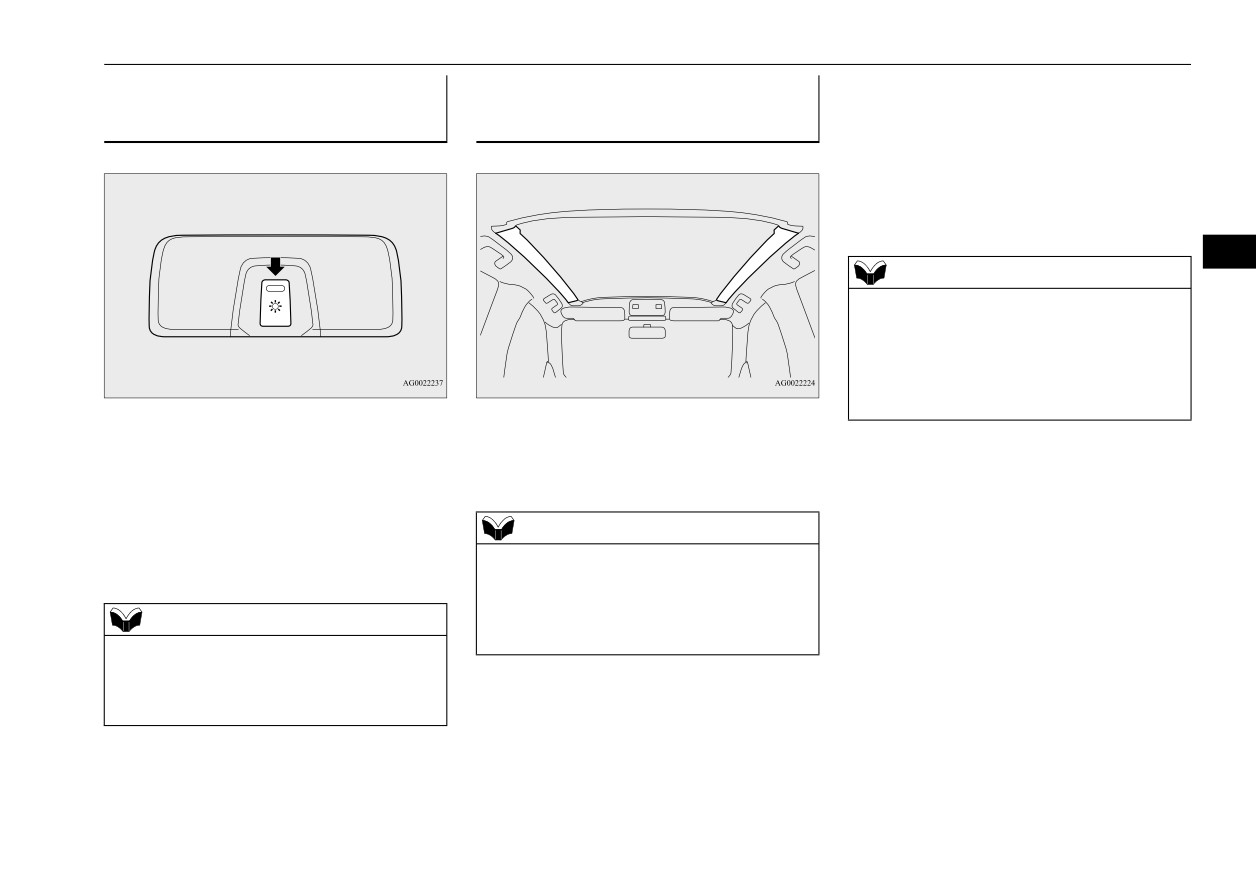
Sunshade illumination dim-
Sunshade illumination (if so
engine, the key is removed while all doors
ming control switch
(if so equipped)
equipped)
and the liftgate remain closed.
N00568500020
N00568601031
z For vehicles equipped with the F.A.S.T.-
key, the operation mode is put in OFF
while the engine is running and the doors
and the liftgate are closed.
5
NOTE
z The time until the sunshade illumination
goes off can be adjusted. If it is adjusted, the
time until the dome light go off is also
adjusted automatically at the same time.
See your authorized Mitsubishi Motors
dealer for details.
The brightness of the sunshade illumination
The sunshade illumination turns on when the
can be adjusted to 3 different levels when the
ignition switch or the operation mode is in
The sunshade illumination also turns on when
ignition switch or the operation mode is in
ON or ACC.
a door or the liftgate is opened, and goes off
ON or ACC.
30 seconds after the door or the liftgate is
Each time you press the switch, the bright-
NOTE
closed, even when the engine switch is in the
ness switches in sequence from high mid-
“OFF” position or the operation mode is in
z The sunshade illumination does not turn on if
dle low off high.
the sunshade illumination dimming control
OFF.
switch is off.
However, the sunshade illumination immedi-
NOTE
Refer to
“Sunshade illumination dimming
ately goes off in the following cases.
control switch” on page 5-175.
z The brightness can be adjusted even when
z When the power door lock function is
the ignition switch is in the “OFF” position
or the operation mode is in OFF, provided
used to lock the vehicle.
When the sunshade illumination is turned on,
that the sunshade illumination is turned on.
z When the remote control transmitter of
it will go off approximately 30 seconds after
the keyless entry system or the F.A.S.T.-
the following operation is performed.
key is used to lock the vehicle.
Features and controls
5-175

Storage spaces
z If the vehicle is equipped with the
NOTE
F.A.S.T.-key, when the F.A.S.T.-key is
z The interior light auto-cutout function can be
used to lock the vehicle.
deactivated.
The time until the lights automatically go off
NOTE
can be adjusted. See your authorized
Mitsubishi Motors dealer for details.
z
When the doors other than the driver’s door
and liftgate are closed if the driver’s door is
closed while its lock knob is in the lock posi-
5
tion, the light goes off immediately.
Storage spaces
z
The sunshade illumination does not turn on if
N00526400469
the sunshade illumination dimming control
switch is off.
CAUTION
z
The time until the sunshade illumination
z
Never leave lighters, carbonated drink cans,
Interior light auto-cutout func-
goes off can be adjusted. If it is adjusted, the
or spectacles in the cabin when parking the
time until the dome light go off is also
tion (dome light and other
vehicle in hot sunshine. The cabin will
adjusted automatically at the same time. See
lights)
become extremely hot, so lighters and other
your authorized Mitsubishi Motors dealer for
N00526301452
flammable items may catch fire and
details.
unopened drink cans (including beer cans)
z If any of the interior lights are left
may rupture. The heat may also deform or
switched on with the ignition switch is in
crack plastic spectacle lenses and other spec-
the “OFF” position or the operation mode
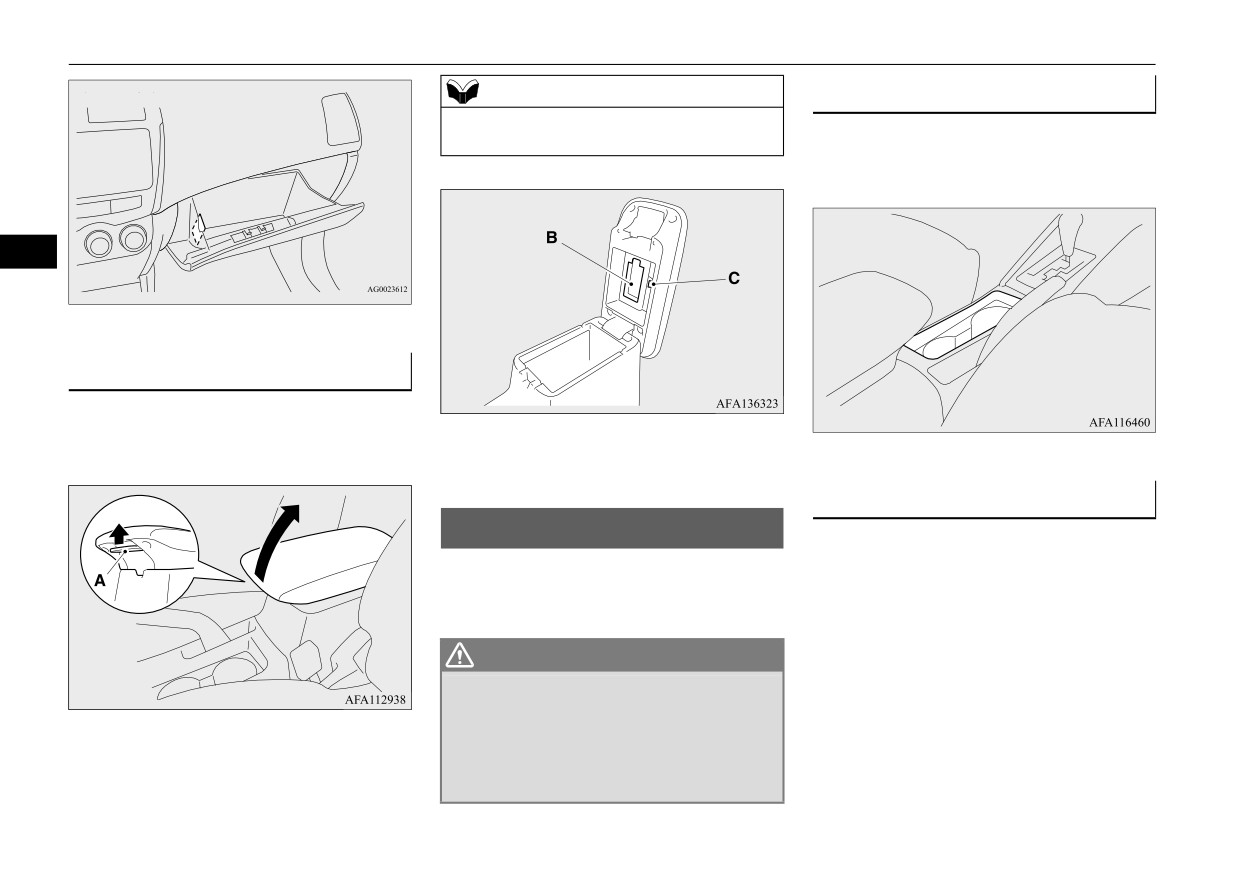
Center console down light
tacle parts that are made of plastic.
is in OFF, it goes off automatically after
N00596100047
z
Keep the lids of storage spaces closed while
approximately 30 minutes.
driving the vehicle. A lid or the contents of a
The center console down light illuminates
z The lights will illuminate again after they
storage space could otherwise cause injuries
when the light switch is in the “
” or “
”
automatically go off if the ignition switch
during a sudden stop.
position. When the light switch is in the
or the engine switch is operated, or if the
“AUTO” position, the center console down
keyless entry system or the F.A.S.T.-key
light also illuminates when the parking lights
is operated.
NOTE
illuminate.
z
Do not leave valuables in any storage space
when leaving the vehicle.
5-176
Features and controls

Storage spaces
5
1- Floor console box
2- Glove compartment
NOTE
NOTE
z When the lights are illuminated with the
z There is a limit to the size of pens that can be
light switch in the “
”, “
”, or “AUTO”
stored in the holder. Forcing large pens into
Glove compartment
position, the glove compartment light illumi-
the holder could cause damage.
N00551501360
nates.
WARNING
Card holder
z An open glove compartment door can
Pen holder
cause a serious injury or death to the front
There is a card holder inside the glove com-
passenger in an accident, even if the pas-
There is a pen holder inside the glove com-
partment.
senger is wearing his/her seat belt. Always
keep the glove compartment door closed
partment.
when driving.
To open, pull the lever (A).
Features and controls
5-177
Cup holders
NOTE
For the front seat
z The floor console box can also be used as an
arm rest.
The cup holder is located in front of the floor
console.
5
Floor console box
N00551601361
To open the console box, lift the release lever
B- Tissue holder
(A) and raise the lid.
C- Pen holder
For the rear seat
N00537001244
Cup holders
N00527301547
In order to use the cup holder, allow the arm
rest (A) to drop down.
The cup holder is designed for holding cups
or drink-cans securely in its holes.
WARNING
z Do not spray water or spill beverages
inside the vehicle. If the switches, wires, or
electrical components become wet, they
A pocket-sized tissue pack and a pen can be
could malfunction or cause a vehicle fire.
stored on the underside of the floor console
If you accidentally spill a beverage, wipe
box lid.
up as much liquid as possible.
5-178
Features and controls
Bottle holder
There are bottle holders located on the front
Cargo area cover (if so
doors.
equipped)
N00500101058
CAUTION
z Do not place luggage or other items on the
cargo area cover. Any items on the cargo
5
area cover would obstruct your rearward
view, and they could fly forward and cause
injuries or other mishap in the event of hard
braking.
Bottle holder
N00502801088
To install
NOTE
WARNING
z
Make sure all lids are tightly closed when
1. Insert the concave portion
(A) on the
z Do not spray water or spill beverages
storing beverages that are in plastic bottles,
underside of the cargo area cover into the
inside the vehicle. If the switches, wires, or
etc.
inside protruding portion (B) of the lift-
electrical components become wet, they
z
Some beverages may not be stored, depend-
gate.
could malfunction or cause a vehicle fire.
ing on the size and shape of the plastic bot-
If you accidentally spill a beverage, wipe
tles, etc.
up as much liquid as possible.
CAUTION
z Drink beverages while driving your vehicle
is distracting and can cause an accident.
z Vibration and shaking while driving may
cause beverages to spill. Be very careful, as
spilling hot beverages could cause burns.
Features and controls
5-179

Assist grips
body weight. They are intended for use only
CAUTION
while seated in the vehicle.
z Lightly push the cargo area cover to make
sure that the concave portion
(A) is set
firmly in the protruding portion (B) of the
liftgate. If the cargo area cover is not
securely locked in place, it could unhook
while driving and cause injuries.
5
2. Hang the strap (C) of the cargo area cover
on the hook (D).
WARNING
z Do not put a hanger or any heavy or
pointed object on the coat hook. If the cur-
CAUTION
tain airbag was activated, any such item
z Do not use the assist grips when getting into
could be propelled away with great force
or out of the vehicle. The assist grips could
and could prevent the curtain airbag from
detach causing you to fall.
inflating correctly. Hang clothes directly
on the coat hook (without using a hanger).
Make sure there are no heavy or sharp
objects in the pockets of clothes that you
Coat hook
hang on the coat hook.
N00553600153
To remove
There is a coat hook on the rear seat assist
grip of the driver’s side.
Follow this procedure in reverse to remove.
Assist grips
N00559000061
The assist grips (located above the doors on
the headliner) are not designed to support
5-180
Features and controls

Luggage hooks
Luggage hooks
N00528501298
There are hooks on the sides of the luggage
compartment for use in securing luggage.
5
CAUTION
z Do not load the luggage higher than the top
of the seatback.
Be sure that luggage is firmly secured.
Restricted rear vision or flying objects enter-
ing the passenger compartment during sud-
den braking could result in a serious
accident.
Features and controls
5-181
Driving safety
Driving precaution
6-2
Fuel economy
6-2
Driving, alcohol and drugs
6-2
Floor mat
6-3
6
Vehicle preparation before driving
6-4
Safe driving techniques
6-4
Driving during cold weather
6-5
Braking
6-5
Parking
6-6
Loading information
6-6
Cargo loads
6-10
Trailer towing
6-12
Driving precaution
to perform satisfactorily in off-road condi-
z
Keep your tires inflated to the recom-
Driving precaution
tions.
mended pressures.
N00629301106
Always drive safely and steer the vehicle
z
When you drive on highways or dry
carefully. Avoid operating the vehicle in a
improved roads, set the drive mode-selec-
WARNING
manner that might require sharp turns or
tor “2WD” or “4WD AUTO” position (if
z Utility vehicles have a significantly higher
abrupt maneuvers. As with other vehicles of
so equipped).
rollover rate than other types of vehicles.
this type, failure to operate this vehicle cor-
z
For freeway driving, maintain a speed of
Avoid abrupt maneuvers and excessive
rectly can result in loss of control or vehicle
approximately 50 mph (80 km/h) when
speed. Always buckle up.
rollover.
traffic, roadway and weather conditions
In a rollover crash, an unbelted person is sig-
safely permit.
6
Your vehicle has been designed for both nor-
nificantly more likely to die than a person
z
Keep your air filter clean and your vehicle
mal and occasional off-road use. However,
wearing a seat belt. Before starting the vehi-
lubricated according to the recommenda-
avoid driving the vehicle through areas where
cle, always make certain that you and all your
tions in this manual.
the tires may get stuck in deep sand or mud as
passengers are properly wearing their seat
z
Always keep your vehicle well main-
your vehicle is designed primarily for use on
belts (with children in the rear seat, in appro-
tained. A poorly maintained engine
pavement, unlike a conventional off-road
priate restraints).
wastes fuel and costs money.
vehicle.
z
Never overload your vehicle.
Keep in mind that 2-wheel drive vehicles are
less capable than 4-wheel drive vehicles for
Fuel economy
driving on muddy, slippery, wet or snow-cov-
N00628800152
Driving, alcohol and drugs
ered roads.
N00628900049
Fuel economy is dependent on many factors.
Utility vehicles have higher ground clearance
Your personal driving habits can have a sig-
Drunk driving is one of the most frequent
and a narrower track, which enables them to
nificant effect on your fuel use. Several rec-
causes of accidents.
perform in a wide variety of off-road situa-
ommendations for achieving the greatest fuel
Your driving ability can be seriously impaired
tions. Because of the higher ground clear-
economy are listed below.
even with blood alcohol levels far below the
ance, these vehicles have a higher center of
legal minimum. If you have been drinking,
gravity, which makes them handle differently
z Whenever accelerating from a stop,
don’t drive. Ride with a designated non-
than ordinary vehicles when driving on pave-
always accelerate slowly and smoothly.
drinking driver, call a cab or a friend, or use
ment. They are not designed to maneuver or
z When parked for even a short period, do
public transportation. Drinking coffee or tak-
corner at the same speed on pavement as con-
not idle the engine. Shut it off.
ing a cold shower will not make you sober.
ventional 2-wheel drive passenger cars any
z Plan your trips to avoid unnecessary
Similarly, prescription and nonprescription
more than low-slung sports cars are designed
stops.
drugs affect your alertness, perception and
reaction time. Consult with your doctor or
6-2
Driving safety
Floor mat
pharmacist before driving while under the
2. Align the floor mat with the installation
WARNING
influence of any of these medications.
holes over the retaining clips.
z
Always install the mat with the correct
3. Secure the floor mat with retaining clips.
side facing down.
WARNING
z
Never install a second mat over or under
z NEVER DRINK AND DRIVE.
an existing floor mat.
Your perceptions are less accurate, your
z
Do not use a floor mat designed for
reflexes are slower and your judgment is
another model vehicle even if it is a
impaired.
Mitsubishi genuine floor mat.
z
Before driving, be sure to check the fol-
lowing:
6
• Periodically check that the floor mat is
Floor mat
properly secured with the retaining clips.
N00628600046
If you remove the floor mat while clean-
The original equipment floor mat provided
ing the inside of your vehicle or for any
with your vehicle was specifically designed
other reason, always check the condition
for your vehicle. Always properly position
of the floor mat after it has been rein-
NOTE
the floor mat and assure it does not interfere
stalled.
z
The shape of the mat and the number of
with operation of the pedals. Always use the
• While the vehicle is stopped with the
retaining clips may vary depending on the
retaining clip on the driver’s floorboard to
engine off, check that the floor mat is not
vehicle model.
interfering with the pedals by depressing
secure the floor mat. When used, this clip will
the pedals fully.
help prevent the floor mat from moving for-
ward and possibly interfering with the opera-
WARNING
tion of the pedals. To prevent the floor mat
z
If a floor mat is the wrong size or is not
from moving forward and possibly interfering
properly installed, it can interfere with the
with the operation of the pedals, Mitsubishi
operation of the pedals. Interference with
genuine floor mats are recommended.
the pedals can cause unintended accelera-
tion and/or increased stopping distances
resulting in a crash and injury. Always
To install the floor mat
make sure the floor mat does not interfere
N00628700047
with the accelerator or brake pedal.
1. Place the floor mat to fit the shape of the
z
Always use the retaining clip on the
floorboard.
driver’s floorboard to secure the floor
mat.
Driving safety
6-3
Vehicle preparation before driving
Vehicle preparation before
Defrosters
Lights
driving
Check these by selecting the defroster mode,
Have someone watch while you turn all the
N00629001855
and set the blower switch on high. You should
exterior lights on and off. Also check the turn
For a safer and more enjoyable trip, always
be able to feel the air blowing against the
signal indicators and high-beam indicators on
check for the following:
windshield.
the instrument panel.
Refer to
“Defrosting or defogging
(wind-
Seat belts and seats
shield, door windows)” on page 7-8, 7-14.
Fluid leaks
6
z
Before starting the vehicle, make certain
Tires
that you and all passengers are seated and
Check the ground under the vehicle after
wearing their seat belts properly
(with
parking overnight, for fuel, water, oil, or
children in the rear seat, in appropriate
Check all the tires for heavy tread wear or
other leaks. Make sure all the fluid levels are
restraints), and that all the doors and lift-
uneven wear patterns. Look for stones, nails,
correct. Also, if you can smell fuel, you need
gate are locked.
glass, or other objects stuck in the tread. Look
to find out why immediately and have it
z
Move the driver’s seat as far backward as
for any tread cuts or sidewall cracks. Check
fixed.
possible, while still keeping good visibil-
the wheel nuts for tightness, and the tires
ity, and good control of the steering
(including spare tire) for proper pressure.
Safe driving techniques
wheel, brakes, accelerator, and controls.
Replace your tires before they are heavily
N00629201150
Check the instrument panel indicators and
worn out.
multi-information display for any possible
As your vehicle is equipped with a tire pres-
Even this vehicle’s safety equipment, and
problem.
sure monitoring system, there is a risk of
your safest driving, cannot guarantee that you
z
In the same way, the front passenger seat
damage to the tire inflation pressure sensors
can avoid an accident or injury. However, if
should also be moved as far back as possi-
when the tire is replaced on the rim. Tire
you give extra attention to the following
ble.
replacement should, therefore, be performed
areas, you can better protect yourself and
z
Make sure that infants and small children
only by an authorized Mitsubishi Motors
your passengers:
are properly restrained in accordance with
dealer.
z Drive defensively. Be aware of traffic,
all laws and regulations.
road and weather conditions. Leave plenty
of stopping distance between your vehicle
and the vehicle ahead.
6-4
Driving safety
Driving during cold weather
z
Before changing lanes, check your mir-
WARNING
Braking
rors, blind spots, and use your turn-signal
z The battery gives off explosive hydrogen
N00629500491
light.
gas. Any spark or flame can cause the bat-
z
While driving, watch the behavior of
All the parts of the brake system are critical
tery to explode, which could cause serious
other drivers, bicyclists, and pedestrians.
to safety. Have the vehicle serviced by an
injury or death.
z
Always obey applicable laws and regula-
authorized Mitsubishi Motors dealer or a
Always wear protective clothes and a face
tions. Be a polite and alert driver. Always
mask when working with your battery, or
repair facility of your choice at regular inter-
leave room for unexpected events, such as
let a skilled mechanic do it.
vals according to the “WARRANTY AND
sudden braking.
MAINTENANCE MANUAL”.
z
If you plan to drive in another country,
z
Warm the engine sufficiently. After start-
6
obey their vehicle registration laws and
ing the engine, allow a short warm-up
When brakes are wet
make sure you will be able to get the right
time to distribute oil to all cylinders. Then
fuel.
drive your vehicle slowly.
Check the brake system while driving at a
z
Stay at low speeds at first so that the
low speed immediately after starting, espe-
transaxle, transfer case and rear axle oil
Driving during cold weather
cially when the brakes are wet, to confirm
have time to spread to all the lubrication
N00629401514
they work normally.
points.
z
Check the battery. At the same time,
A film of water can be formed on the brake
z Check the engine antifreeze.
check the terminals and wiring. During
discs and prevent normal braking after driv-
If there is not enough coolant because of a
extremely cold weather, the battery will
ing in heavy rain or through large puddles, or
leak or from engine overheating, add
not be as strong. Also, the battery power
after the vehicle is washed. If this occurs, dry
Mitsubishi Motors Genuine Super Long
level may drop because more power is
the brakes out by driving slowly while lightly
Life Coolant Premium or equivalent.
used for cold starting and driving.
depressing the brake pedal.
Please read this section in conjunction
Before driving the vehicle, check to see if
with the “Engine coolant” on page 9-7.
the engine runs at the proper speed and if
When driving in cold weather
the headlights are as bright as normally.
WARNING
Charge or replace the battery if necessary.
During extreme cold weather, it is possi-
z Never open the radiator cap when the
On snowy roads, ice can form on the braking
radiator is hot. You could be seriously
system, making the brakes less effective.
ble that a very low battery could freeze.
burned.
While driving in such conditions, pay close
attention to preceding and following vehicles
and to the condition of the road surface. From
Driving safety
6-5
Parking
time to time, lightly depress the brake pedal
Parking with the engine run-
Do not keep the steering wheel
and check how effective the brakes are.
ning
fully turned for a long time
When driving downhill
Never leave the engine running while you
More effort could be required to turn the
take a short sleep or rest. Also, never leave
steering wheel.
It is important to take advantage of the engine
the engine running in a closed or poorly ven-
Refer to
“Electric power steering system
braking by downshifting while driving on
tilated place.
(EPS)” on page 5-72.
steep downhill roads in order to prevent the
brakes from overheating.
6
WARNING
When leaving the vehicle
z Leaving the engine running risks injury or
Parking
death from accidentally moving the selec-
Always remove the key from the ignition
N00629601402
tor lever or from the accumulation of toxic
switch and lock all doors and the liftgate
exhaust fumes in the passenger compart-
when leaving the vehicle unattended.
ment.
Parking on a hill
Always try to park your vehicle in a well lit
area.
When parking on a hill, set the parking brake,
Where you park
and turn the front wheels toward the curb on a
Loading information
downhill, or away from the curb on an uphill.
Your front bumper can be damaged if you
N00629900408
If necessary, apply chocks to wheels.
scrape it over curbs or parking stop blocks.
Be sure that the parking brake is firmly set
It is very important to know how
Be careful when traveling up or down steep
when parked and that the selector lever is in
much weight your vehicle can carry.
slopes where your bumper can scrape the
the “P” (PARK) position.
This weight is called the vehicle
road.
When parking on a hill, it is important to set
capacity weight and includes the
the parking brake before moving the selector
weight of all occupants, cargo
lever to the “P” (PARK) position. This pre-
WARNING
vents loading the parking brake against the
z Do not park your vehicle in areas where
(including the roof load), non-fac-
transaxle. When this happens, it is difficult to
combustible materials such as dry grass or
tory-installed options, if any, being
move the selector lever out of the
“P”
leaves can come in contact with a hot
towed. The tire and loading informa-
(PARK) position.
exhaust, since a fire could occur.
tion placard located on the driver’s
door sill of your vehicle will show
6-6
Driving safety
Loading information
how much weight it may properly
z
Vehicle normal load on the tire:
z
Accessory weight: the combined
carry.
load on an individual tire that is
weight (in excess of those stan-
determined by distributing to each
dard items which may be
WARNING
axle its share of the curb weight,
replaced) of automatic transmis-
z Never overload your vehicle.
accessory weight, and normal
sion, power steering, power
Overloading can damage your
occupant weight and dividing by
brakes, power windows, power
vehicle, adversely affect vehi-
two.
seats, radio, and heater, to the
cle performance, including
z
Maximum loaded vehicle weight:
extent that these items are avail-
6
handling and braking, cause
the sum of -
able as factory-installed equip-
tire failure, and result in an
(a) Curb weight;
ment (whether installed or not).
accident.
(b) Accessory weight;
z
Vehicle capacity weight: the rated
(c) Vehicle capacity weight; and
cargo and luggage load plus
It is important to familiarize yourself
(d) Production options weight.
150 lbs (68 kg)* times the vehi-
with the following terms before load-
z
Curb weight: the weight of a
cle’s designated seating capacity.
ing your vehicle:
motor vehicle with standard
z
Production options weight: the
equipment including the maxi-
combined weight of those
z Vehicle maximum load on the tire:
mum capacity of fuel, oil, and
installed
regular
production
load on an individual tire that is
coolant.
options weighing over
5 lbs
determined by distributing to each
(2.3 kg) in excess of those stan-
axle its share of the maximum
dard items which they replace, not
loaded vehicle weight and divid-
previously considered in curb
ing by two.
weight or accessory weight,
including heavy duty brakes, ride
levelers, roof rack, heavy duty
battery, and special trim.
Driving safety
6-7
Loading information
z Normal occupant weight: 150 lbs
(68 kg)* times the number of
specified occupants.
(In your
vehicle the number is 3)
z Occupant distribution: Occupant
distribution within the passenger
compartment (In your vehicle the
distribution is 2 in front, 1 in sec-
6
ond row seat)
*:150 lbs (68 kg) is the weight of
This placard shows the maximum
one person as defined by U.S.A.
number of occupants permitted to
Steps for Determining Correct
and Canadian regulations.
ride in your vehicle as well as “the
Load Limit
combined weight of occupants and
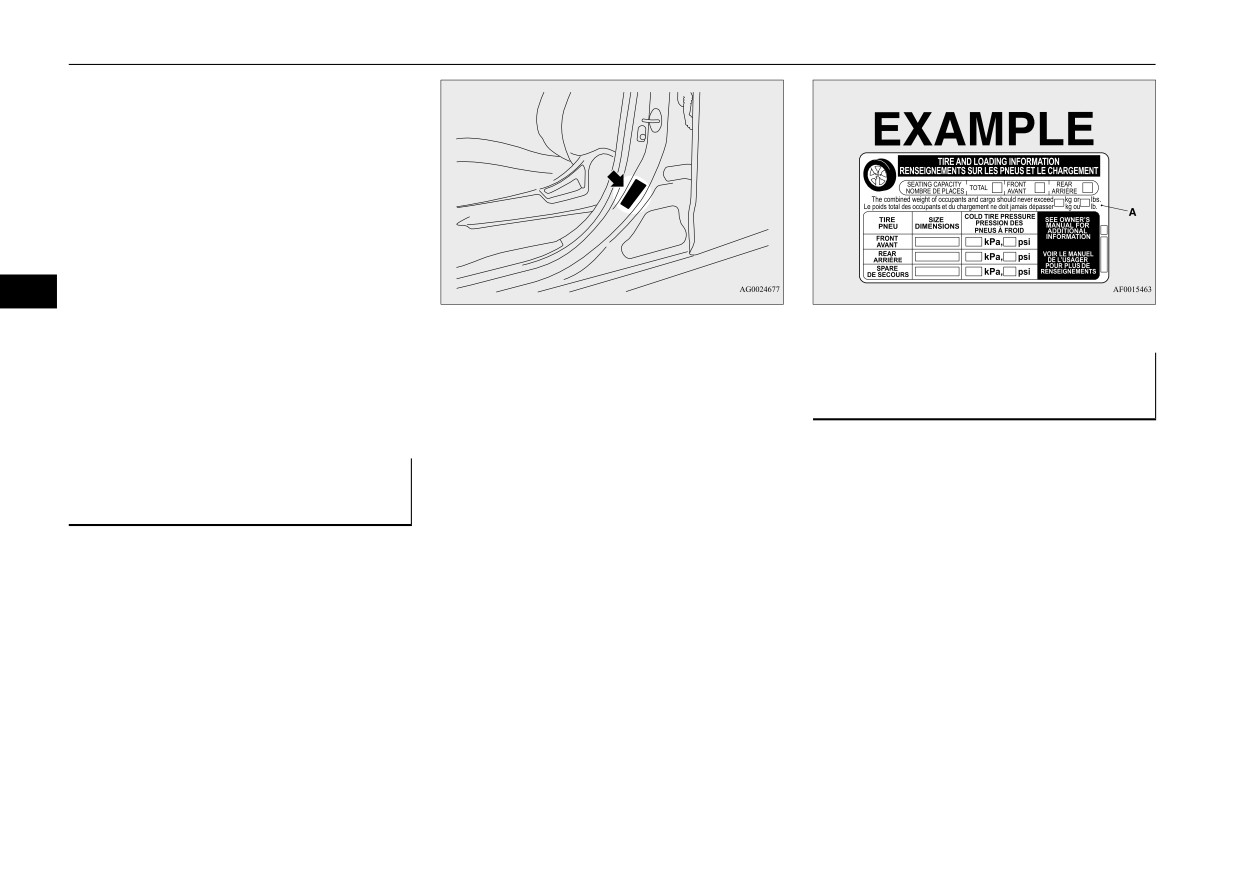
N00630201251
cargo” (A), which is called the vehi-
1. Locate the statement “The com-
Tire and loading information
cle capacity weight. The weight of
bined weight of occupants and
placard
roof load is included in the definition
cargo should never exceed XXX
N00630100383
of
“cargo” when determining the
kg or XXX lbs.” on your vehicle’s
The tire and loading information
vehicle capacity weight. This placard
placard.
placard is located on the inside sill of
also tells you the size and recom-
2. Determine the combined weight
the driver’s door.
mended inflation pressure for the
of the driver and passengers that
original equipment tires on your
will be riding in your vehicle.
vehicle. For more information, refer
3. Subtract the combined weight of
to “Tires” on page 9-14.
the driver and passengers from
XXX kg or XXX lbs.
6-8
Driving safety
Loading information
4. The resulting figure equals the
NOTE
available amount of cargo and
z
The above steps for determining
luggage load capacity. For exam-
correct load limit were written in
ple, if the “XXX” amount equals
accordance with U.S.A. regula-
1400 lbs. and there will be five
tions.
150 lbs. passengers in your vehi-
Your vehicle cannot tow
a
cle, the amount of available cargo
trailer, so step 6 is irrelevant.
and luggage load capacity is
6
650 lbs. (1400 - 750 (5 x 150) =
650 lbs.)
5. Determine the combined weight
of luggage and cargo being loaded
on the vehicle. That weight may
not safely exceed the available
cargo and luggage load capacity
calculated in Step 4.
6. If your vehicle will be towing a
trailer, load from your trailer will
be transferred to your vehicle.
Consult this manual to determine
how this reduces the available
cargo and luggage load capacity
of your vehicle.
Driving safety
6-9
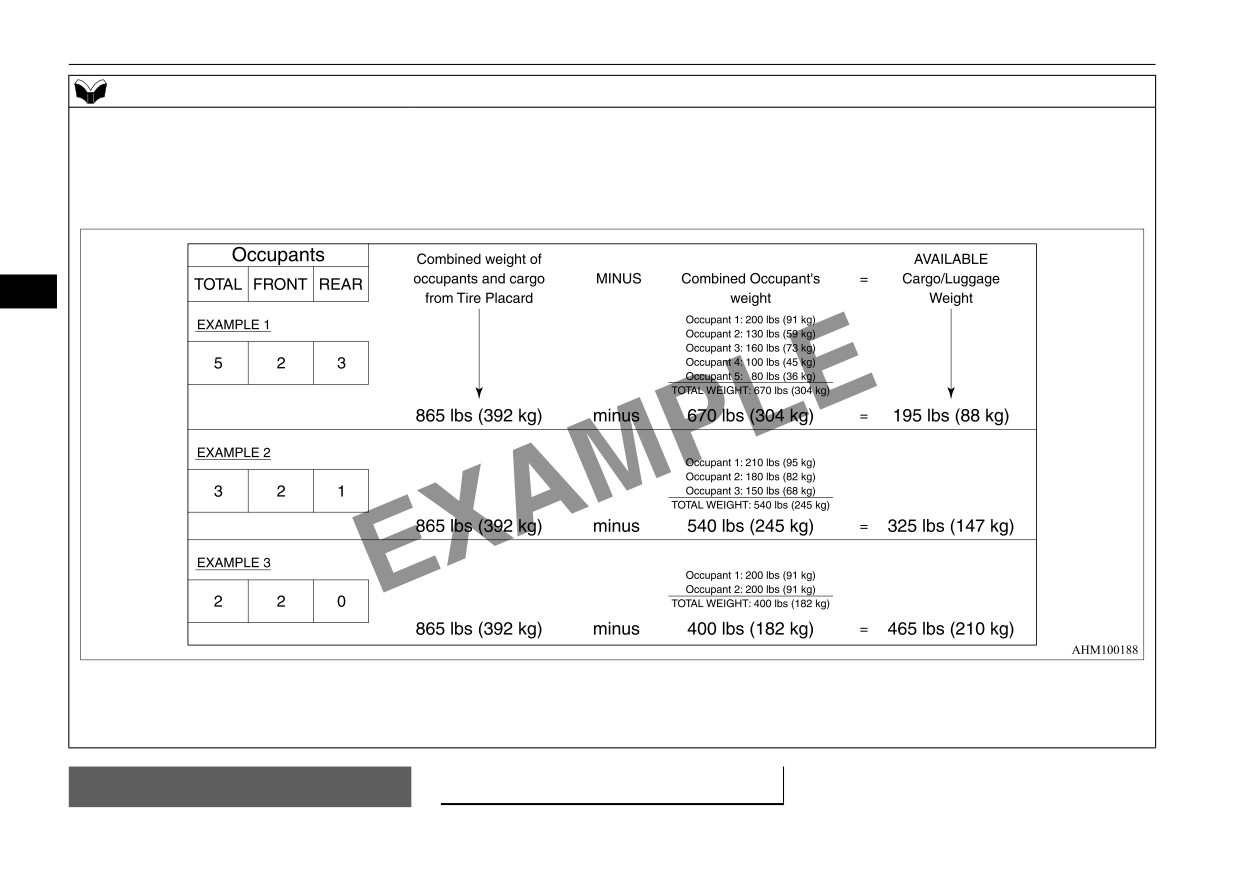
Cargo loads
NOTE
z The following table shows examples on how to calculate total cargo/load capacity of your vehicle with varying
seating configurations and number and size of occupants. This table is for illustration purposes only and may not
be accurate for the seating and load capacity of your vehicle.
z For the following example the combined weight of occupants and cargo should never exceed 865 lbs (392 kg).
6
z Under a maximum loaded vehicle condition, gross axle weight ratings (GAWR’s) for the front and rear axles
must not be exceeded. For further information on GAWR’s, vehicle loading, see the “Specifications” section of
this manual.
To determine the cargo load capacity for your
Cargo loads
Cargo load precautions
vehicle, subtract the weight of all vehicle
N00629700435
N00630301148
6-10
Driving safety

Cargo loads
occupants from the vehicle capacity weight.
WARNING
WARNING
For additional information, if needed, refer to
z Do not load cargo or luggage higher than
z The total weight of all occupants and lug-
“Steps for Determining Correct Load Limit”
the top of the seatback. Be sure that your
gage, including your roof load, must not
on page 6-8.
cargo or luggage cannot move when your
exceed the vehicle capacity weight. For
DO NOT USE the Gross Vehicle Weight Rat-
vehicle is in motion.
more information, refer to “Tire and load-
ing and Gross Axle Weight Rating numbers
Having either the rear view blocked, or
ing information placard” on page 11-2.
listed on the safety certification label
(A)
your cargo being thrown inside the cabin
z Roof load is determined by adding the
located on the inside sill of the driver’s door
if you suddenly have to brake can cause a
weight of the roof carrier and the weight
as the guide for passengers and/or cargo
serious accident or injury or death.
of the luggage placed on the roof carrier.
weight.
z Put cargo or luggage in the cargo area of
z For additional information, refer to
6
your vehicle. Try to spread the weight
“Maximum roof load” on page 11-3.
evenly.
CAUTION
Loading cargo on the roof
z
Do not load luggage directly onto the roof.
N00630401178
Use a roof carrier that properly fits your
vehicle.
WARNING
For installation, refer to the instruction man-
z
Weight placed on the roof of the vehicle
ual provided with the roof carrier.
will raise the vehicle’s center of gravity
z
Place the luggage on the carrier so that its
and adversely affect its handling charac-
weight is distributed evenly with the heaviest
teristics. As a result, driving errors or
items on the bottom. Do not load items that
emergency maneuvers could lead to a loss
are wider than the roof carrier.
of control and result in an accident. Drive
z
When attaching/removing the roof carrier
WARNING
slowly and avoid excessive maneuvers
and loading/removing luggage, do not apply
z
To reduce the risk of serious injury or
such as sudden braking or quick turning.
excessive pressure on a single point.
death, the combined weights of the driver,
z
Make sure that the weight of luggage and
Depending on how and where the force is
passengers and cargo must never exceed
the roof carrier do not exceed the maxi-
applied, this may cause dents on the vehicle
the vehicle capacity weight.
mum roof load, 176 lb (80 kg). If the maxi-
roof.
z
Exceeding the vehicle capacity weight will
mum roof load is exceeded, this could
adversely affect vehicle performance,
cause damage to the vehicle or result in an
including handling and braking, and may
accident.
cause an accident.
Driving safety
6-11

Trailer towing
CAUTION
Refitting the covers
z
Before driving and after traveling a short dis-
1. With each cover, put the tabs (C) on the
tance, always check the load to make sure it
is securely fastened to the roof carrier.
cover in the holes (D) in the roof.
Stop the vehicle periodically and check that
2. Slide the cover (B) toward the rear of the
the load remains secure. If the load is not
vehicle to install it.
secure, it could fall from the vehicle and
damage your vehicle, another vehicle or cre-
ate a road hazard.
6
NOTE
z
To prevent wind noise or reduction in gas
Attaching the roof carrier
mileage, remove the roof carrier when not in
use.
z
Before using an automatic car wash, check
Slide each cover (B) toward the front of the
with the attendant to determine if the roof
vehicle to remove it.
carrier should be removed.
z
Be sure that adequate clearance is main-
tained for raising the liftgate when installing
a roof carrier.
Trailer towing
N00629800306
Roof carrier mounting brackets
(if so equipped)
N00630601138
When installing the roof carrier, use the
brackets (A).
The brackets (A) are located under each cover
(B).
6-12
Driving safety
Trailer towing
WARNING
z Do not use this vehicle for
trailer towing. It may not be
possible to maintain control or
adequate braking.
6
Driving safety
6-13
Comfort controls
Vents
7-2
Automatic air conditioning-Type1 (if so equipped)
7-4
Automatic air conditioning-Type2 (if so equipped)
7-9
Important air conditioning operating tips
7-15
Air purifier
7-15
General information about your radio
7-16
7