Mitsubishi L200 (2020 year). Manual in english - page 2
Central door locks
Central door locks
NOTE
Vehicle-speed sensitive auto-
matic door lock (with impact-
z
If the vehicle is equipped with the keyless
NOTE
operation system, the driver’s door can be
sensitive unlock mechanism)
locked or unlocked with the emergency key.
3
z Repeated continuous operation between lock
Refer to “Emergency key” on page 3-11
All of the doors lock automatically when the
and unlock could activate the central door
vehicle speed exceeds approximately
locking systems built-in protection circuit
and prevent the system from operating. If
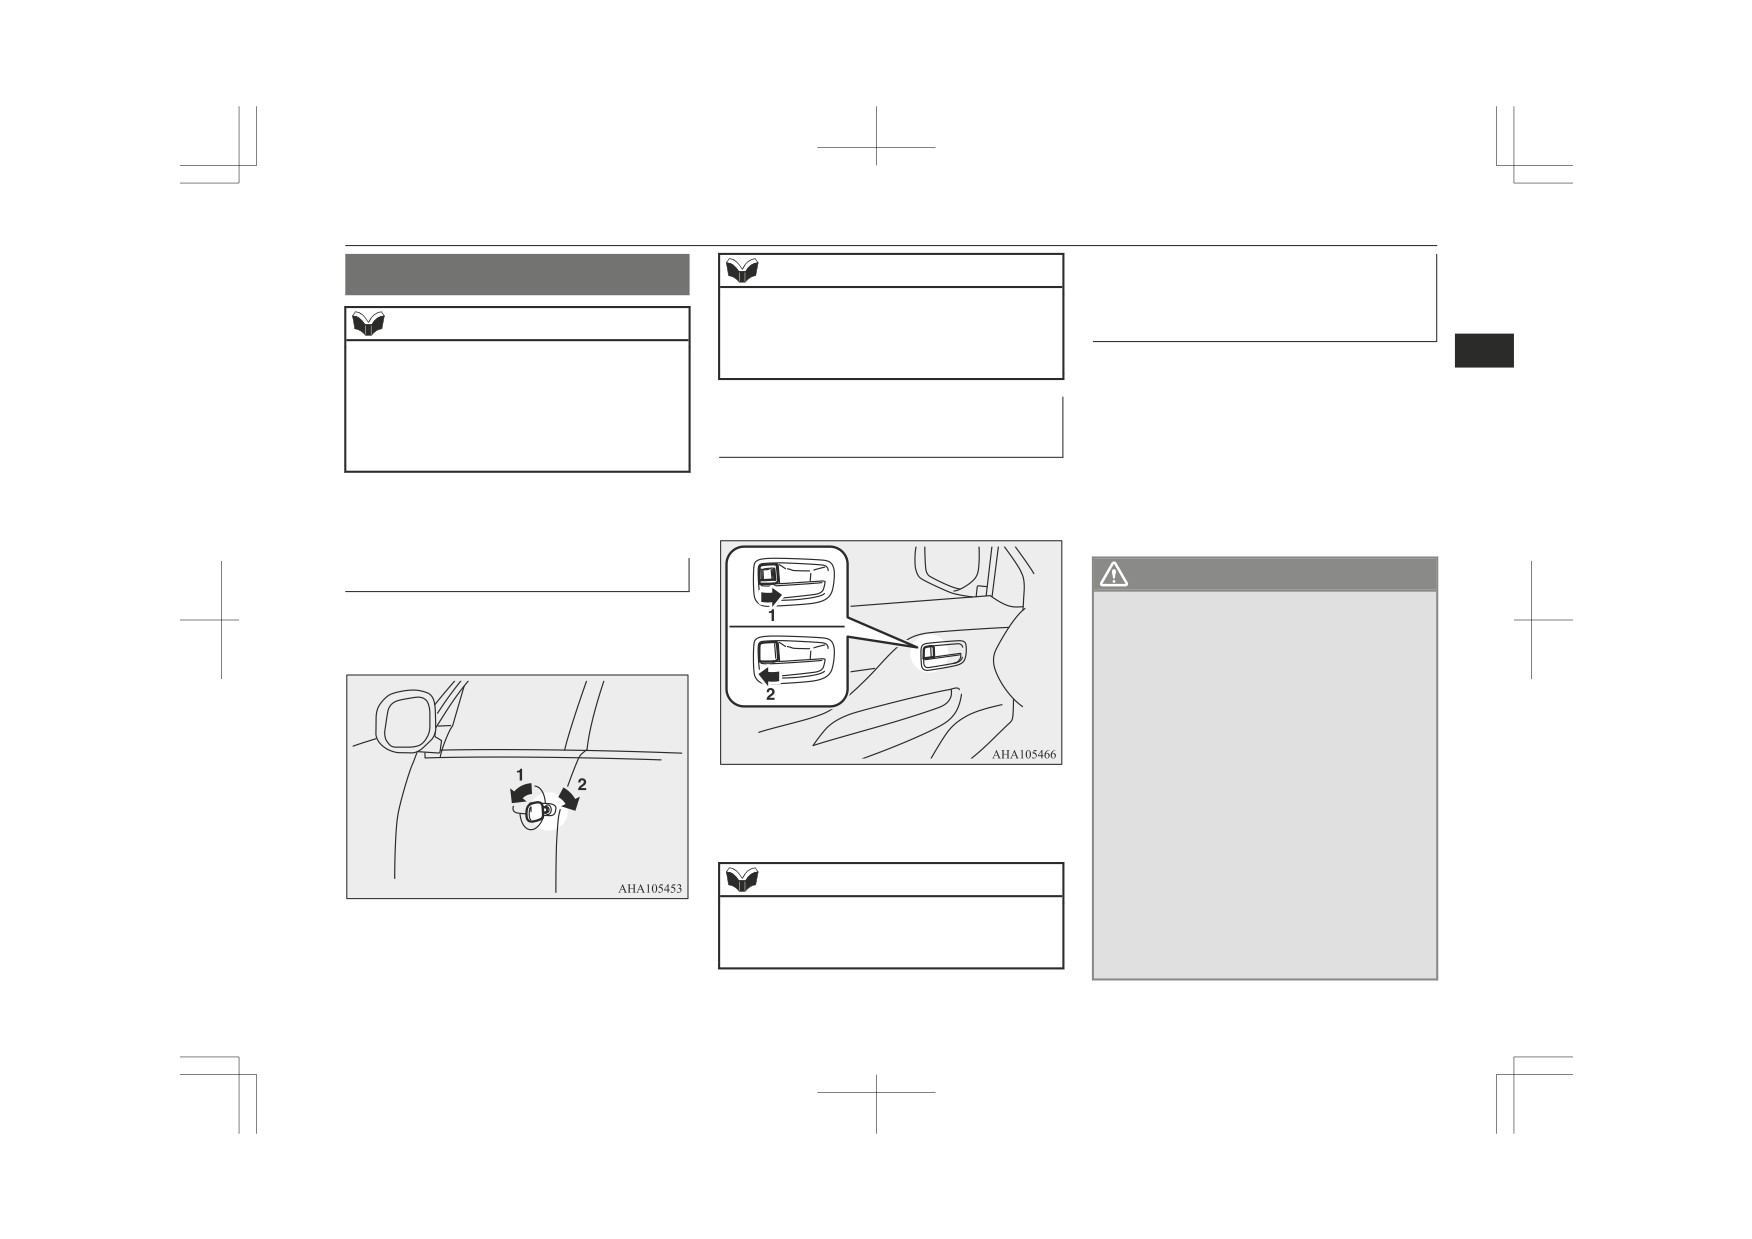
Driver’s door with inside lock
15 km/h (9 mph). In addition, all of the doors
this occurs, wait approximately 1 minute be-
knob
unlock when a strong impact that could be
fore operating the central door lock system.
very dangerous to the occupants is sustained
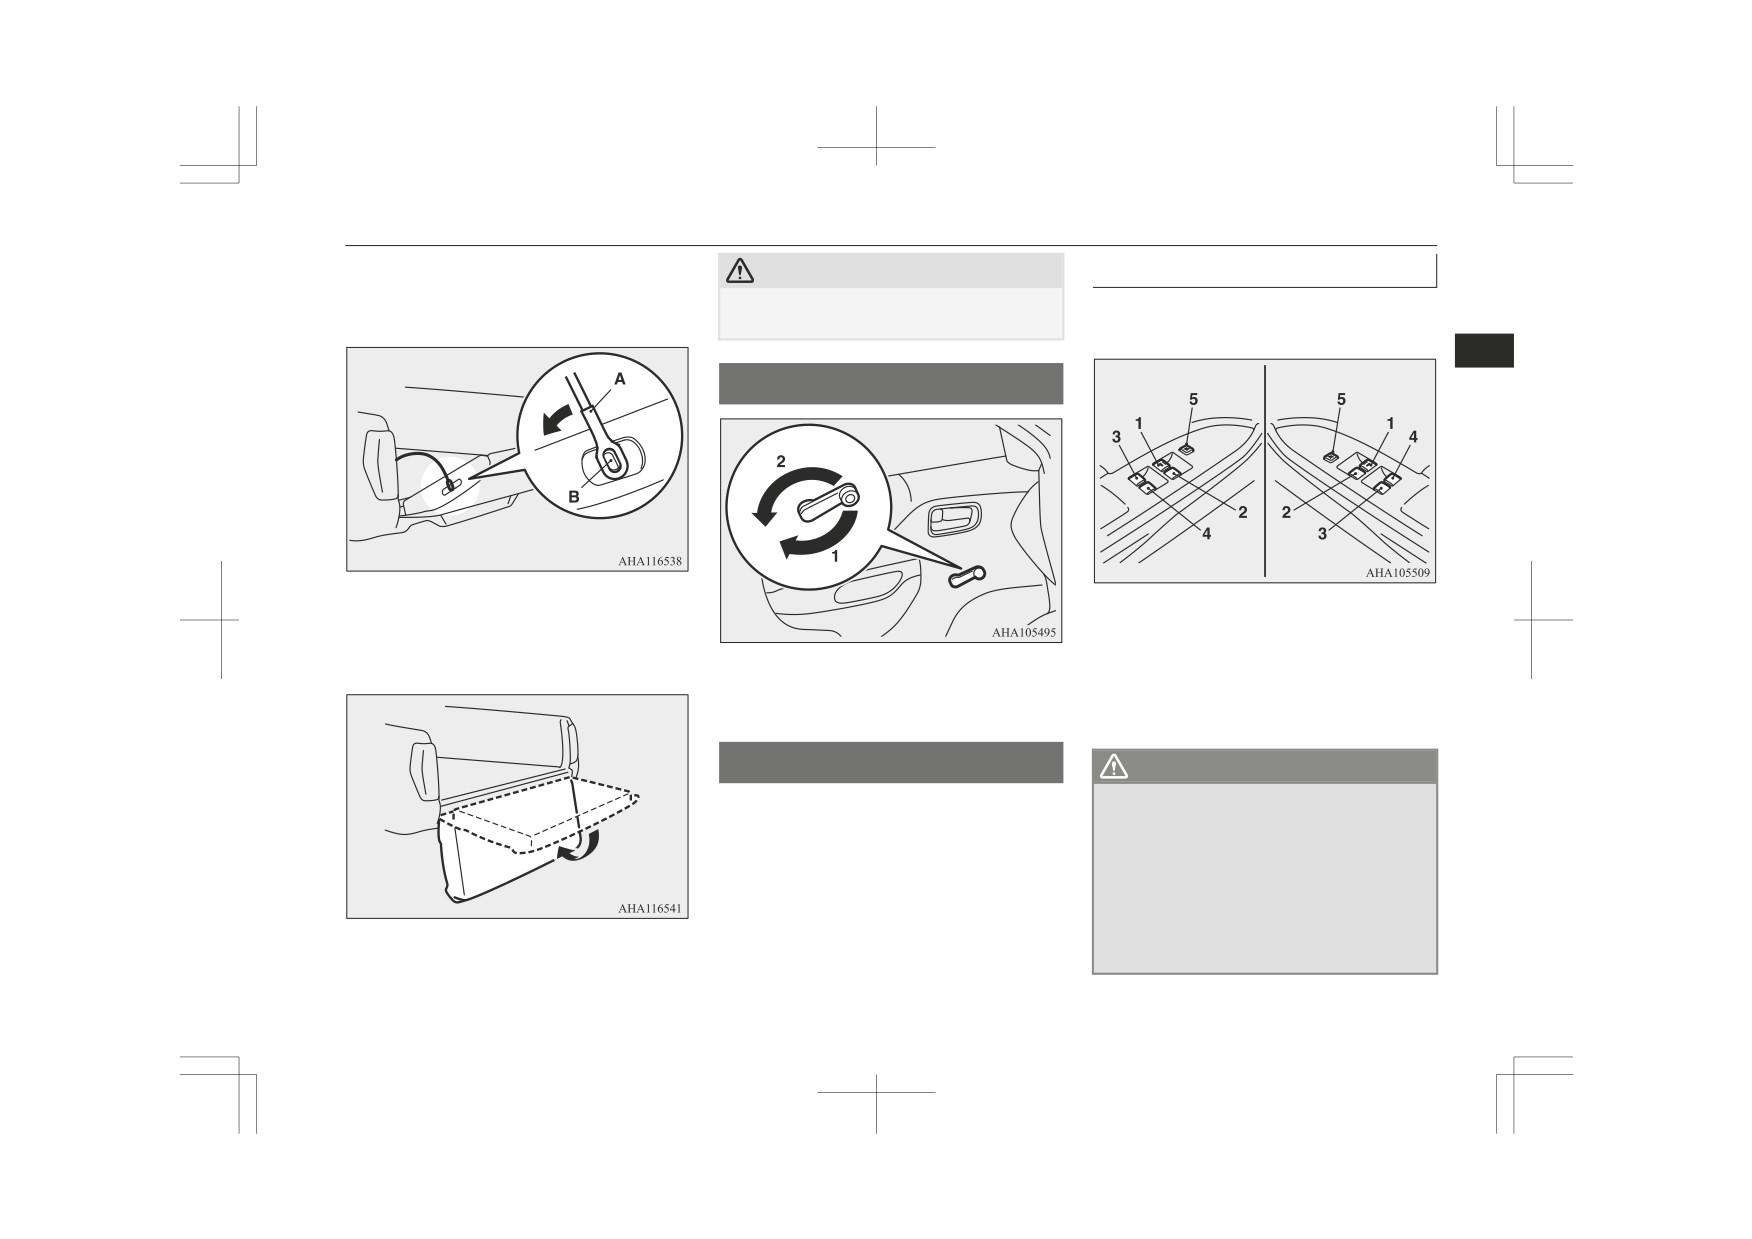
Using the door lock knob on the driver’s door
by the collision of the vehicle. This is pre-
locks or unlocks all doors.
pared for rescue activities when an unexpec-
All of the doors can be locked and unlocked
ted accident occurs.
as described hereafter.
Driver’s door with key
WARNING
Using the key on the driver’s door locks or
z When the vehicle-speed sensitive automat-
ic door lock/impact-sensitive unlock
unlocks.
mechanism may not operate in the follow-
ing conditions, have the vehicle inspected
at a MITSUBISHI MOTORS Authorized
Service Point immediately.
• The door does not lock automatically
even when the vehicle speed exceeds ap-
proximately 15 km/h (9 mph).
• The door unlocks automatically while
1. Lock
driving.
2. Unlock
• Even when the ignition switch or the
operation mode is in ON, the SRS
warning lamp does not come on or it
NOTE
remains on.
• The SRS warning lamp comes on while
z
Be careful not to lock the doors while the
driving.
key is inside the vehicle when getting off the
1. Lock
• The central door lock system is broken
vehicle.
2. Unlock
down.
Locking and unlocking
3-17
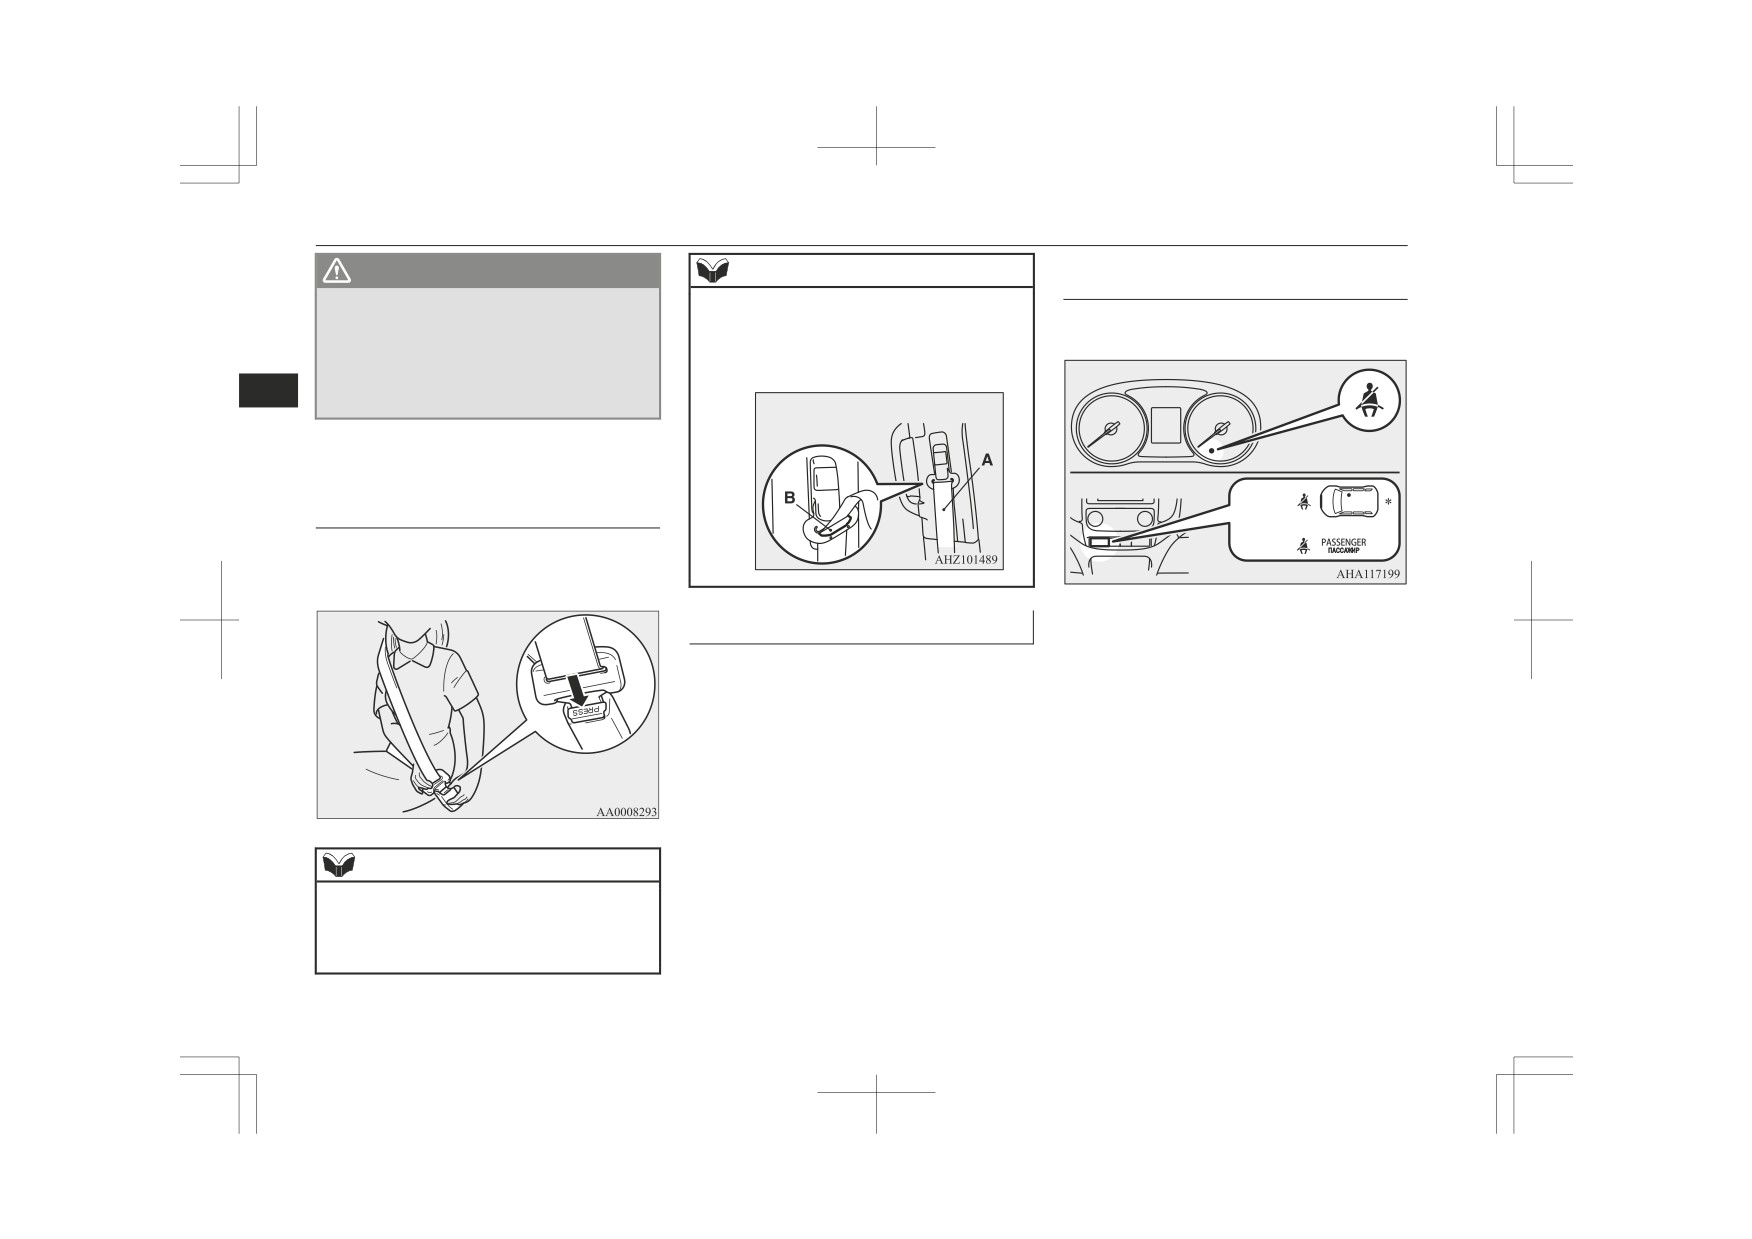
Dead Lock System*
These functions are deactivated when the ve-
2. Get out of the vehicle. Close all of the
NOTE
hicle is shipped from the factory. If you wish
doors.
z Even if the vehicle suffers significant defor-
to activate or deactivate these functions,
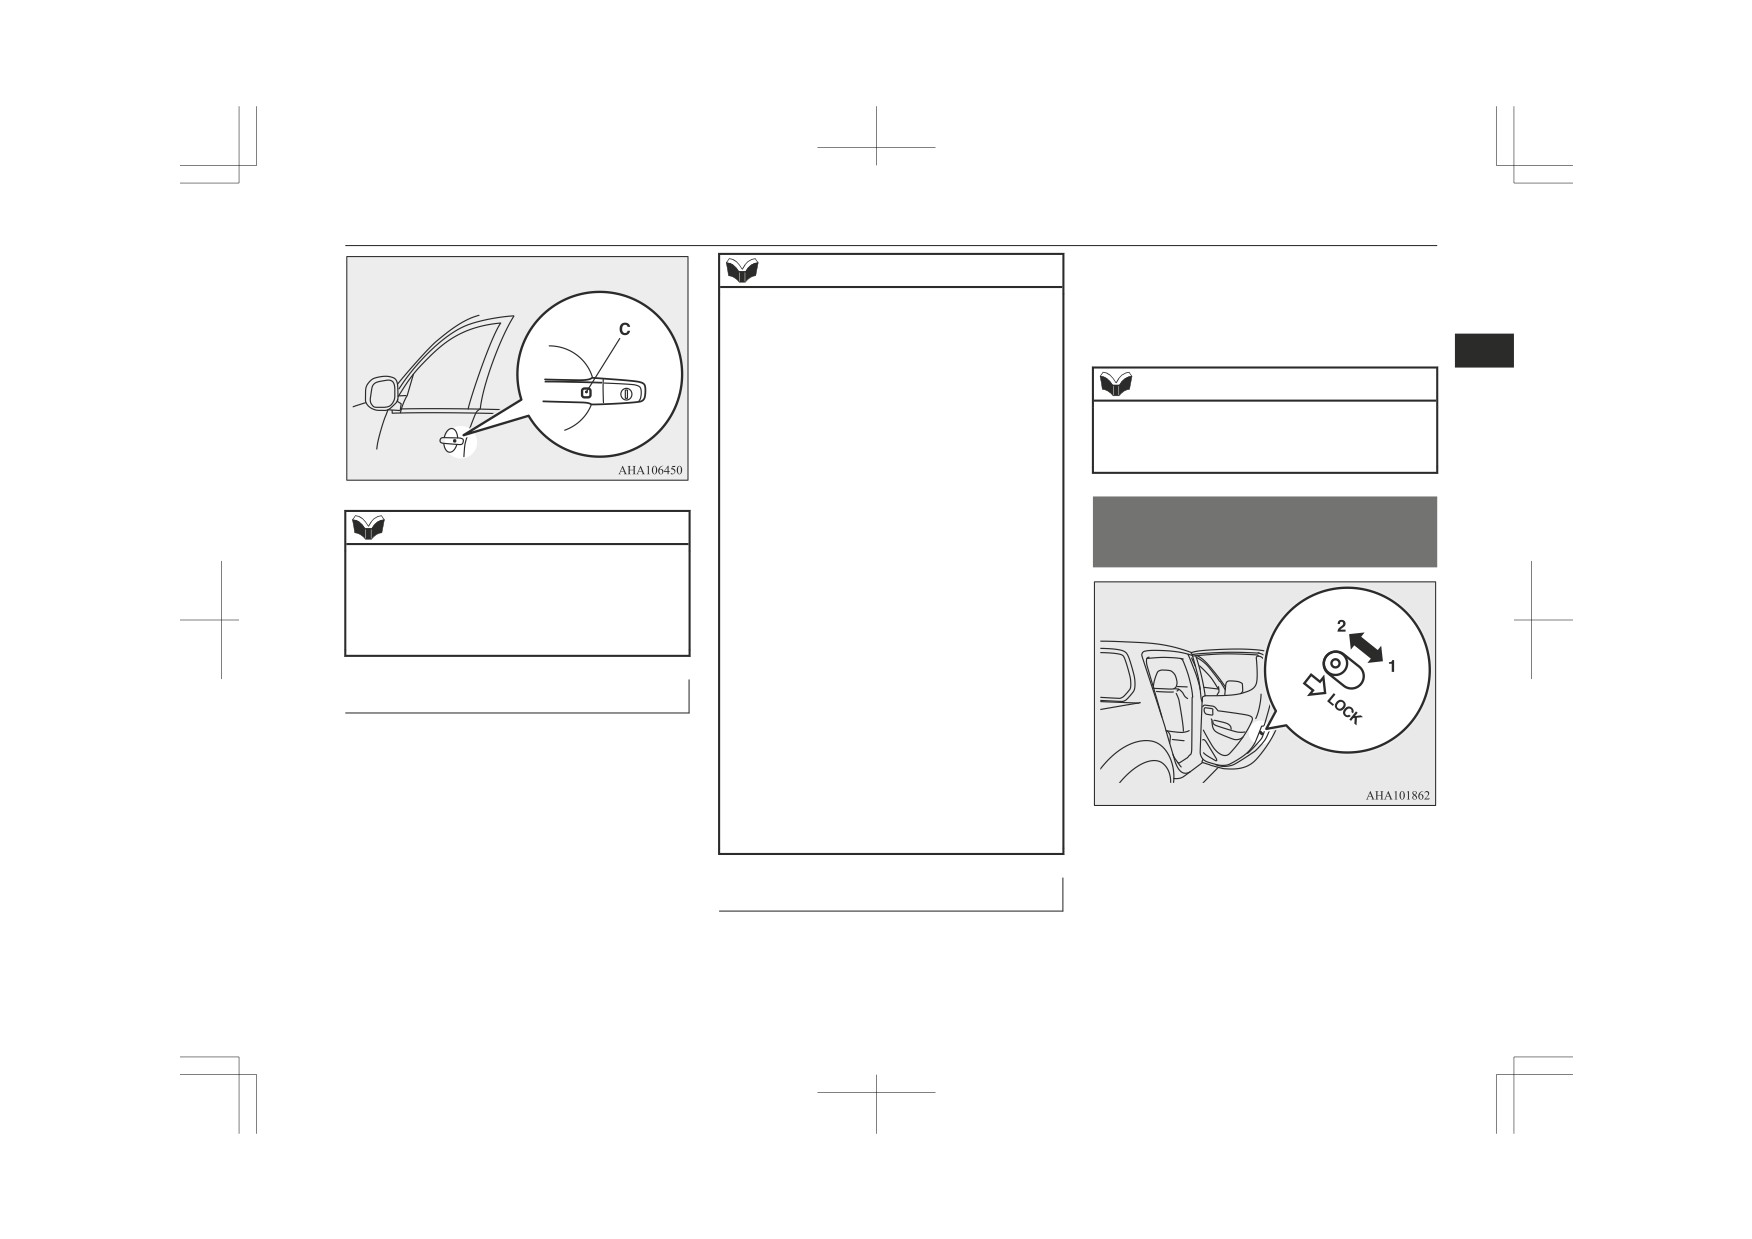
3. Press the LOCK switch (A) on the key,
mation from a collision etc., depending on
please contact a MITSUBISHI MOTORS
the driver’s or front passenger’s door
the location and angle of the collision, as
3
Authorized Service Point.
lock/unlock switch (C) to lock all of the
well as on the shape and condition of the
other object in the collision, the doors may
doors. The turn-signal lamps will blink
not unlock. The extent of deformation or
Dead Lock System*
once.
damage to the vehicle does not necessarily
4. Press the switch again within 2 seconds.
correlate with unlocking of the doors.
The turn-signal lamps will blink three
The Dead Lock System helps prevent theft.
z These functions are activated when the vehi-
times to show that the Dead Lock Sys-
When the keyless entry system or the keyless
cle is shipped from the factory. If you wish
operation function has been used to lock all
tem has been set.
to activate or deactivate these functions,
of the doors, the Dead Lock System makes it
please contact a MITSUBISHI MOTORS
Authorized Service Point.
impossible to unlock the doors using the in-
Keyless entry system
Keyless operation
side lock knobs.
system
Unlocking by using the ignition
switch, the engine switch or the
CAUTION
selector lever
z Do not set the Dead Lock System when
someone is inside the vehicle. With the Dead
It is possible to unlock all of the doors when-
Lock System set, it is not possible to unlock
ever as follows.
the doors using the inside lock knobs. If you
erroneously set the Dead Lock System, un-
[Vehicles with M/T]
lock the doors using the UNLOCK switch
The ignition switch is turned to the “LOCK”
on the key or using the keyless operation
position or the operation mode is put in OFF.
function.
[Vehicles with A/T]
The selector lever is placed in the
“P”
Setting the system
(PARK) position while the operation mode is
in ON. Or the operation mode is put in OFF.
1. Turn the ignition switch to the “LOCK”
position and then remove the key (vehi-
cles with keyless entry system), or put
the operation mode in OFF
(vehicles
with keyless operation system).
3-18
Locking and unlocking
“Child-protection” rear doors (Double cab)
After setting the Dead Lock System, reach
NOTE
into the vehicle through a window and con-
z
If a door is not opened within 30 seconds of
firm that you cannot unlock the doors using
unlocking, the doors are automatically re-
the lock knobs.
locked and the Dead Lock System is simul-
3
taneously set again.
z
Even when it is not possible to use the key-
NOTE
less entry system or keyless operation func-
tion to unlock the doors, it is possible to use
z If you need advice on how to set the Dead
Lock System, please contact a MITSUBISHI
the key to unlock the driver’s door. When
the key is used to unlock the driver’s door,
MOTORS Authorized Service Point.
the Dead Lock System is cancelled for only
the driver’s door. If you wish to subsequent-
“Child-protection” rear
ly unlock all other doors, turn the ignition
NOTE
switch to the “ON” or “ACC” position, or
doors (Double cab)
z Pressing the LOCK switch (A) on the key
put the operation mode in ON or ACC.
once while the Dead Lock System is set cau-
z
It is possible to adjust the time between
ses the turn-signal lamps to blink three
pressing the UNLOCK switch (B) on the
times, so it is possible to confirm that the
key or the driver’s or front passenger’s door
Dead Lock System is set.
lock/unlock switch (C) and automatic lock-
ing. For details, please contact a
MITSUBISHI MOTORS Authorized Serv-
Cancelling the system
ice Point.
When the following operation is performed,
z
It is possible to lock the doors and set the
Dead Lock System at the same time with a
the doors will unlock and the Dead Lock Sys-
single push of the LOCK switch (A) on the
tem will be simultaneously cancelled.
key, the driver’s or front passenger’s door
z The UNLOCK switch (B) on the key is
lock/unlock switch (C). For details, please
pressed.
contact a MITSUBISHI MOTORS Author-
z The driver’s or front passenger’s door
ized Service Point.
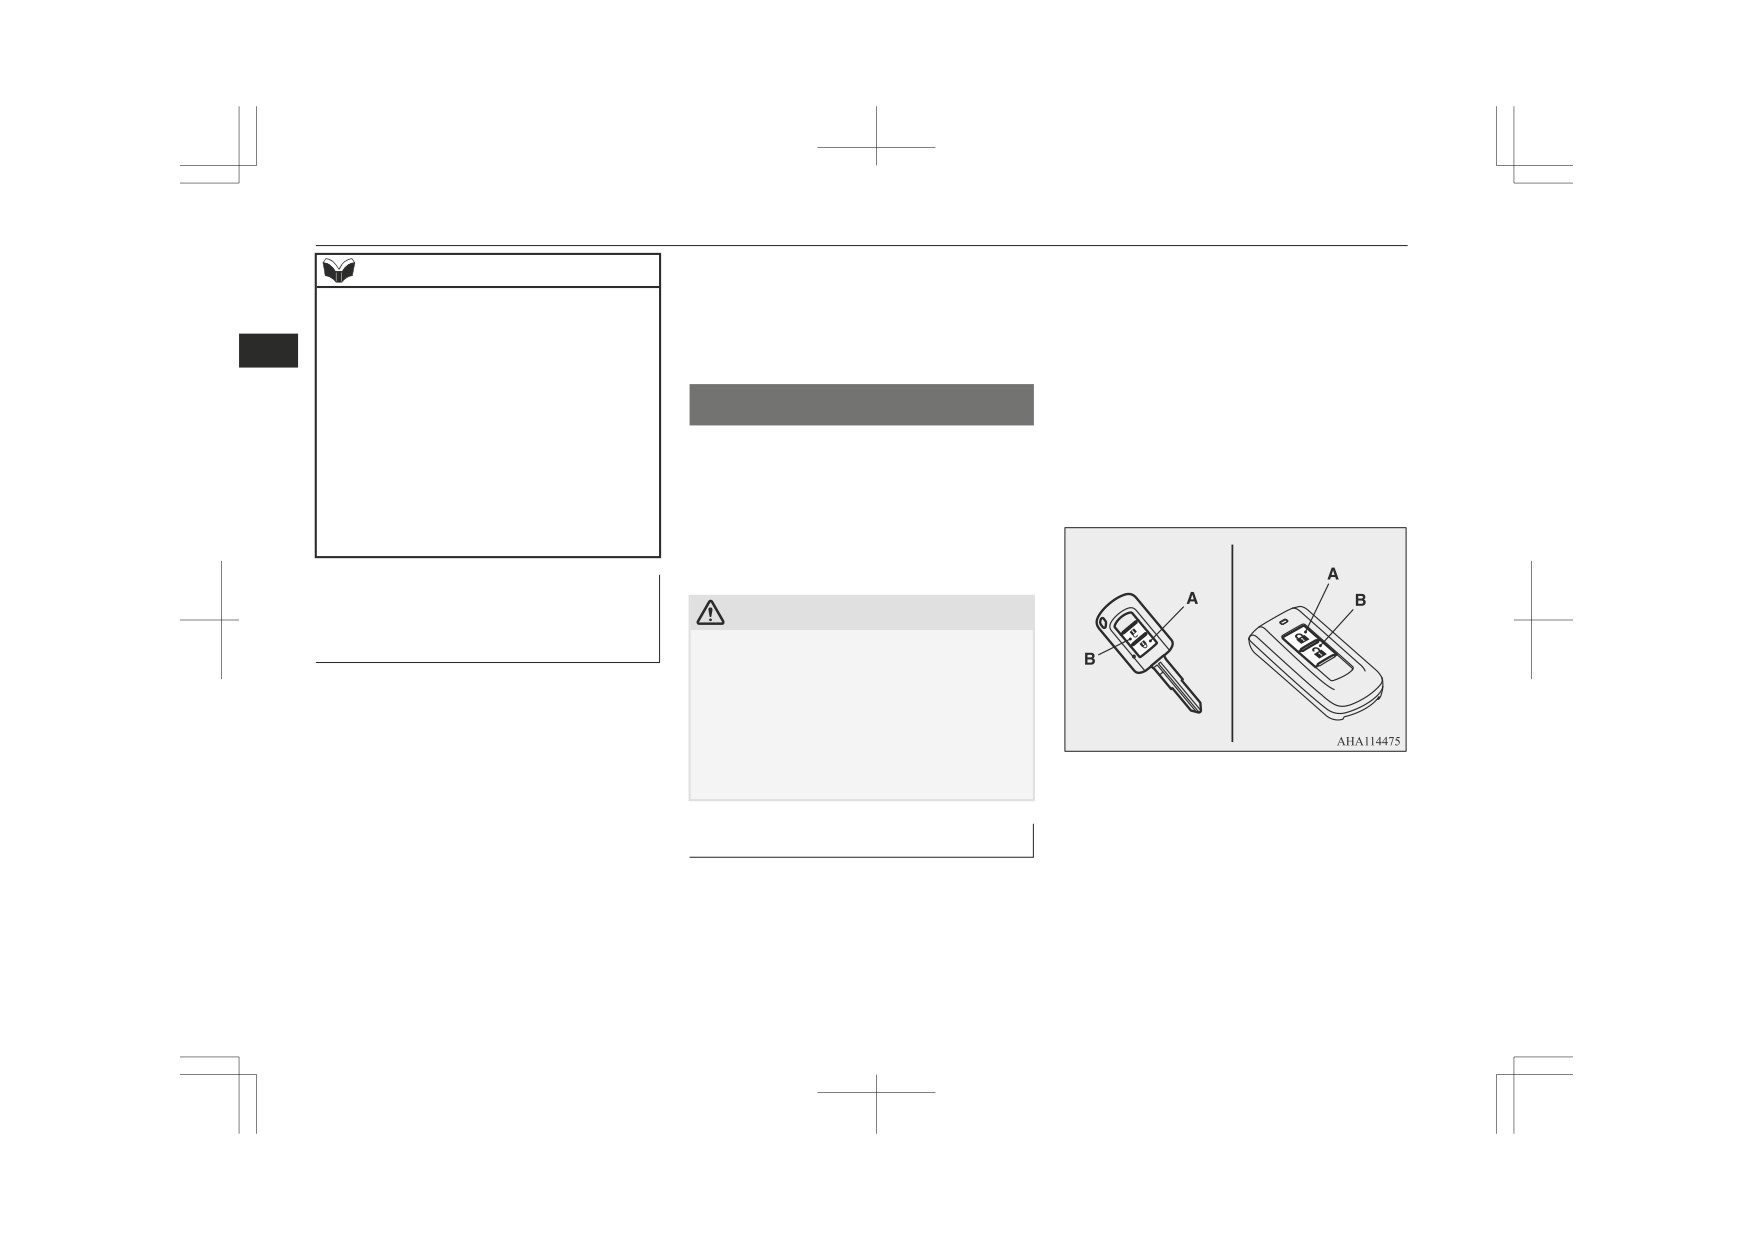
1- Lock
lock/unlock switch (C) is pressed while
2- Unlock
you are carrying the keyless operation
Testing the system
key.
Child protection helps prevent doors from be-
Open all of the door windows, then set the
ing opened accidentally, especially when
Dead Lock System.
small children are in the rear seat.
(Refer to “Setting the system” on page 3-18.)
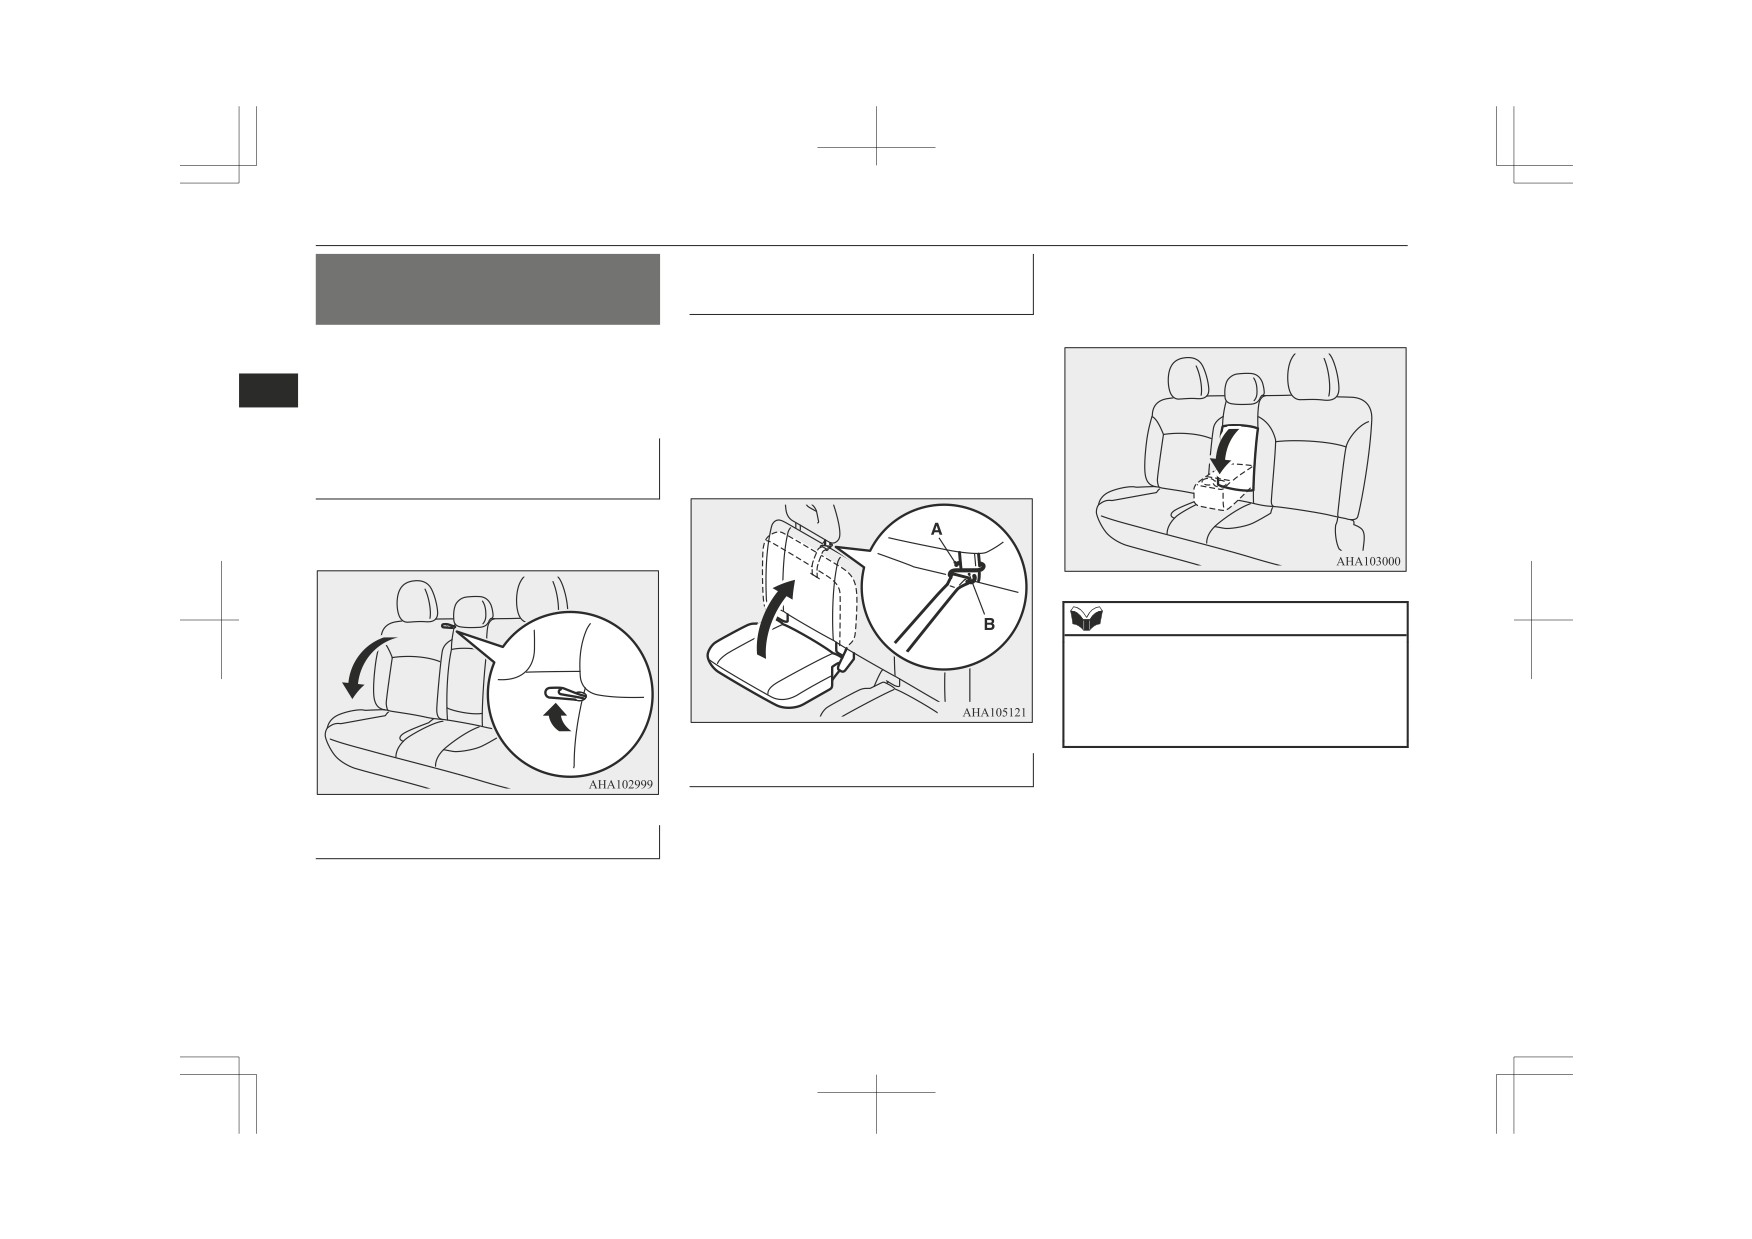
A lever is provided on each rear door.
Locking and unlocking
3-19
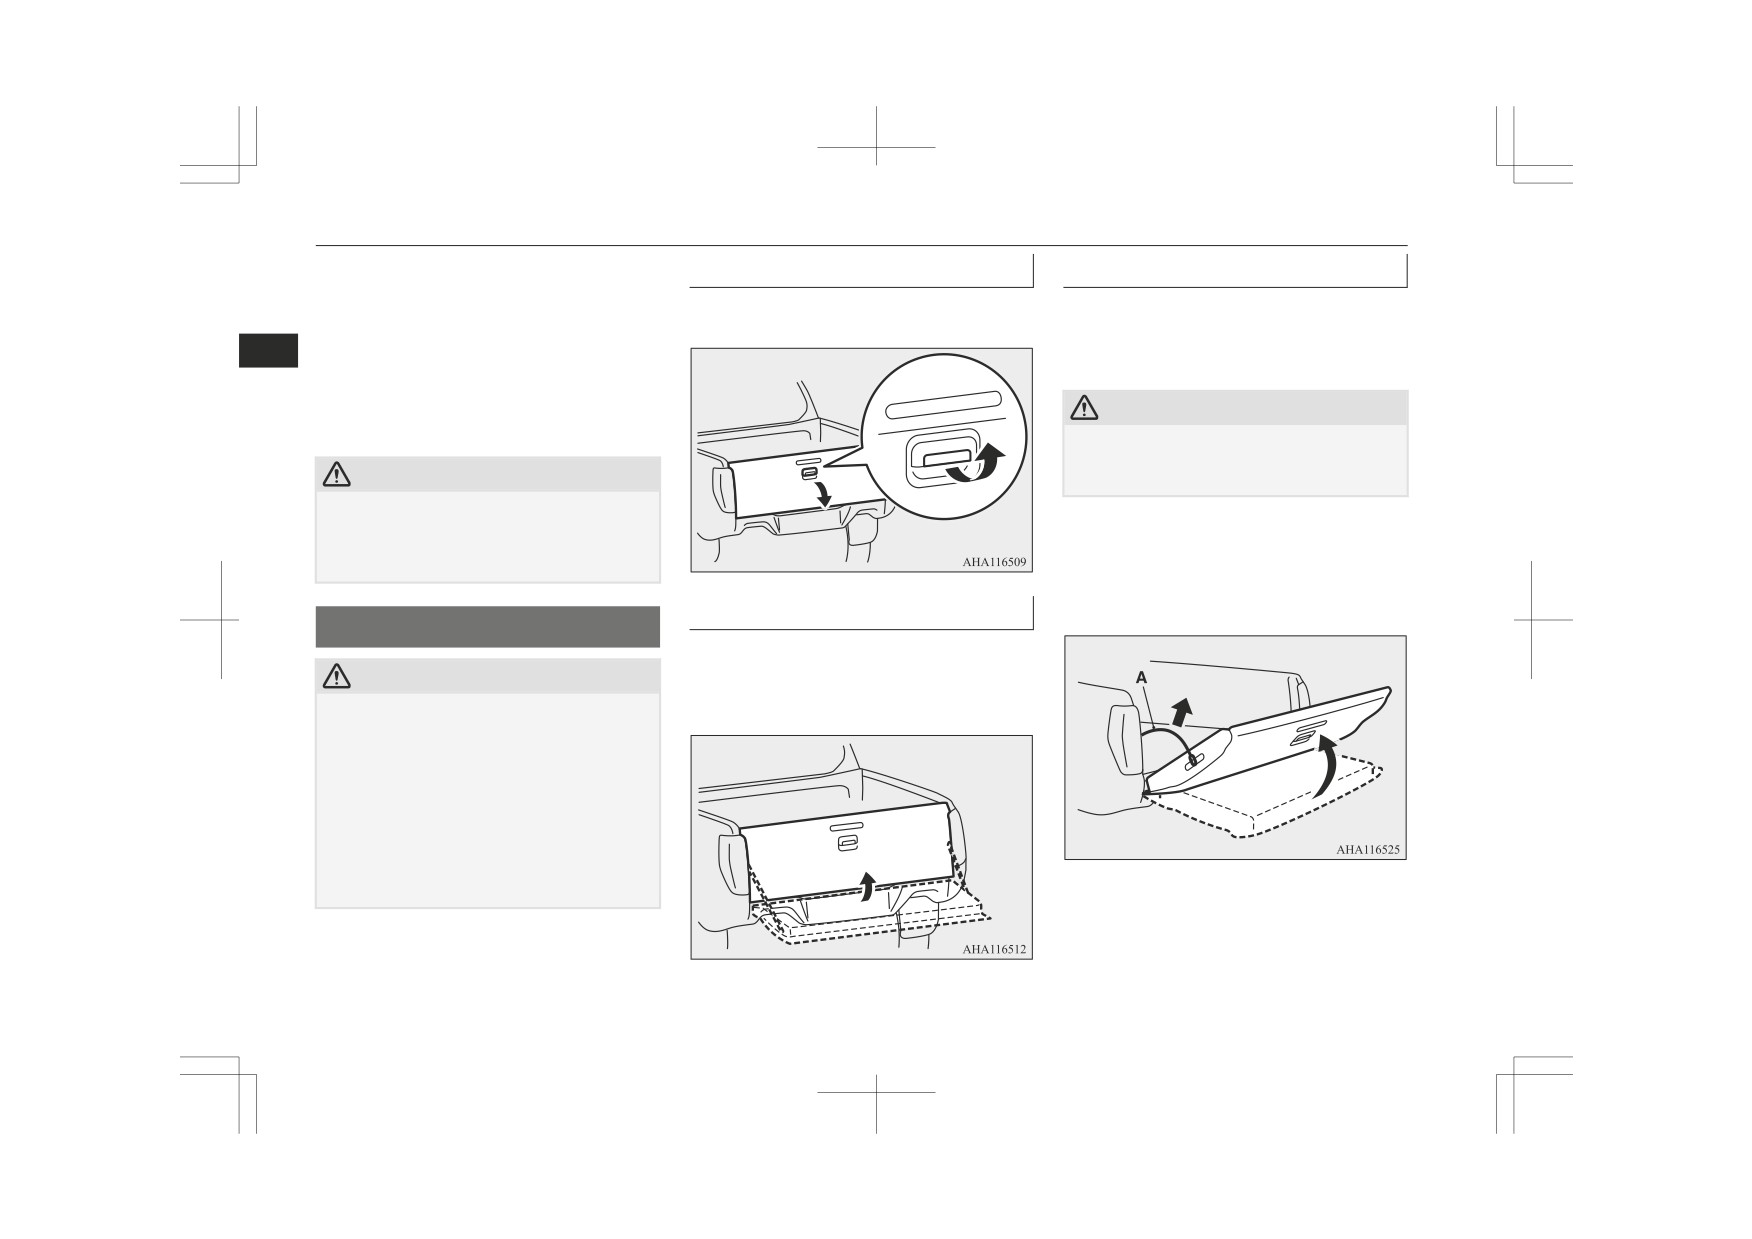
Rear gate
If the lever is set to the locked position, the
To open
To swing down
rear door cannot be opened using the inside
handle.
Lift up the handle and lower the rear gate.
The rear gate can be swung down in two
To open the rear door while the child protec-
stages except some models. To lower it to the
3
tion is in use, pull the outside door handle.
second stage, proceed as follows:
If the lever is set to the “Unlock” position,
the child protection mechanism does not
CAUTION
function.
On vehicles with the rear bumper, never
z
swing down the rear gate because the rear
CAUTION
gate could be damaged.
z When driving with a child in the rear seat,
please use the child protection to prevent ac-
1. Swing open the rear gate to the first po-
cidental door opening which may cause an
sition. Then, lift it up to the position
accident.
shown in the illustration while holding
the wire (A).
To close
Rear gate
Raise the rear gate and close with enough
CAUTION
force to latch the assembly securely into posi-
tion.
z Do not stand behind the exhaust pipe when
loading and unloading luggage. Heat from
the exhaust could lead to burns.
z Pay attention not to catch your fingers in the
rear gate.
z Do not weight the rear gate.
z Before driving, make sure that the rear gate
is securely closed. If the rear gate opens
while driving the vehicle, objects stored in
the cargo area could fall out onto the road.
3-20
Locking and unlocking
Manual window control*
2. Remove the wire (A) on one side while
Electric window control switch
CAUTION
aligning the hole in the wire with the
Each door window opens or closes while the
hook (B).
z Never close the rear gate with the wire left
unhooked.
corresponding switch is operated.
3
Driver’s switch
Driver’s switch
Manual window control*
LHD
RHD
3. Remove the wire on the other side in the
1- Driver’s door window
same manner, and have the rear gate
2- Front passenger’s door window
swing down slowly.
3- Rear left door window (Double cab)
1- To open
4- Rear right door window (Double cab)
2- To close
5- Lock switch
Electric window control*
WARNING
The electric windows can only be operated
z Before operating the electric window con-
trol, make sure that nothing can get trap-
with the ignition switch or the operation
ped (head, hand, finger, etc.).
mode in ON.
z Never leave the vehicle without removing
the key.
z Never leave a child (or other person who
might not be capable of safe operation of
the electric window control) in the vehicle
alone.
Locking and unlocking
3-21
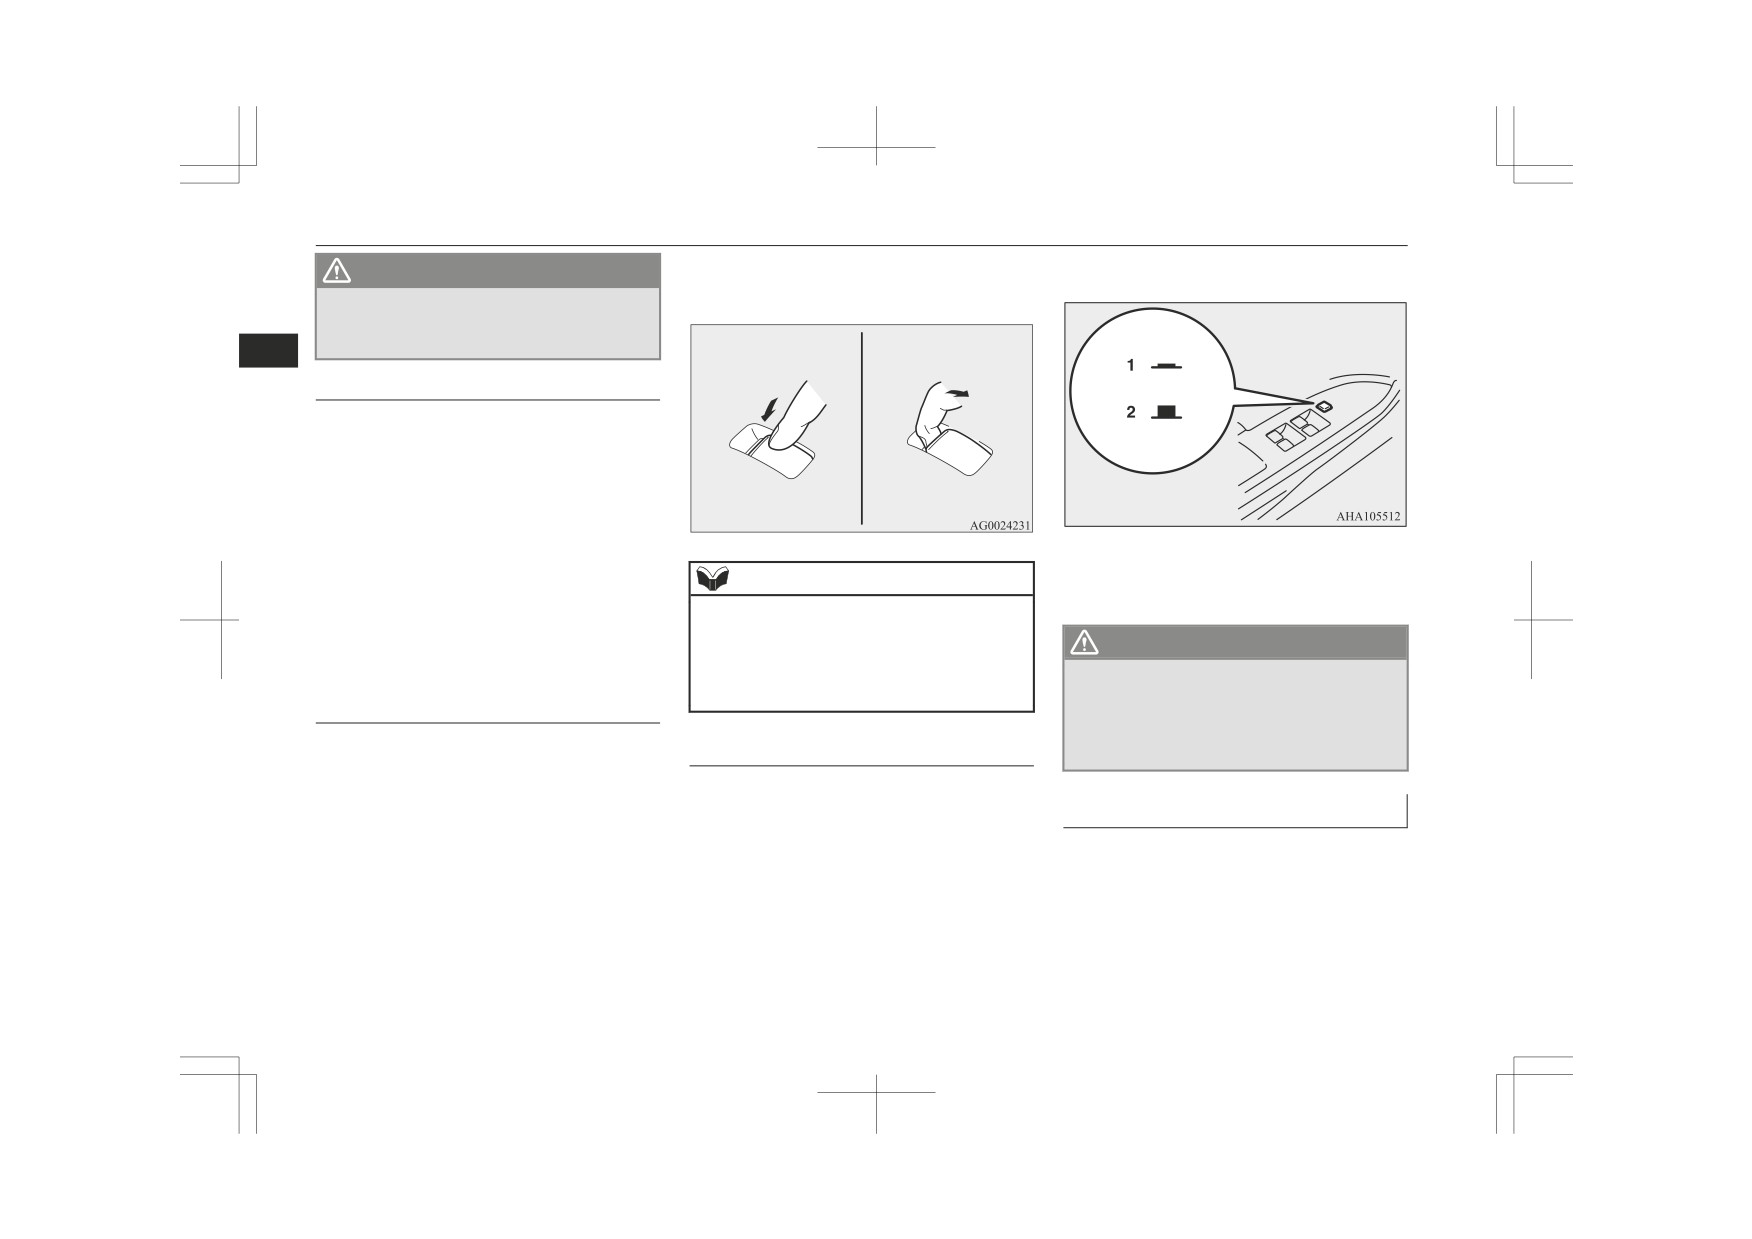
Electric window control*
Press the switch down for opening the win-
To unlock, press it once again.
WARNING
dow, and pull up the switch for closing it.
z The child may tamper with the switch at
the risk of its hands or head being trap-
ped in the window.
3
Driver’s switches
The driver’s switches can be used to operate
all door windows. A window can be opened
or closed by operating the corresponding
switch.
Press the switch down to open the window,
and pull up the switch to close it.
If the switch for the driver’s window is fully
1- Lock
pressed down/pulled up, the door window au-
NOTE
2- Unlock
tomatically opens/closes completely.
z Repeated operation with the engine stopped
If you want to stop the window movement,
will run down the battery. Operate the win-
operate the switch lightly in the reverse direc-
dow switches only while the engine is run-
WARNING
tion.
ning.
z
A child may tamper with the switch at the
z
The rear door windows only open halfway.
risk of its hands or head being trapped in
Passenger’s switches
the window. When driving with a child in
the vehicle, please press the window lock
The passenger’s switches can be used to op-
Lock switch
switch to disable the passenger’s switches.
erate the corresponding passenger’s door
When this switch is operated, the passenger’s
windows.
switches cannot be used to open or close the
Timer function
door windows and the driver’s switch cannot
open or close any door windows other than
The door windows can be opened or closed
for 30 seconds after the engine is stopped.
the driver’s door window.
However, once the driver’s door or the front
passenger’s door is opened, the windows can-
not be operated.
3-22
Locking and unlocking
Electric window control*
Safety mechanism (driver’s
NOTE
window only)
z
The safety mechanism can be activated if the
When the door window is automatically
driving conditions or other circumstances
cause the driver’s door window to be subjec-
closed by pulling up the switch fully, if a
3
ted to a physical shock similar to that caused
hand or head is trapped in the closing win-
by a trapped hand or head.
dow, it will lower automatically.
z
If the safety mechanism is activated five or
Nonetheless, make sure that nobody puts
more times in a row, the safety mechanism
their head or hand out of the window when
will be cancelled and the door window will
closing the driver’s door window.
not close correctly.
The lowered window will become operation-
In such a case, the following procedure
should be implemented to rectify this situa-
al after a few seconds.
tion. If the window is open, repeatedly raise
the driver’s door window switch until that
WARNING
window has been fully closed. Following
this, release the switch, raise the switch once
z If the battery terminals are disconnected
again and hold it in this condition for at least
or the fuse for electric window is replaced,
1 second, then release it. You should now be
the safety mechanism will be cancelled.
able to operate in the normal fashion.
If a hand or head got trapped, a serious
z
If the battery terminals are disconnected or
injury could result.
the fuse for electric window is replaced, the
safety mechanism will be cancelled and the
door window will not automatically open/
CAUTION
close completely.
z The safety mechanism is cancelled just be-
If the window is open, repeatedly raise the
fore the window is fully closed. This allows
driver’s door window switch until the win-
the window to close completely. Therefore
dow has been fully closed. Following this,
be especially careful that no fingers are trap-
release the switch, raise the switch once
ped in the window.
again and hold it in this condition for at least
z The safety mechanism is deactivated while
1 second, then release it. You should now be
the switch is pulled up. Therefore be espe-
able to operate the driver’s door window in
cially careful that fingers are not trapped in
the normal fashion.
the door window opening.
Locking and unlocking
3-23
Seat and seat belts
Seat adjustment
4-02
4
Front seats
4-02
Rear seat (Club cab and Double cab)*
4-04
Head restraints*
4-05
Seat belts
4-07
Pregnant women restraint
4-10
Seat belt pretensioner system and force limiter system*
4-10
Child restraint
4-11
Seat belt inspection
4-23
Supplemental restraint system (SRS)-airbag
4-24
Seat adjustment
Seat adjustment
WARNING
CAUTION
z
To minimize the risk of personal injury in
z When sliding or reclining the seat rearward,
Adjust the driver’s seat so that you are com-
the event of a collision or sudden braking,
pay careful attention to the rear seat passen-
fortable and that you can reach the pedals,
the seatbacks should always be in the al-
gers.
steering wheel, switches etc. while retaining
most upright position while the vehicle is
a clear field of vision.
in motion. The protection provided by the
4
seat belts may be reduced significantly
Front seats
when the seatback is reclined. There is
WARNING
greater risk that the passenger will slide
under the seat belt, resulting in serious in-
z
Do not attempt to adjust the seat while
Manual type
jury, when the seatback is reclined.
driving. This can cause loss of vehicle con-
z
Do not place objects under the seats. This
trol and result in an accident. After ad-
could prevent the seat from locking se-
justments are made, ensure the seating is
curely, and it could lead to an accident. It
locked in position by attempting to move
may also cause damage to the seat or oth-
the seat forward and rearward without
er parts.
using the adjusting mechanism.
z
It is extremely dangerous to ride in the
cargo area (inside or outside) of a vehicle.
CAUTION
Also, the cargo area and rear seats should
never be used as a play area by children.
Make sure the seat is adjusted by an adult or
z
In a collision, people or children riding
with adult supervision for correct and safe
unrestrained in these areas are more like-
operation.
ly to be seriously injured or killed.
z
Do not place a cushion or the like between
z
Do not allow people or children to ride in
your back and the seatback while driving.
any area of your vehicle that is not equip-
The effectiveness of the head restraints will
1- To adjust forward or backward
ped with seats and seat belts, and make
be reduced in the event of an accident.
Lift the handle and adjust the seat to the
sure that everyone travelling in your vehi-
z
The reclining mechanism of the front man-
desired position, and release the handle.
cle is in a seat and wearing a seat belt, or
ual seat’s seatback is spring loaded, causing
2- To recline the seatback
in the case of a child is strapped in a child
it to fold the seatback forward when the lock
Pull the lever up and then lean backward
restraint.
lever is operated. When using the lever, sit
to the desired position, and release the
close to the seatback or hold it with your
hand to control its return motion.
lever.
z
When sliding the seats, be careful not to
3- To adjust seat cushion height (driver’s
catch your hand or foot.
side only)
Turn the dial and adjust the seat cushion
height to the desired position.
4-02
Seat and seat belts
Front seats
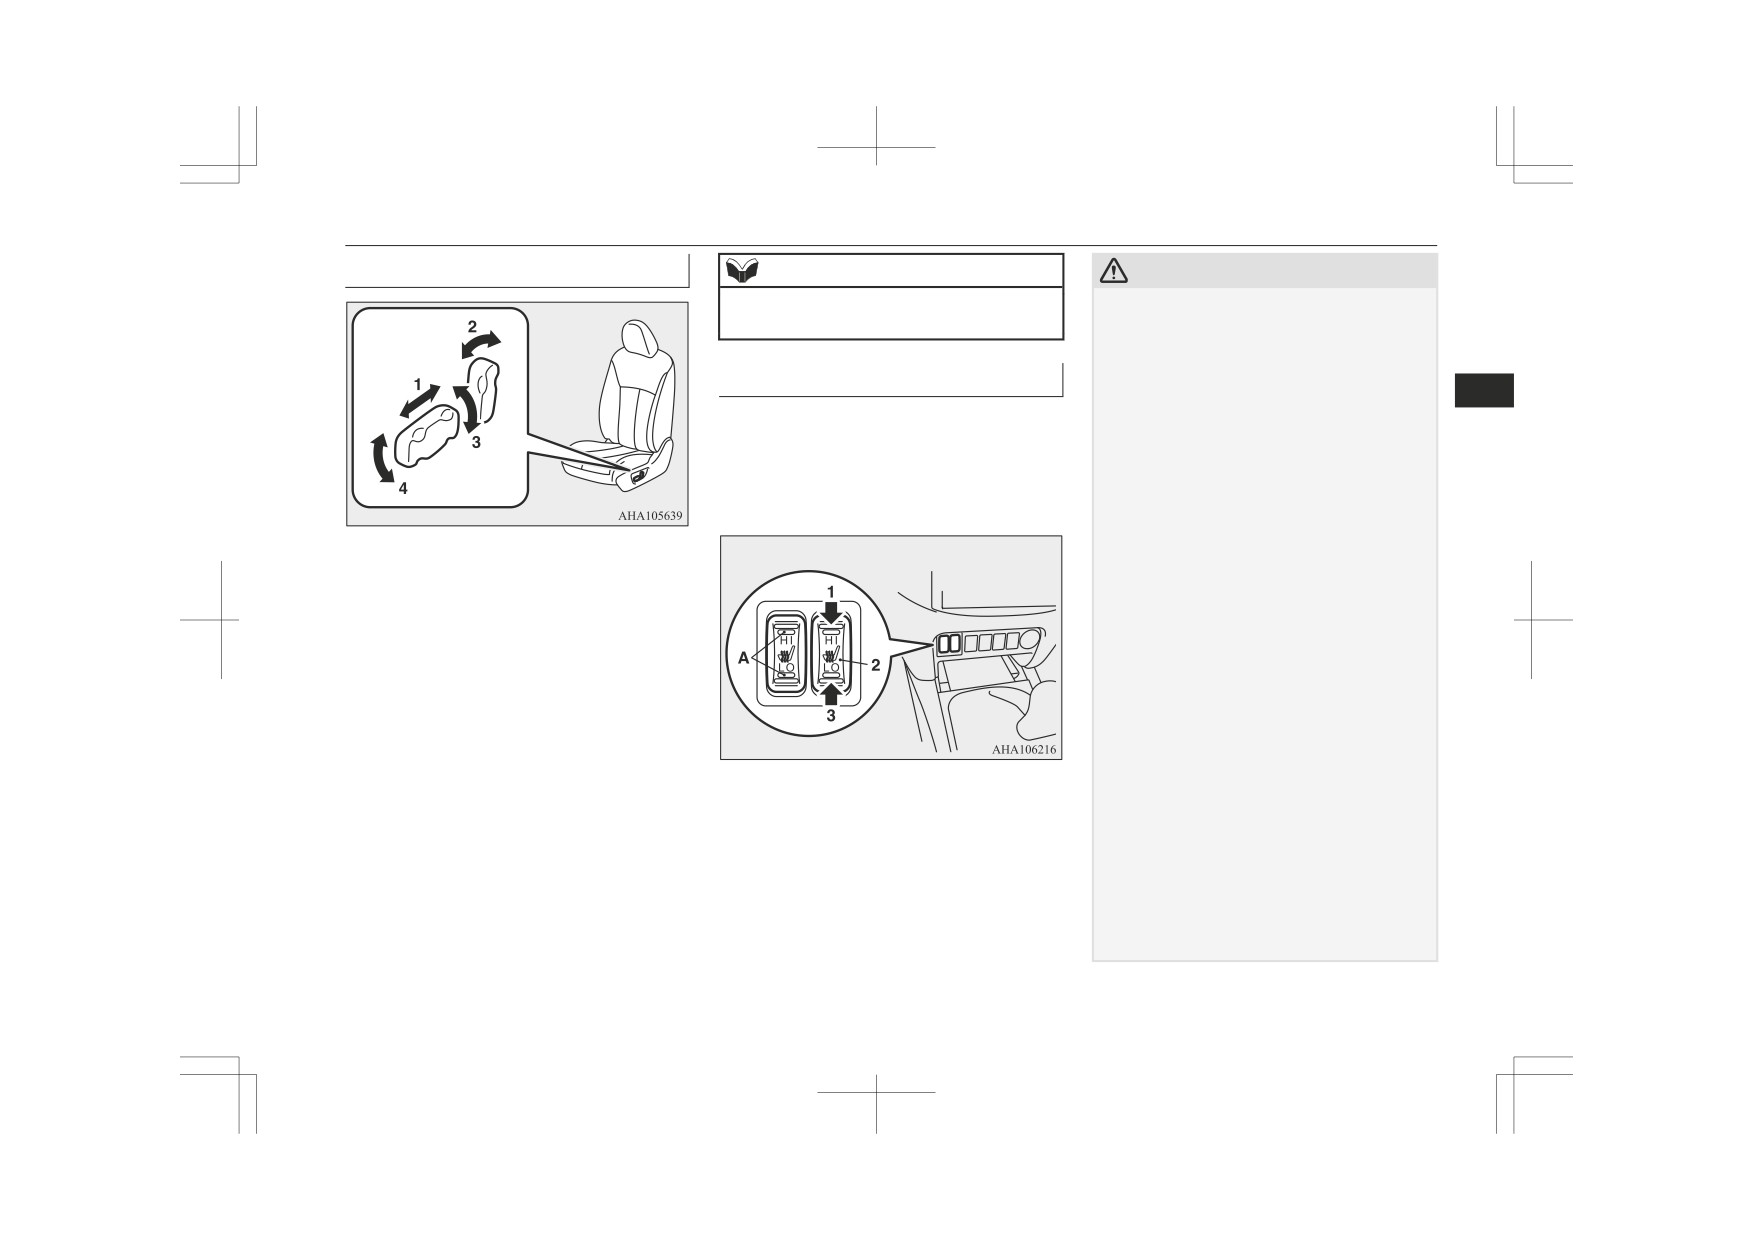
Power type*
NOTE
CAUTION
z To prevent the battery from running down,
z
Operate in the high position for quick heat-
operate the switch with the engine running.
ing. Once the seat is warm, set the heater to
low to keep it warm. Slight variations in seat
temperature may be felt while using the
Heated seats*
heated seats. This is caused by the operation
4
of the heater’s internal thermostat and does
The heated seats can be operated with the ig-
not indicate a malfunction.
nition switch or the operation mode in ON.
z
If the following types of persons use the
Operate the switch as indicated by arrows.
heated seats, they might become too hot or
The indication lamp (A) will illuminate while
receive minor burns (red skin, heat blisters,
the heater is on.
etc.):
• Children, elderly or ill people
• People with sensitive skin
1- To adjust forward or backward
• Excessively tired people
Operate the switch as indicated by the
• People under the influence of alcohol or
arrows and adjust the seat to the desired
sleep inducing medication (cold medicine,
etc.)
position.
z
Do not place heavy objects on the seat or
2- To recline the seatback
stick pins, needles, or other pointed objects
Operate the switch as indicated by the
into it.
arrows and adjust the seatback angle to
Do not use a blanket, cushion, or other mate-
z
the desired position.
rial with high heat insulation properties on
3- To adjust seat height
the seat while using the heater; this might
Operate the switch as indicated by the
cause the heater element to overheat
arrows and adjust the seat height to the
z
Do not use benzine, kerosene, petrol, alcohol
1 (HI)
Heater high (for quick heating).
or other organic solvents when cleaning the
desired position.
seats. Doing so could damage not only the
If the entire switch is operated, then the
2
Heater off.
seat cover, but also the heater element.
entire seat moves.
3 (LO)
Heater low
(to keep the seat
z
If water or any other liquid is spilled on the
4- To adjust seat cushion angle
seat, allow it to dry thoroughly before at-
warm).
Operate the switch as indicated by the
tempting to use the heater.
arrows and adjust the seat cushion angle
z
Turn the heater off immediately if it appears
to be malfunctioning during use.
to the desired position.
Seat and seat belts
4-03
Rear seat (Club cab and Double cab)*
Rear seat (Club cab and
Folding up the seat cushion
To return to the original position, push it
backward (into the seatback) until it is level
(Club cab)
Double cab)*
with the seat.
The right and left seat cushions can be folded
When a person is sitting in the middle seating
up separately.
position of the rear seat, adjust the head re-
To fold the seat cushions up, raise the seat
4
straint to height at which it lock in position.
cushions.
Refer to “Head restraints*” on page 4-05.
Securely retain the seat cushion by hooking
the retaining band (A) onto the head restraint
Folding the seatback forward
(B) of the rear seat.
(Double cab)
Pull up the band on the top of the seatback
and fold it forward.
NOTE
z Do not climb or sit on the armrest. Doing so
could damage the armrest.
z The top surface of the armrest contains a cup
holder for rear seat occupants.
Refer to “Cup holder” on page 7-104.
Armrest (Double cab)
To use the armrest, fold it down.
To return (Double cab)
Raise the seatback until it is locked securely
in place.
Push and pull the seatback lightly to be sure
it is secure.
4-04
Seat and seat belts
Head restraints*
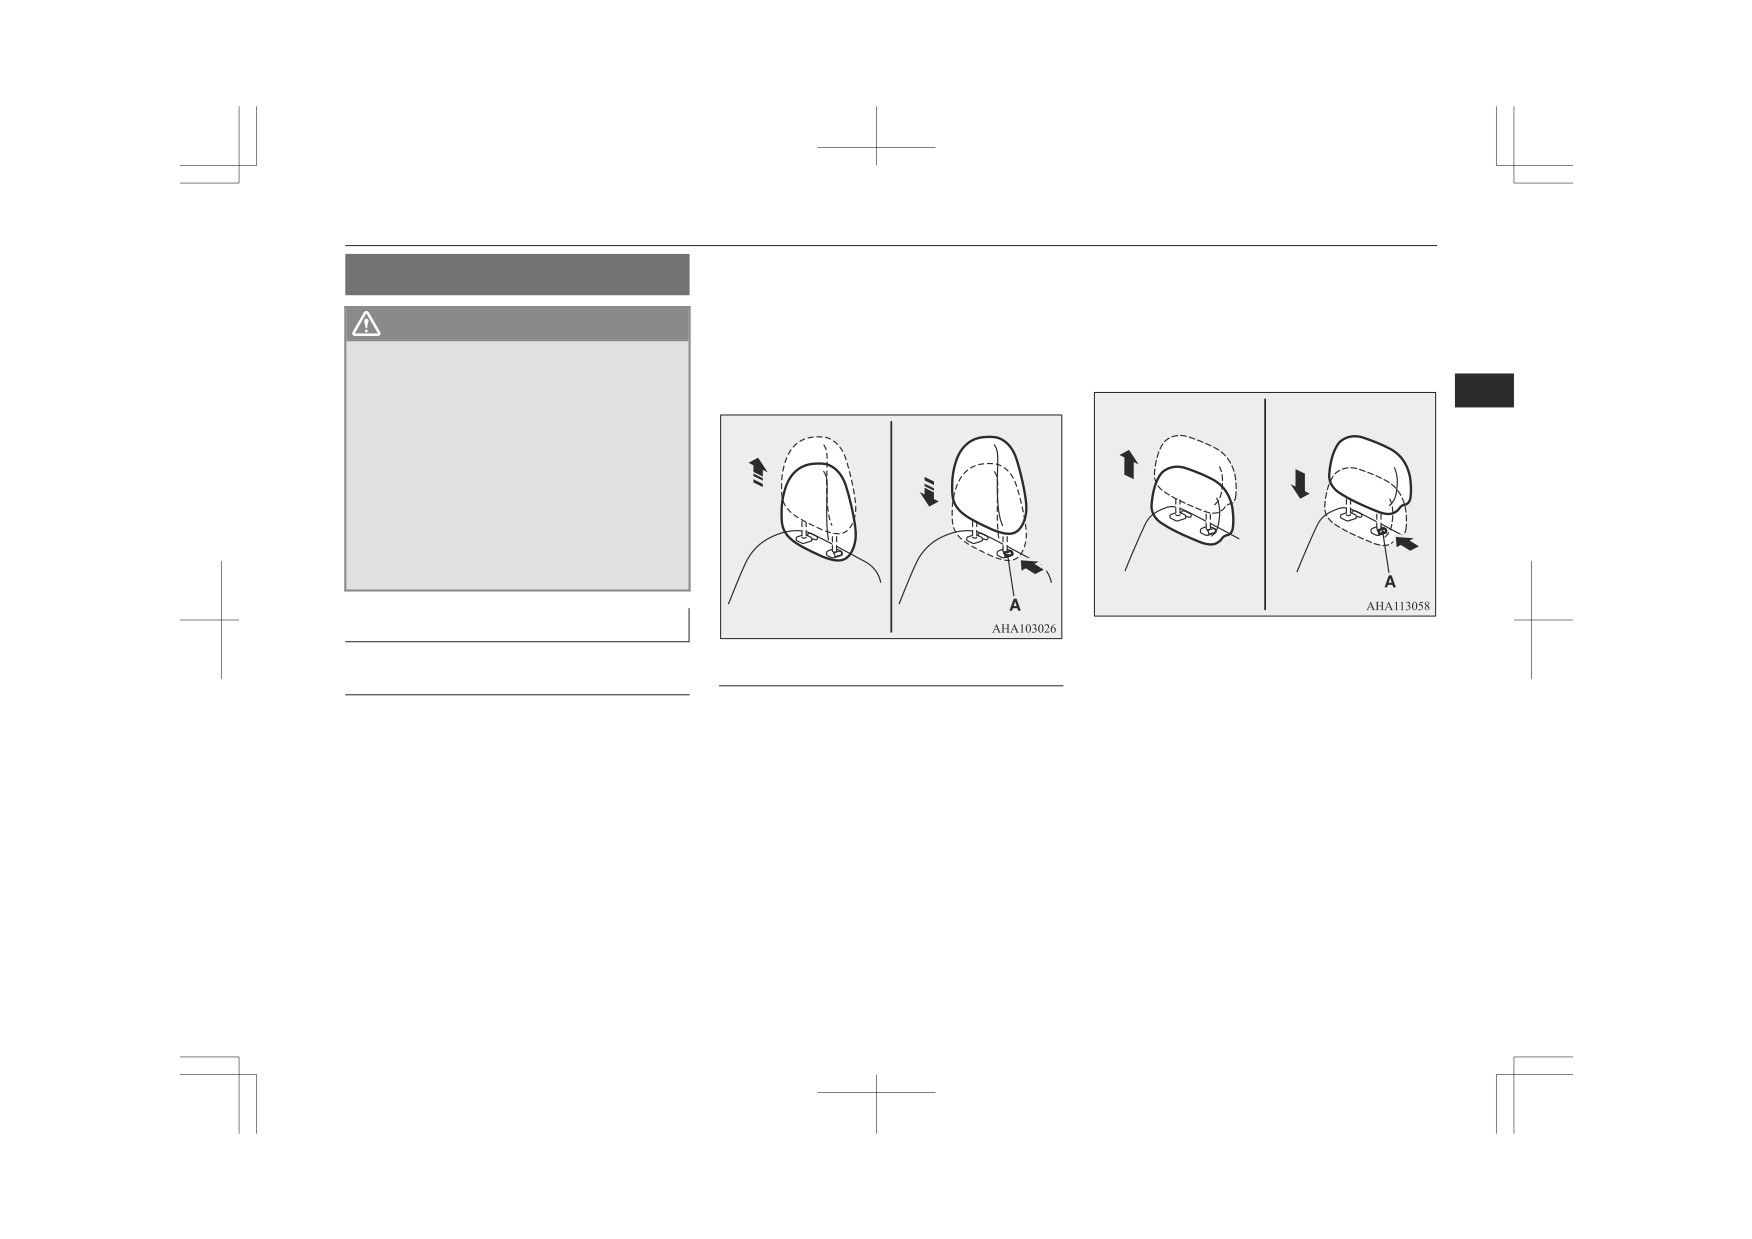
To raise the head restraint, move it upward.
To lower the restraint, move it downward
Head restraints*
To lower the restraint, move it downward
while pushing the height adjusting knob (A)
while pushing the height adjusting knob (A)
in the direction of the arrow. After adjust-
WARNING
in the direction of the arrow. After adjust-
ment, push the head restraint downward and
ment, push the head restraint downward and
make sure that it is locked.
z Driving without the head restraints in
place can cause you and your passengers
make sure that it is locked.
serious injury or death in an accident. To
4
reduce the risk of injury in an accident,
always make sure the head restraints are
installed and properly positioned when
the seat is occupied.
z Never place a cushion or similar device on
the seatback. This can adversely affect
head restraint performance by increasing
the distance between your head and the
restraint.
To adjust height
Rear centre seat (Double cab)
Front seats
To reduce the risk of injury in an accident,
Adjust the head restraint height so that the
pull up the head restraint to the locked posi-
centre of the head restraint is as close as pos-
tion.
sible to ear level to reduce the chances of in-
jury in the event of collision. Any person too
To raise the head restraint, move it upward.
tall for the head restraint to reach their seated
ear level, should adjust the restraint as high
as possible.
Seat and seat belts
4-05
Head restraints*
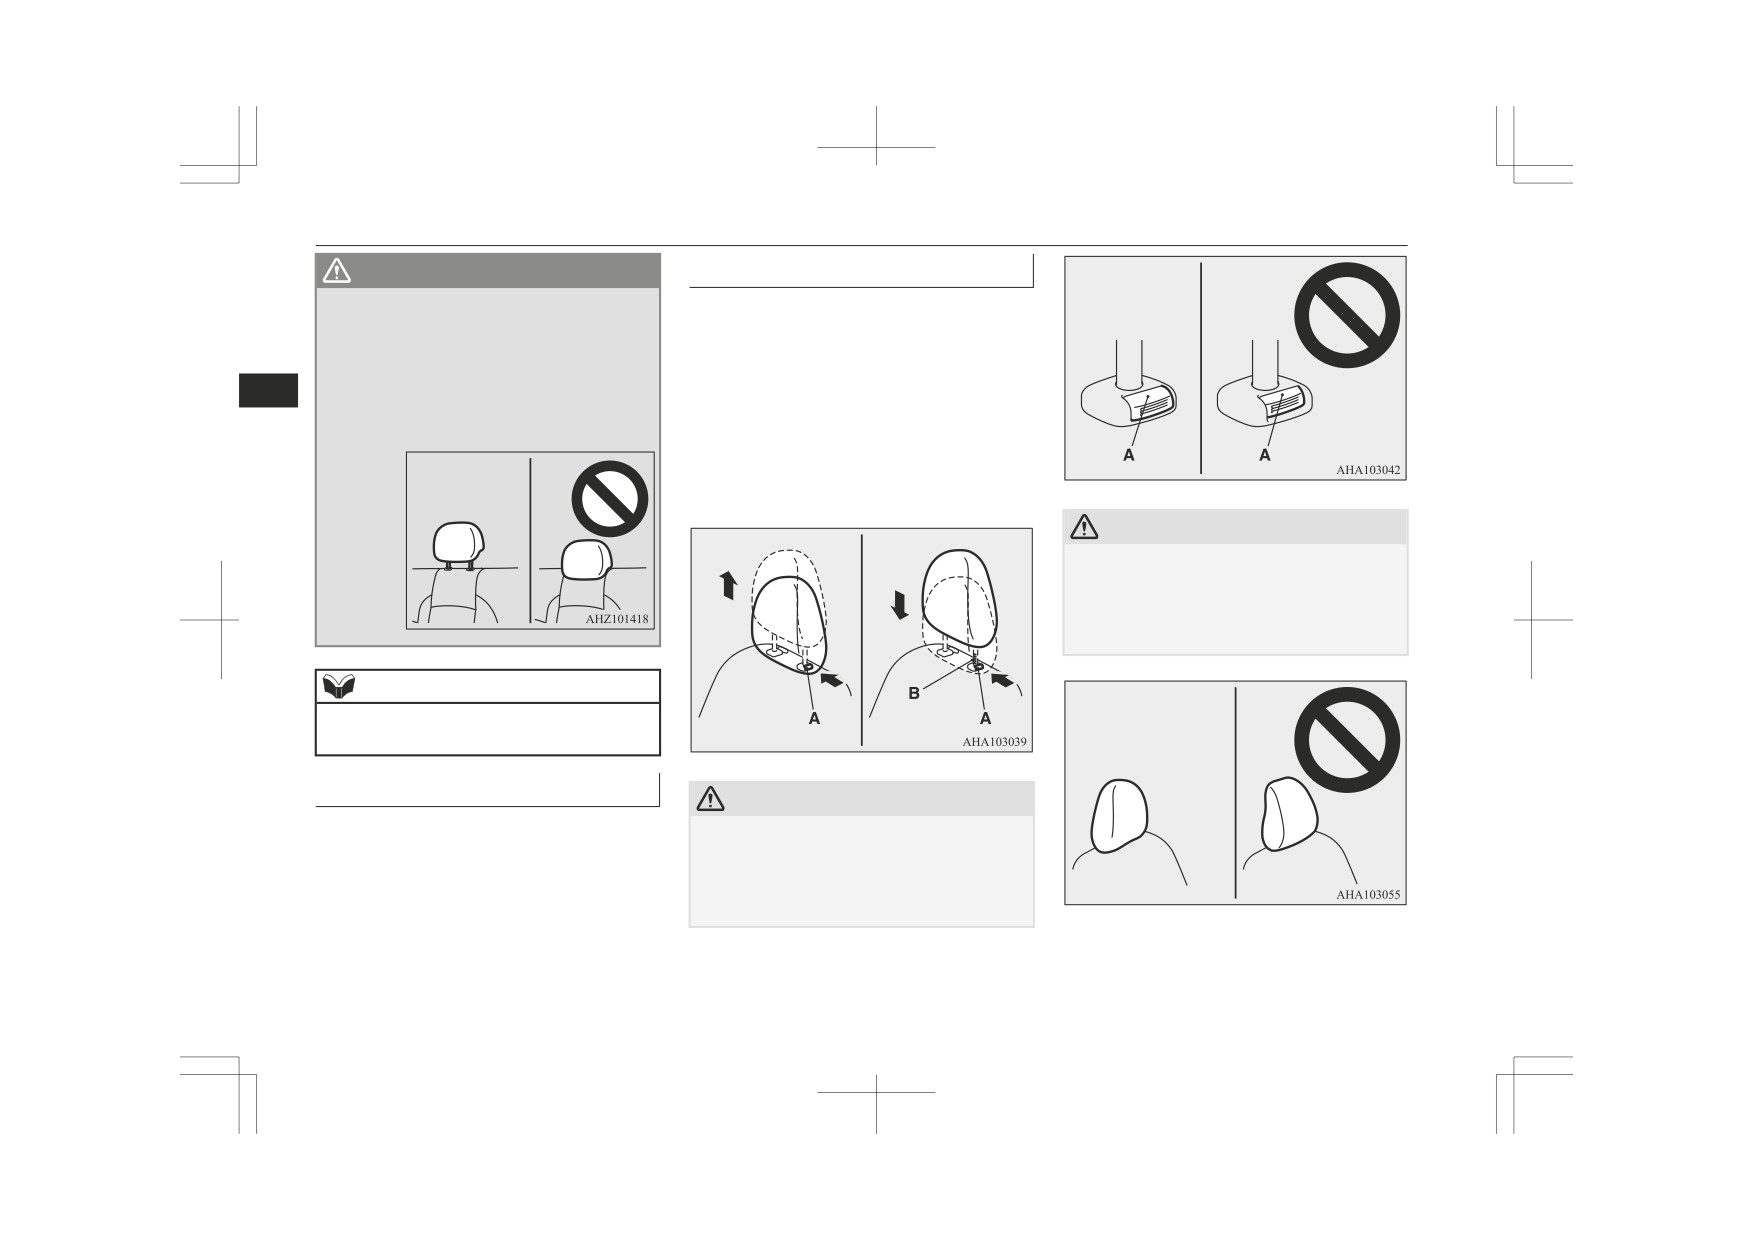
WARNING
To install
z
When a person sits in the middle seating
Confirm that the head restraint is facing the
position of the rear seat, pull up the head
correct direction, and then insert it into the
restraint to a height at which it locks in
seatback while pressing the height adjusting
position. Be sure to make this adjustment
before starting to drive. Serious injuries
knob (A) in the direction indicated by the ar-
4
could otherwise be suffered as the result
row.
of an impact.
The head restraint stalk with the adjustment
notches (B) must be installed in the hole with
the adjusting knob (A) (except head restraints
of the outer seat).
CAUTION
z
The shape and size of the head restraint dif-
fers according to the seat. Always use the
correct head restraint provided for the seat
and do not install the head restraint in the
wrong direction.
NOTE
z
The head restraint height of the outer seat in
the rear seat cannot be adjusted.
To remove
CAUTION
Lift the head restraint with the height adjust-
z Confirm that the height adjusting knob (A)
ing knob (A) pushed in.
is correctly adjusted as shown in the illustra-
tion, and also lift the head restraints to en-
sure that they do not come out of the seat-
back.
4-06
Seat and seat belts
Seat belts
Seat belts
WARNING
NOTE
z
The seat belt will provide its wearer with
z You can check if the belt locks by pulling it
To protect you and your passengers in the
maximum protection if the recliner seat-
forward quickly.
event of an accident, it is most important that
back is placed in fully upright position.
the seat belts are worn correctly while driv-
When the seatback is reclined, there is
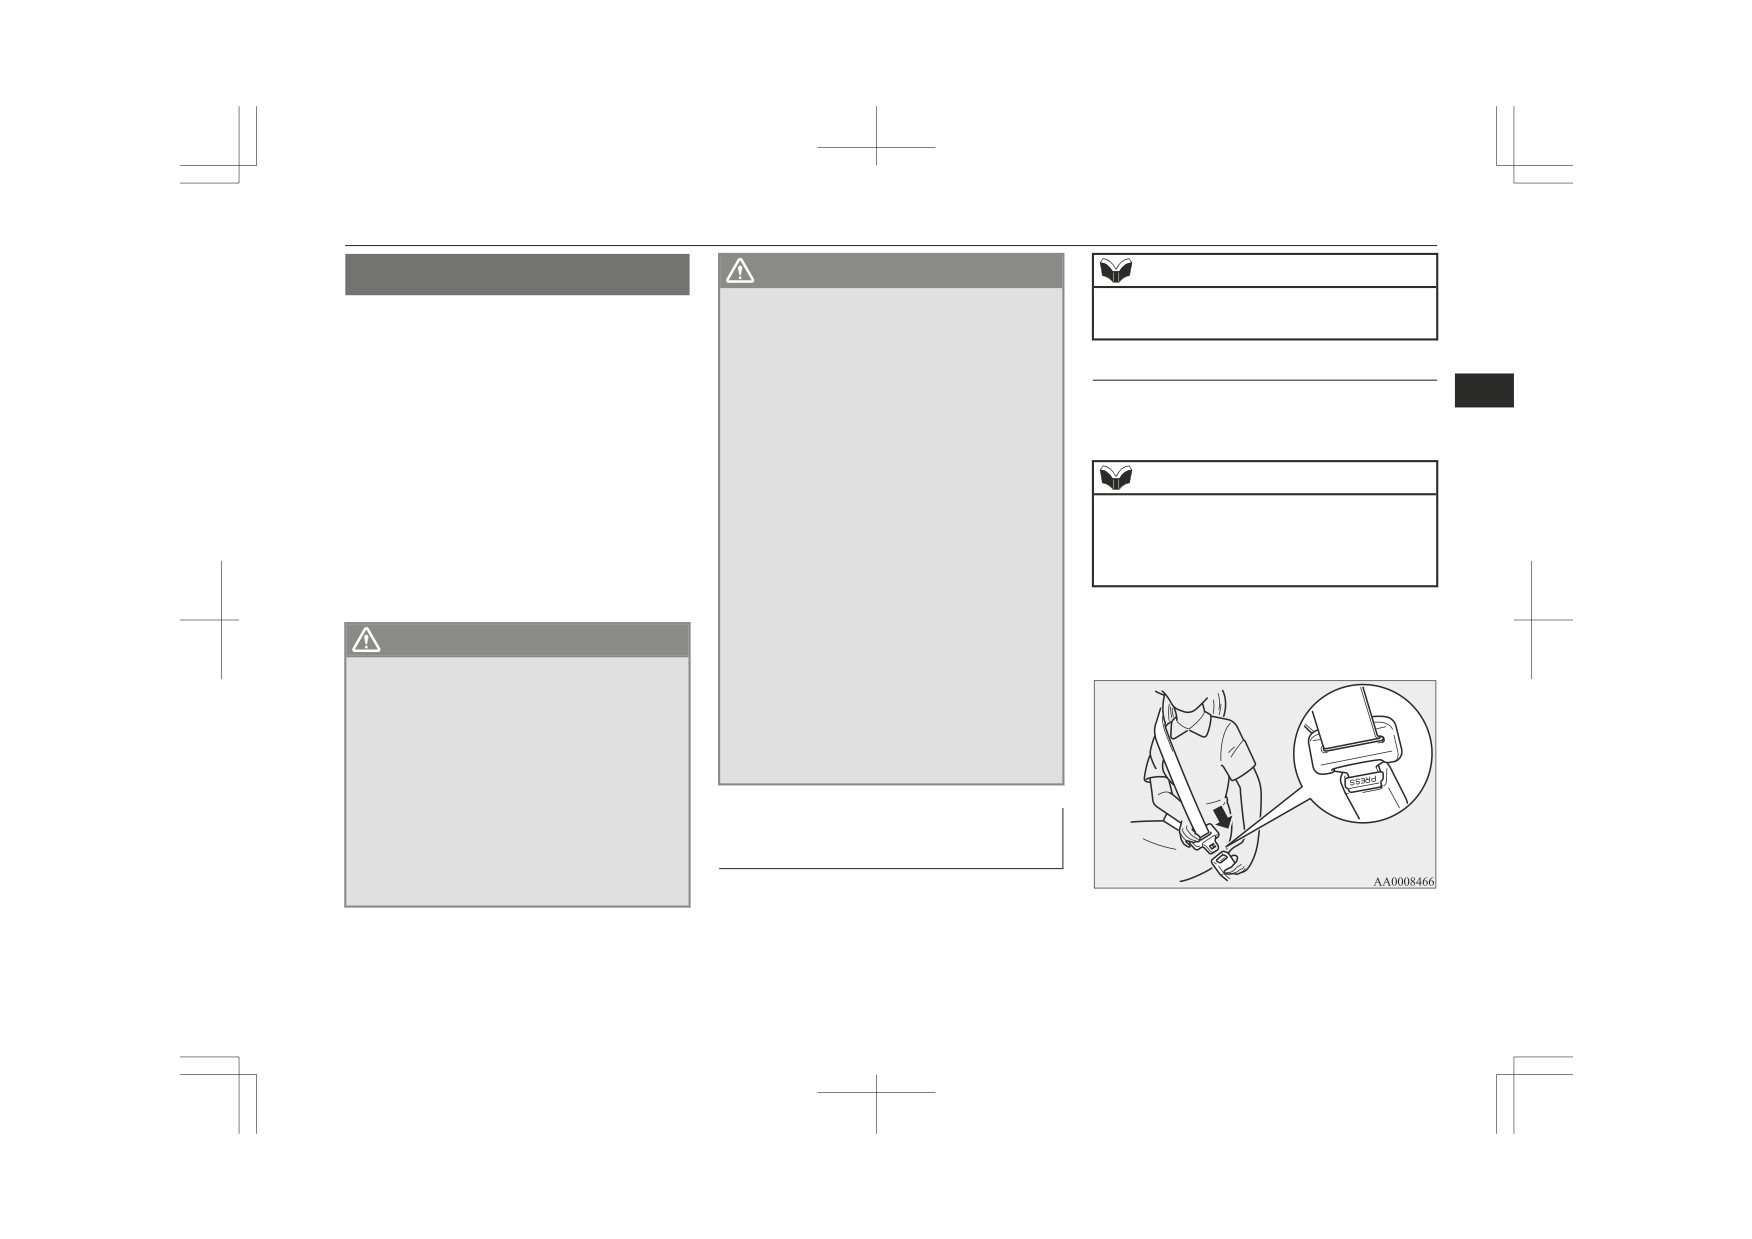
To fasten
ing.
greater risk that the passenger will slide
4
under the belt, especially in a forward im-
1. Pull the seat belt out slowly while hold-
The front seat belts each have a pretensioner
pact accident, and may be injured by the
ing the latch plate.
system. (Club cab)
belt or by striking the instrument panel or
The front seat belts and the rear outer seat
seatbacks.
belts each have a pretensioner system. (Dou-
Remove any twists when using the belt.
NOTE
z
ble cab)
z
No modifications or additions should be
z
When the seat belts cannot be pulled out in a
These belts are used the same way as a con-
made by the user which will either pre-
locked condition, pull the belts once force-
ventional seat belt.
vent the seat belt adjusting devices from
fully and then return them. After that, pull
Refer to “Seat belt pretensioner system and
operating to remove slack, or prevent the
the belts out slowly once again.
force limiter system*” on page 4-10.
seat belt assembly from being adjusted to
remove slack.
z
Never hold a child in your arms or on
2. Insert the latch plate into the buckle until
WARNING
your lap when riding in this vehicle, even
a “click” is heard.
if you are wearing your seat belt. To do so
z Seat belts should always be worn by every
risks severe or fatal injury to the child in
adult who drives or rides in this vehicle,
a collision or sudden stop.
and by all children who are tall enough to
z
Always adjust the seat belt to a snug fit.
wear seat belts properly.
Other children should always use proper
z
Always wear the lap portion of the belt
child restraint systems.
over your hips.
z Always place the shoulder belt over your
shoulder and across your chest. Never put
3-point type seat belt (with
it behind you or under your arm.
z One seat belt should be used by only one
emergency locking mechanism)
person. Doing otherwise can be danger-
This type of belt requires no length adjust-
ous.
ment. Once worn, the belt adjusts itself to the
movement of the wearer, but in the event of a
sudden or strong shock, the belt automatical-
ly locks to hold the wearer’s body.
Seat and seat belts
4-07
Seat belts
For the driver and the front
WARNING
NOTE
passenger’s seat
z Never wear the lap portion of the belt
z If the seat belt (A) or ring (B) becomes dirty,
across your abdomen. During accidents it
the belt may not retract smoothly. If the seat
[Mono-colour liquid crystal display type]
can press sharply against the abdomen
belt and ring are dirty, clean them with a
and increase the risk of injury.
mild soap or detergent solution.
For the driver
z The seat belts must not be twisted when
4
worn.
3. Pull the belt slightly to adjust slackness
as desired.
For the front passenger
To unfasten
Hold the latch plate and push the button on
the buckle.
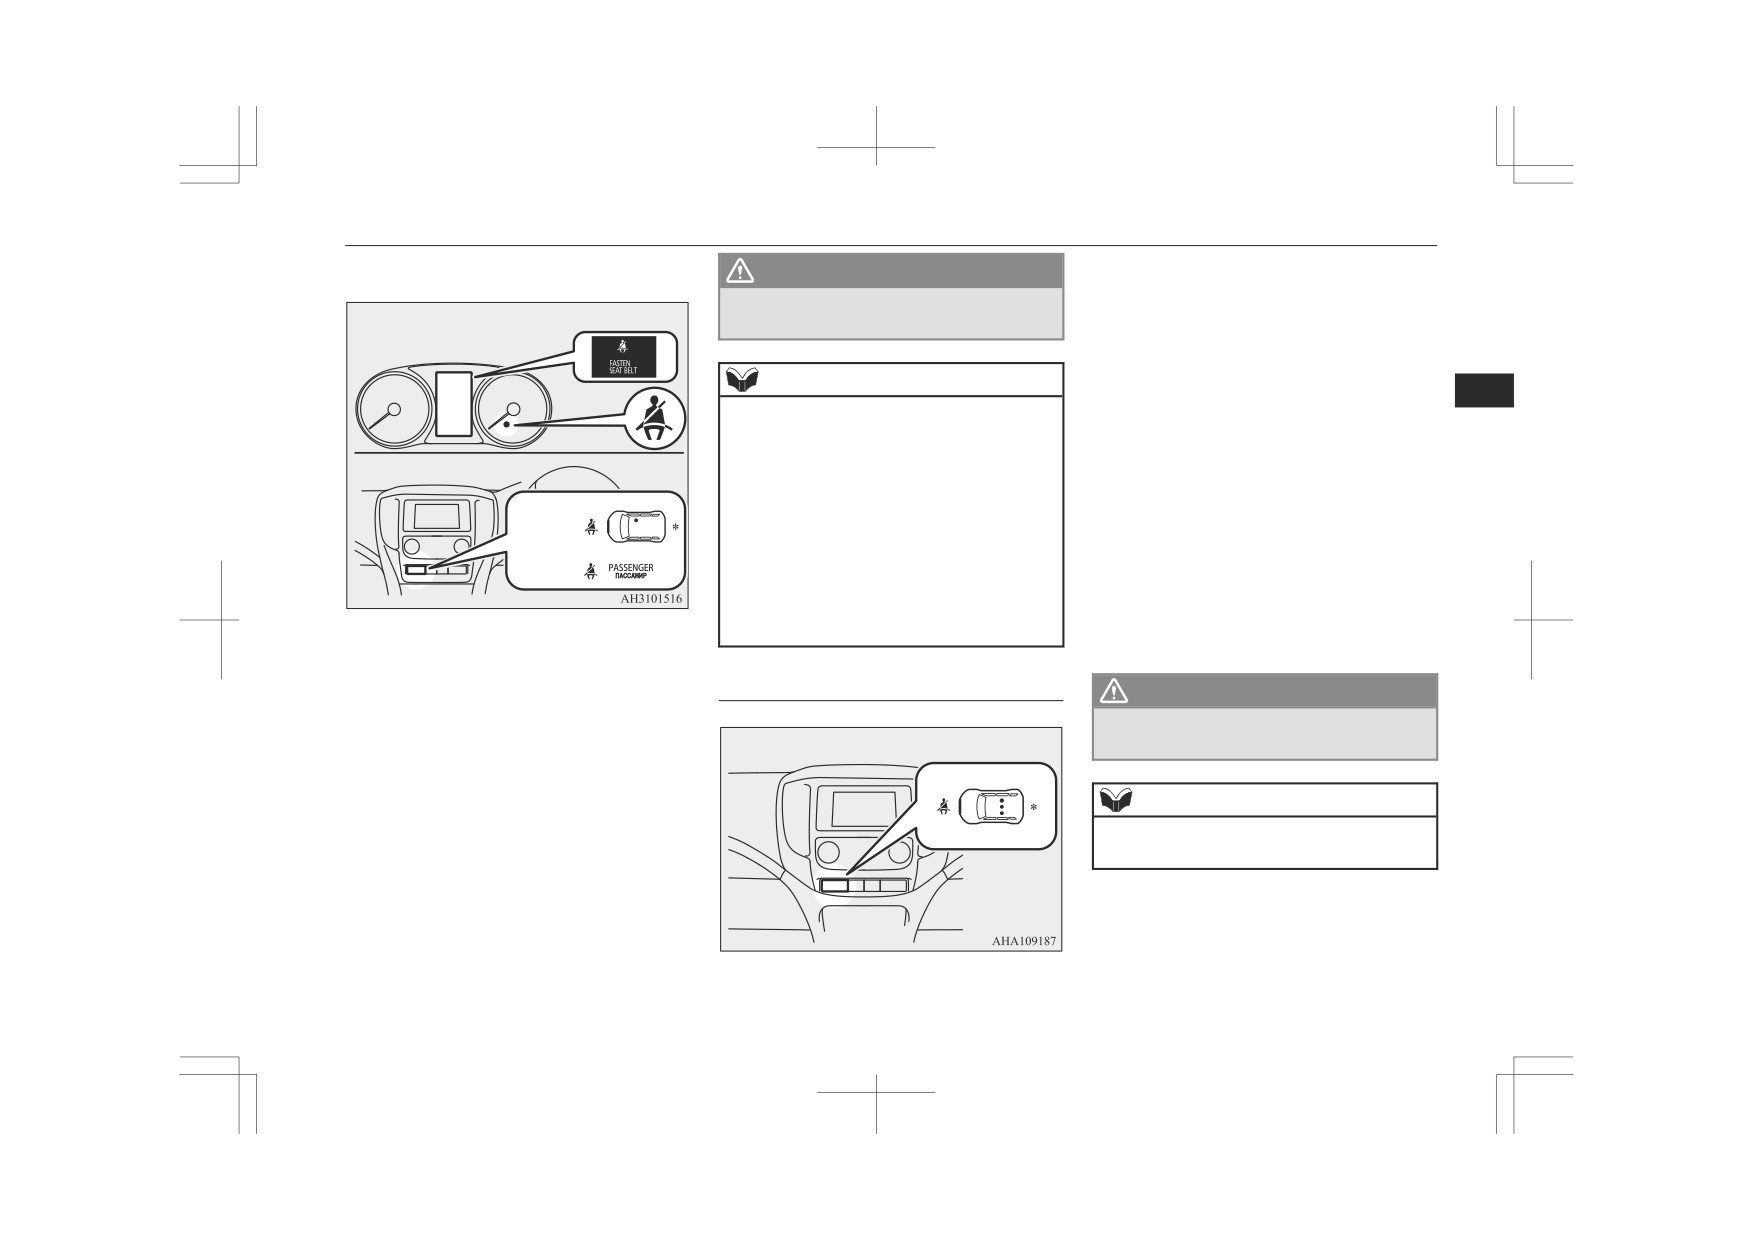
Seat belt reminder
*- This warning lamp shows the case
of the left-hand drive vehicles.
NOTE
z As the belt retracts automatically, keep hold-
ing the latch plate while retracting so that the
belt stows slowly. Failure to do this could
damage the vehicle.
4-08
Seat and seat belts
Seat belts
[Colour liquid crystal display type]
*-
This warning lamp shows the
WARNING
case of the 5-passenger vehicles.
z
Do not install any accessory or sticker
For the driver
that makes the lamp difficult to see.
If the ignition switch is turned to the “ON”
position or the operation mode is put in ON
NOTE
while a seat belt is not fastened, the warning
4
z If the seat belt subsequently remains unfas-
lamp comes on for approximately 30 seconds
tened, the warning lamp and the tone will is-
to remind the rear passenger to fasten the seat
sue further warnings each time the vehicle
belt.
For the front passenger
starts moving from a stop.
If the vehicle is driven with the seat belt still
z For the front passenger seat, the warning
unfastened, the warning lamps come on for
function works only while a person is sitting
on the seat.
approximately another 30 seconds. (This illu-
mination happens only the first time the vehi-
z When luggage is placed on the front passen-
ger seat, a sensor in the seat cushion may,
cle starts moving with the seat belt still un-
depending on the weight and position of the
fastened.)
luggage, cause the warning tone to sound
The warning lamps go off when the seat belt
and the warning lamp to come on.
is fastened.
*- This warning lamp shows the case
of the left-hand drive vehicles.
For the rear passenger’s seats*
WARNING
If the ignition switch is turned to the “ON”
position or the operation mode is put in ON
z Do not install any accessory or sticker
that makes the lamp difficult to see.
while the driver’s and/or the front passeng-
er’s seat belt is not fastened, the warning
lamp comes on and the tone sounds for ap-
NOTE
proximately 6 seconds to remind the driver
z The warning lamp comes on even if no one
and/or the front passenger to fasten the seat
is sitting on the rear seats.
belt.
If the vehicle is driven with the seat belt still
unfastened, the warning lamp will blink and
the tone will sound intermittently until the
seat belt is fastened.
Seat and seat belts
4-09
Pregnant women restraint
NOTE
WARNING
Pretensioner system
When the ignition switch or the operation
z If a seat belt is unfastened while the vehicle
z When adjusting the seat belt anchor, set it
is being driven, the tone sounds for approxi-
at a position that is sufficiently high so
mode is under the following conditions, if
mately
1 second and the warning lamp
that the belt will make full contact with
there is a frontal impact or a side impact (ve-
comes on for approximately 30 seconds. At
your shoulder but will not touch your
hicles equipped with SRS side airbags and
the same time, the warning lamp for the seat
neck.
SRS curtain airbags) severe enough to injure
4
where the seat belt is not fastened comes on.
the driver and/or front passenger or when a
z If the seat belts are initially fastened but a
rollover or overturning of the vehicle is de-
seat belt is unfastened while the vehicle is
Pregnant women restraint
stationary and the vehicle is then driven with
tected (if so equipped), the pretensioner sys-
the seat belt still unfastened, the warning
tem will retract the respective seat belts in-
WARNING
lamp comes on again for approximately 30
stantaneously, thus maximizing the seat belt’s
seconds.
effectiveness.
z Seat belts work for everyone, including
pregnant women. Pregnant women should
[Except vehicles equipped with keyless oper-
use the available seat belts. This will re-
ation system]
Adjustable seat belt anchor
duce the likelihood of injury to both the
The ignition switch is in the
“ON” or
The seat belt anchor height can be adjusted.
woman and the unborn child. The lap belt
“START” position.
To move the anchor, pull the lock knob (A)
should be worn across the thighs and as
[Vehicles equipped with keyless operation
snug against the hips as possible, but not
and slide the anchor to the desired position.
across the waist. Consult your doctor if
system]
Release the lock knob to lock the anchor into
you have any additional questions or con-
The operation mode is in ON.
position.
cerns.
WARNING
Seat belt pretensioner
z To obtain the best results from your pre-
tensioner seat belt, make sure you have
system and force limiter
adjusted your seat correctly and wear
system*
your seat belt properly.
The front seat belts each have a pretensioner
system and force limiter system. (Club cab)
The front seat belts and the rear outer seat
belts each have a pretensioner system and
force limiter system. (Double cab)
4-10
Seat and seat belts
Child restraint
CAUTION
Force limiter system
WARNING
Installation of audio equipment or repairs in
In the event of a collision, each force limiter
z
z When attaching a child restraint system
the vicinity of the pretensioner seat belts or
system will effectively absorb the load ap-
to the rear seat, adjust the front seat to
floor console must be performed in line with
plied to the seat belt so as to minimize the
prevent the front seatbacks from touching
MITSUBISHI MOTORS guidelines. It is
impact to the passenger.
the child’s feet and child restraint system.
important to do so because the work could
Otherwise, the child could be seriously in-
4
affect the pretensioner systems.
jured in the event of hard braking or a
Child restraint
z
If you need to scrap the vehicle, please con-
collision.
sult a MITSUBISHI MOTORS Authorized
Service Point. It is important to do so be-
When transporting children in your vehicle,
cause unexpected activation of the preten-
some type of child restraint system should al-
Caution for installing the child
sioner seat belts could cause injuries.
ways be used according to the size of the
restraint on vehicles with a
child. This is required by law in most coun-
front passenger airbag
tries.
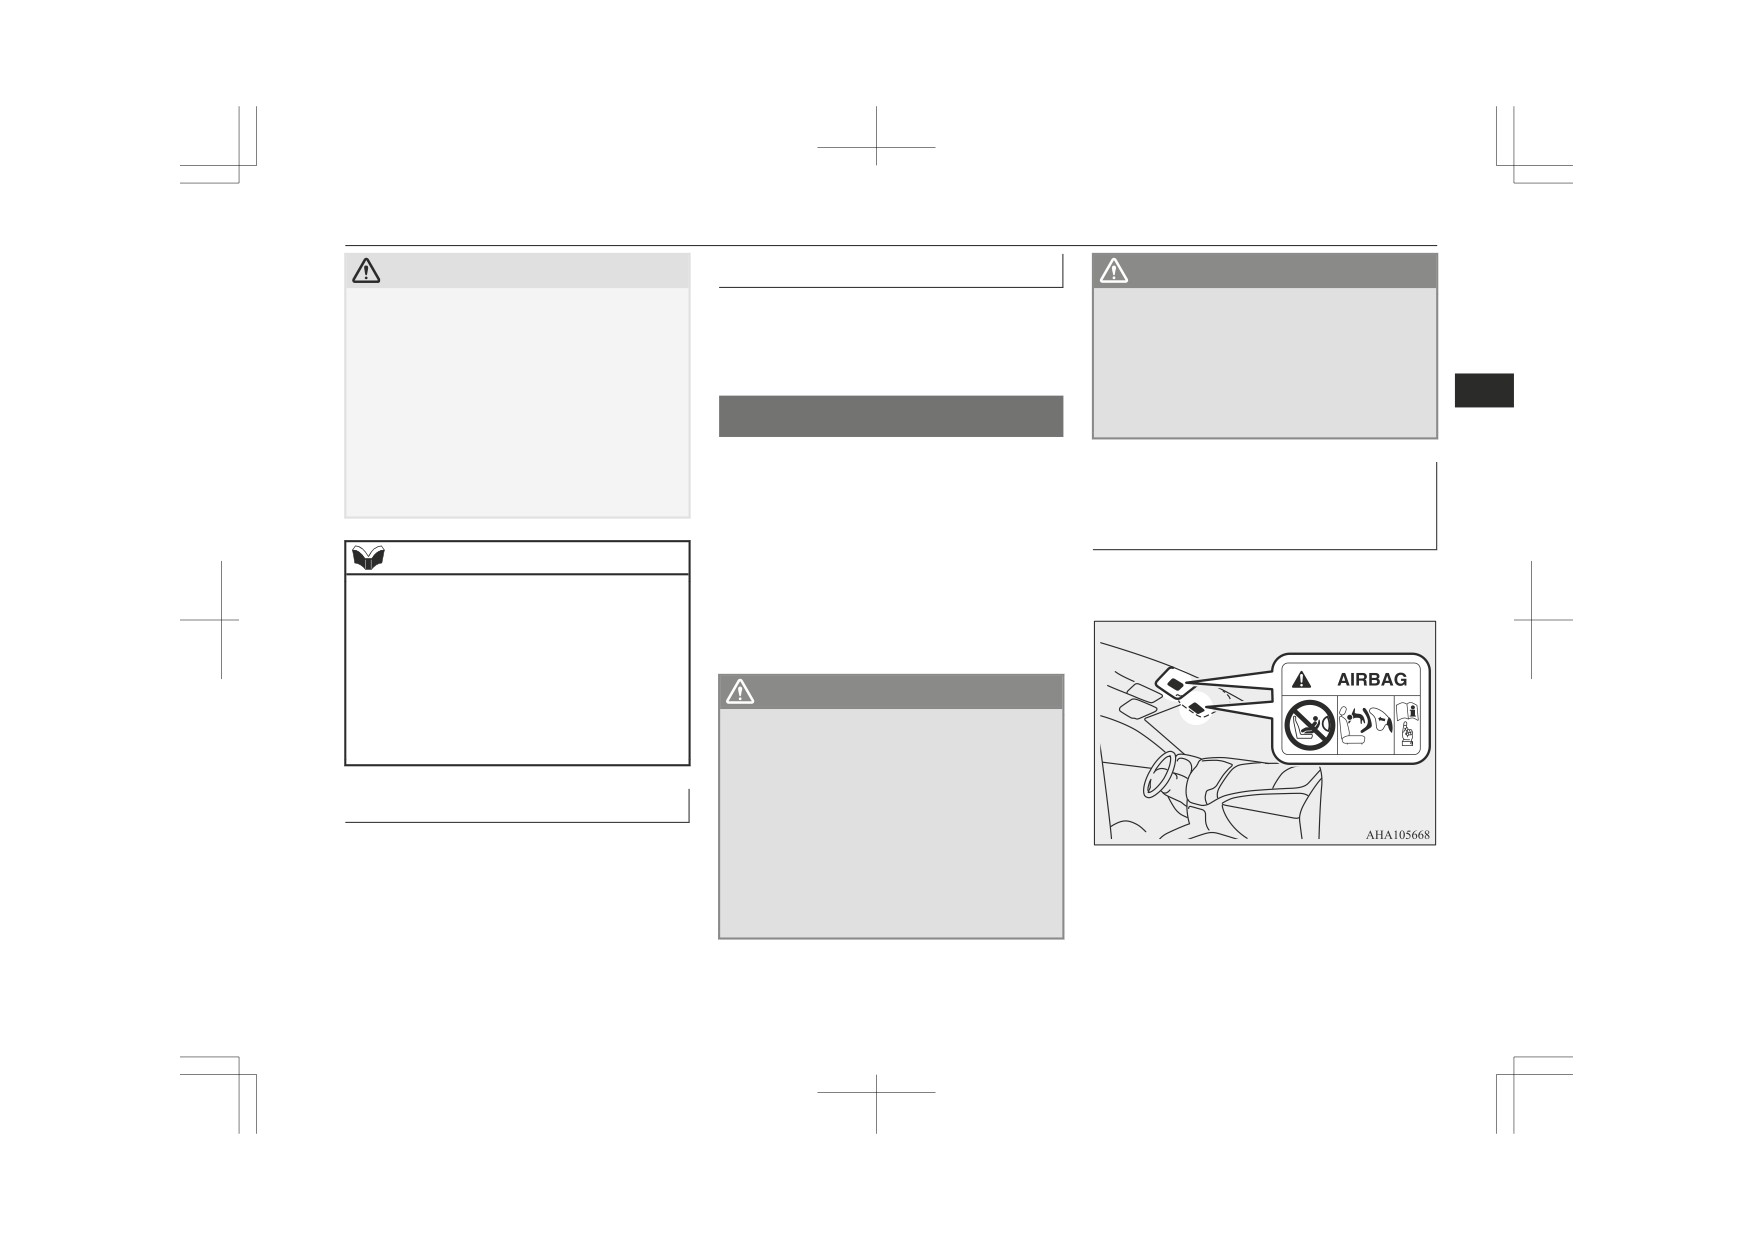
NOTE
The label shown here is attached on vehicles
The regulations concerning driving with chil-
with a front passenger airbag.
z
The pretensioner seat belts will be activated
dren in the front seat may differ from country
if the vehicle suffers a severe impact, even if
to country. You are advised to comply with
the seat belts are not worn.
the relevant regulations.
z
The pretensioner seat belts are designed to
work only once. After the pretensioner seat
belts have been activated, we recommend
WARNING
you to have them replaced by a
MITSUBISHI MOTORS Authorized Serv-
z When possible, put children in the rear
ice Point.
seat. Accident statistics indicate that chil-
dren of all sizes and ages are safer when
properly restrained in the rear seat rather
SRS warning
than in the front seat.
z Holding a child in your arms is no substi-
The same warning lamp/display is shared by
tute for a restraint system. Failure to use
the SRS airbags and the pretensioner seat
a proper restraint system can result in se-
belts.
vere or fatal injury to the child.
Refer to
“SRS warning lamp/display” on
z Each child restraint device or fixing is to
page 4-34.
be used only by one child.
Seat and seat belts
4-11
Child restraint
Instruction:
WARNING
WARNING
z
For small infants, an infant carrier
z Extreme Hazard!
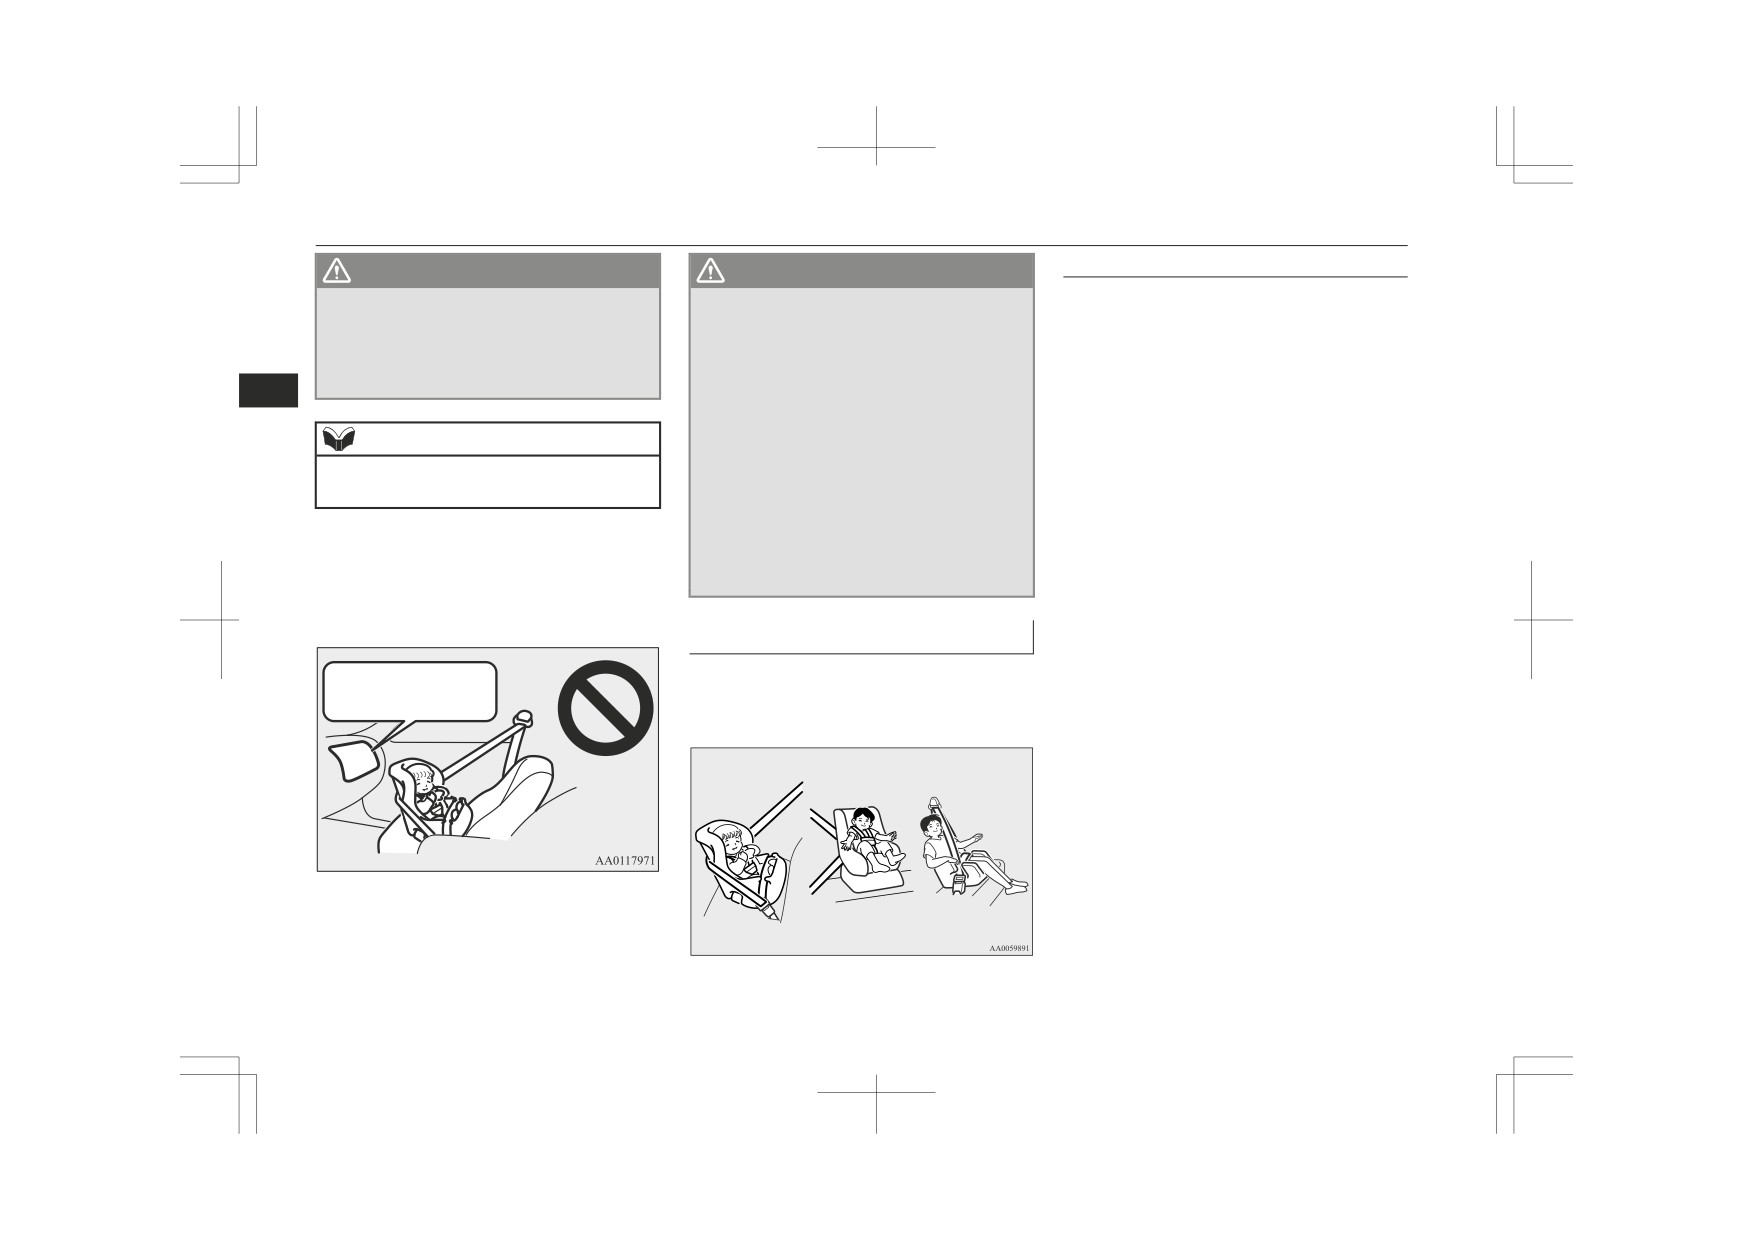
z A REARWARD FACING CHILD RE-
NEVER use a rearward facing child re-
STRAINT must NOT be used in the front
should be used. For small children
straint on a seat protected by an ACTIVE
passenger seat if the front passenger’s air-
whose height when seated allows the
AIRBAG in front of it, DEATH or SERI-
bag has not been deactivated. The force of
shoulder belt to lie in contact with the
OUS INJURY to the CHILD can occur.
an inflating airbag could kill or cause se-
4
face or the throat, a child seat should be
rious injuries to the child. A rearward
used.
facing child restraint should be used in
z
The child restraint system should be ap-
NOTE
the rear seat.
propriate for the child’s weight and
z A FORWARD FACING CHILD RE-
z The labels may be in different positions de-
STRAINT should be used in the rear seat
height and properly fit in the vehicle.
pending on the vehicle model.
whenever possible; if it must be used in
For a higher degree of safety: THE
the front passenger seat, turn off the front
CHILD RESTRAINT SYSTEM
Use rearward facing child restraints in the
passenger’s airbag ON-OFF switch. Fail-
SHOULD BE INSTALLED IN THE
rear seat or turn off the front passenger’s air-
ure to do so could kill or cause serious in-
REAR SEAT.
juries to the child.
bag ON-OFF switch. Refer to “To turn an air-
z
Before purchasing a child restraint sys-
bag off” on page 4-27.
tem, try installing it in the seat to make
Infants and small children
sure there is a good fit. Because of the
When transporting infants and small children
location of the seat belt buckles and the
Front passenger's
shape of the seat cushion, it may be dif-
in your vehicle, follow the instruction given
airbag ON
ficult to securely install some manufac-
below.
turer’s child restraint systems.
If the child restraint system can be
pulled forward or to either side easily on
the seat cushion after the seat belt has
been tightened, choose another manufac-
turer’s child restraint system.
4-12
Seat and seat belts
Child restraint
WARNING
Older children
When installing a child restraint system,
Children who have outgrown the child re-
z
refer to the instructions provided by the
straint system should be seated in the seat
manufacturer of the restraint system.
and wear combination lap shoulder belt.
Failure to do so can result in severe or fa-
The lap portion of the belt should be snug
tal injury to the child.
and positioned low on the abdomen so that it
4
z
After installation, push and pull the child
is below the top of the hip-bone. Otherwise,
restraint system back and forth, and side
the belt could intrude into the child’s abdo-
to side, to see that it is properly secured. If
the child restraint system is not installed
men during an accident and cause injury.
securely, it may cause injury to the child
or other occupants in the case of accident
or sudden stops.
z
When the child restraint system is not in
use, keep your child restraint system fixed
firmly or remove it from the vehicle in or-
der to prevent it from being thrown
around inside the vehicle during an acci-
dent.
NOTE
z
Depending on the seating position in the ve-
hicle and the child restraint system that you
have, the child restraint can be attached us-
ing one of the following two locations:
• Using the lower anchorage in the rear seat
ONLY if the child restraint has ISOFIX/i-
Size mountings (Double cab) (See page
4-21).
• Using the seat belt (See page 4-21).
Seat and seat belts
4-13
Child restraint
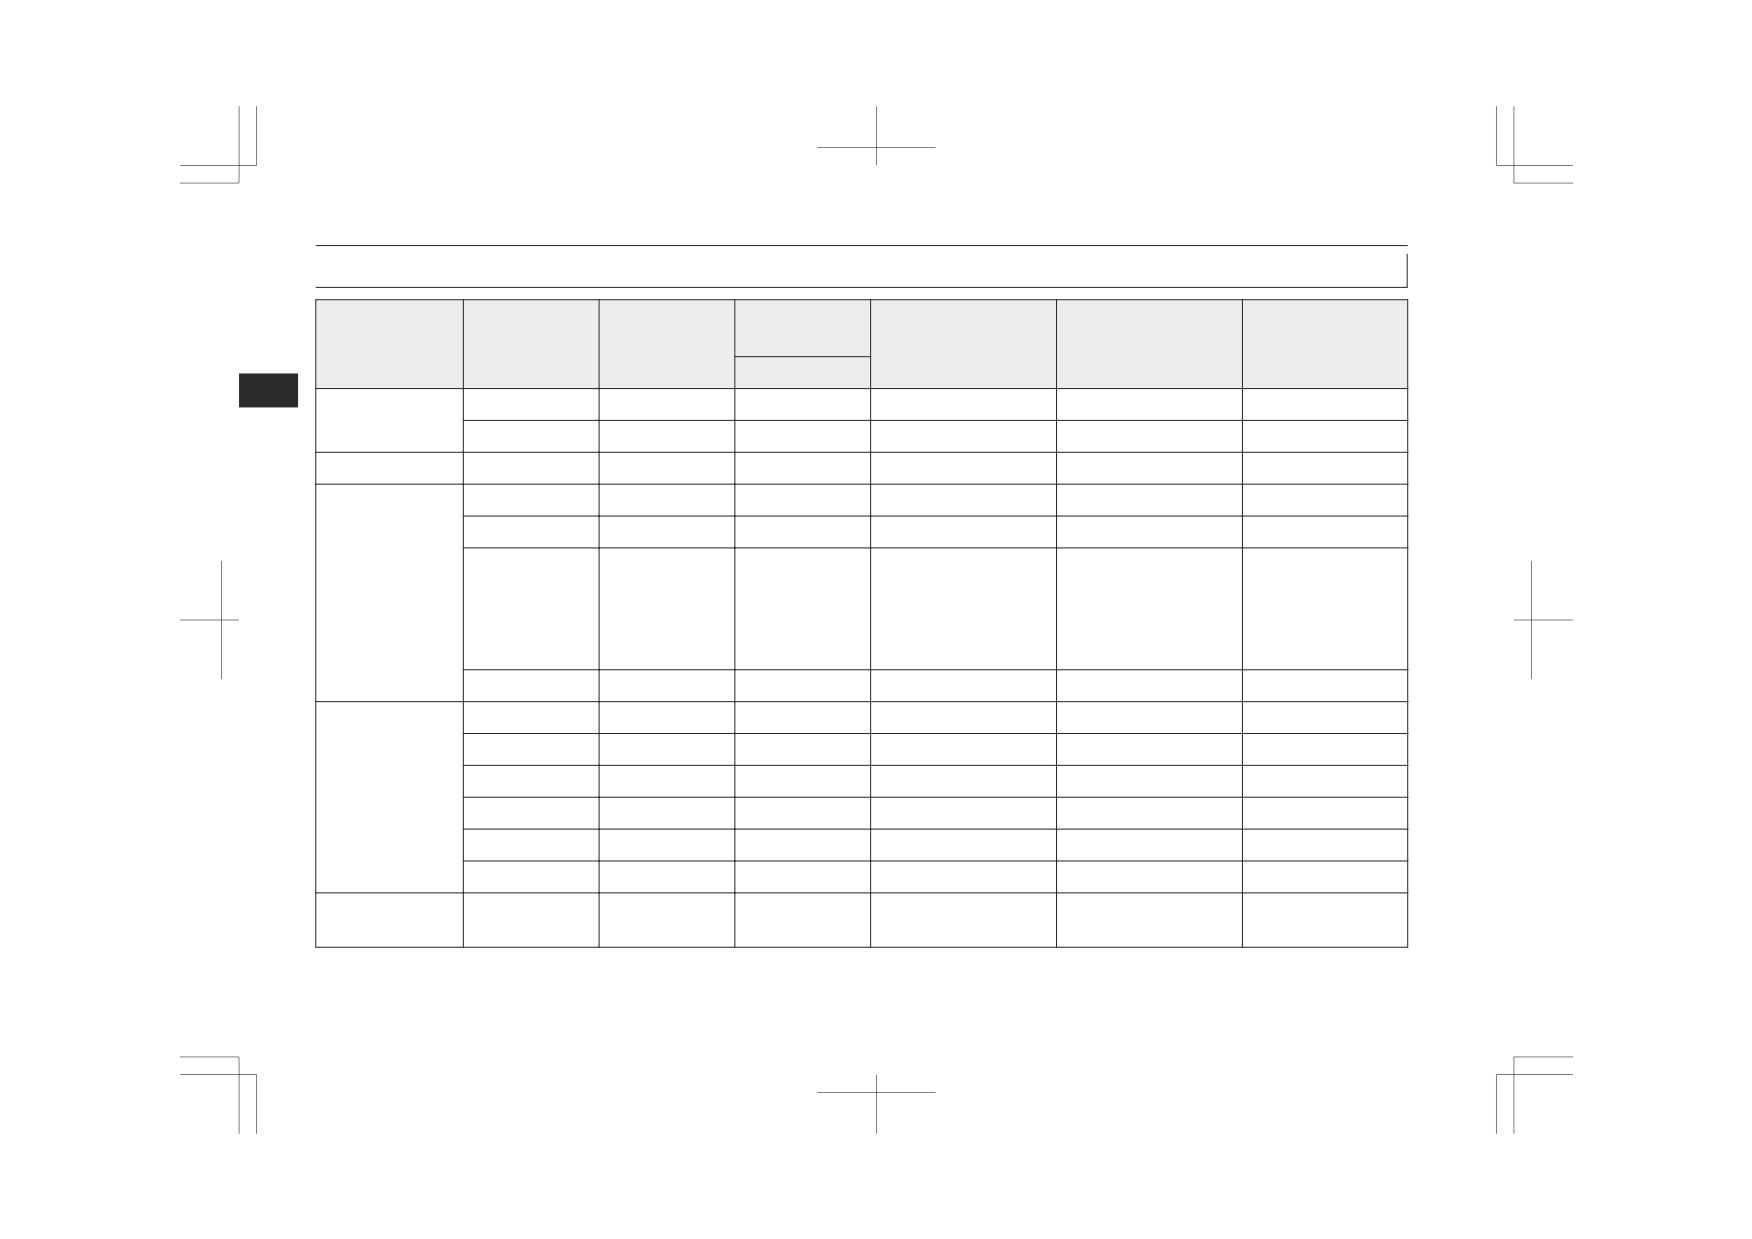
Suitability for various ISOFIX positions (Double cab)
Vehicle ISO-
Recommended Child
UN-R44 Approval
UN-R129 Approval
Mass group
Size class
Fixture
FIX positions*1
Restraint Systems*2
No.
No.
Rear outboard
4
Carrycot
F
ISO/L1
X
—
—
—
G
ISO/L2
X
—
—
—
0 - Up to 10 kg
E
ISO/R1
IL
—
—
—
0+ - Up to 13 kg
E
ISO/R1
IL
—
—
—
—
ISO/R2X
IL
—
—
—
BABY-SAFE i-SIZE:
MZ315055
D
ISO/R2
IL, IL#
BABY-SAFE i-SIZE
—
E1-000008
FLEX BASE:
MZ315056
C
ISO/R3
IL
—
—
—
I - 9 kg to 18 kg
—
ISO/R2X
IL
—
—
—
D
ISO/R2
IL
—
—
—
C
ISO/R3
IL
—
—
—
B
ISO/F2
IUF
—
—
—
B1
ISO/F2X
IUF, IL#
DUO plus: MZ313045
E1-04301133
—
A
ISO/F3
IUF
—
—
—
II & III - 15 kg to
—
—
IL#
KIDFIX XP:
E1-04301304
—
36 kg
MZ315025
4-14
Seat and seat belts
Child restraint
For detailed information, consult your MITSUBISHI MOTORS Authorized Service Point.
CAUTION
z When installing a child restraint system, remove the head restraint from the seat.
z When attaching a child restraint system to the rear seat, adjust the front seat to prevent the front seatbacks from touching the child’s feet and child restraint
system.
4
z
“BABY-SAFE i-SIZE” and “BABY-SAFE i-SIZE FLEX BASE” are designed for children 40-83 cm in height.
Definition of characters to be inserted in the table above:
z IUF- Suitable for ISOFIX forward restraint child restraint systems of universal category approved for use in the mass group.
z IL- Suitable for ISOFIX child restraint systems of semi-universal category approved for use in the mass group.
z IL# - Suitable for particular ISOFIX child restraint systems of MITSUBISHI MOTORS GENUINE Parts.
See the above table of “Recommended Child Restraint Systems”
z X- ISOFIX position not suitable for ISOFIX child restraint systems in this mass group.
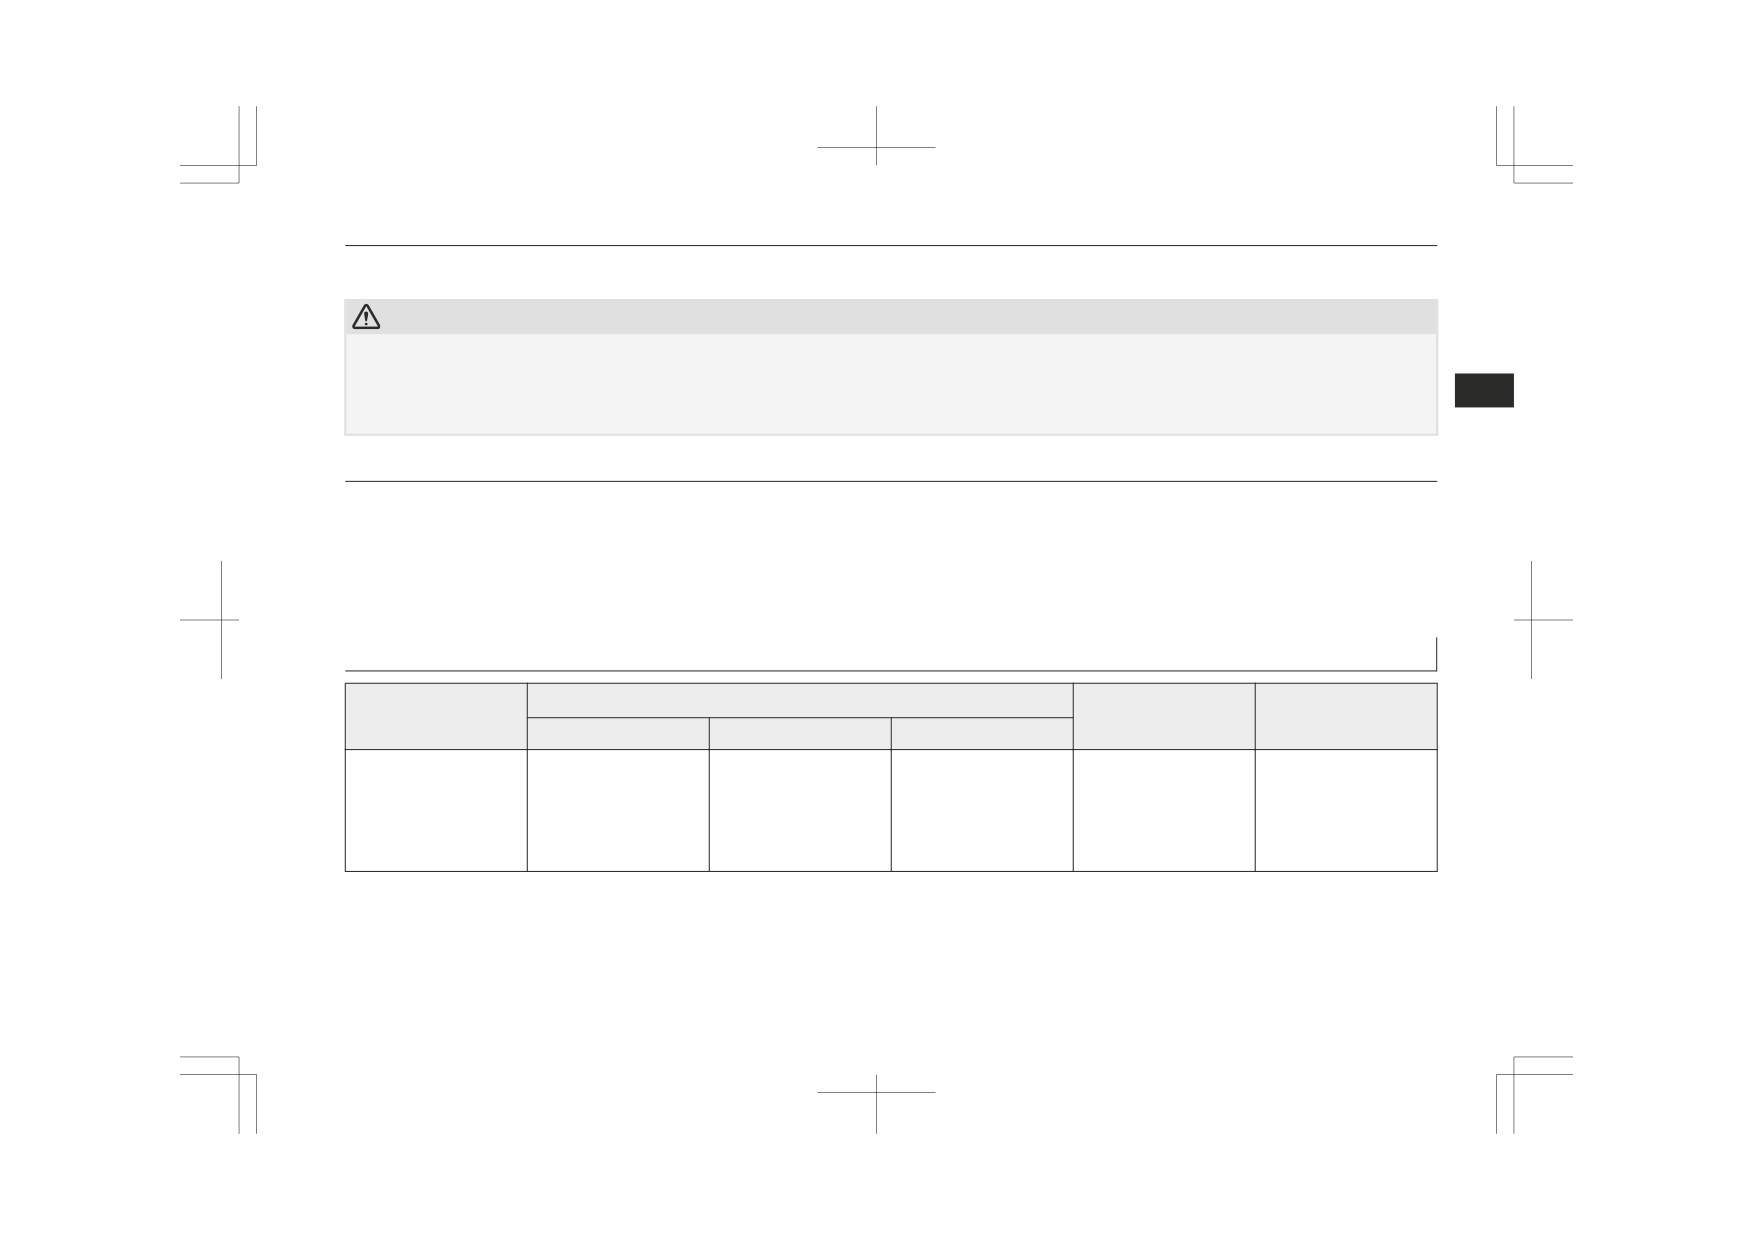
i-Size child restraint system (Double cab)
Seating Position*1
Recommended Child
UN-R129 Approval
Restraint Systems*2
No.
Front passenger
Second outboard
Rear centre
BABY-SAFE i-SIZE:
MZ315055
i-Size child restraint
X
i-U
X
BABY-SAFE i-SIZE
E1-000008
system
FLEX BASE:
MZ315056
*1: Vehicles with i-Size marking. (Refer to “Lower anchorage location” on page 4-20.)
*2: MITSUBISHI MOTORS Europe B.V. reserves the right to changes without any prior announcement.
For detailed information, consult your MITSUBISHI MOTORS Authorized Service Point.
Seat and seat belts
4-15
Child restraint
CAUTION
z
“BABY-SAFE i-SIZE” and “BABY-SAFE i-SIZE FLEX BASE” are designed for children 40-83 cm in height, and up to 13 kg in weight.
Definition of characters to be inserted in the table above:
z i-U- Suitable for i-Size “universal” child restraint system forward and rearward facing.
4
z X- Seating position not suitable for i-Size “universal” child restraint systems.
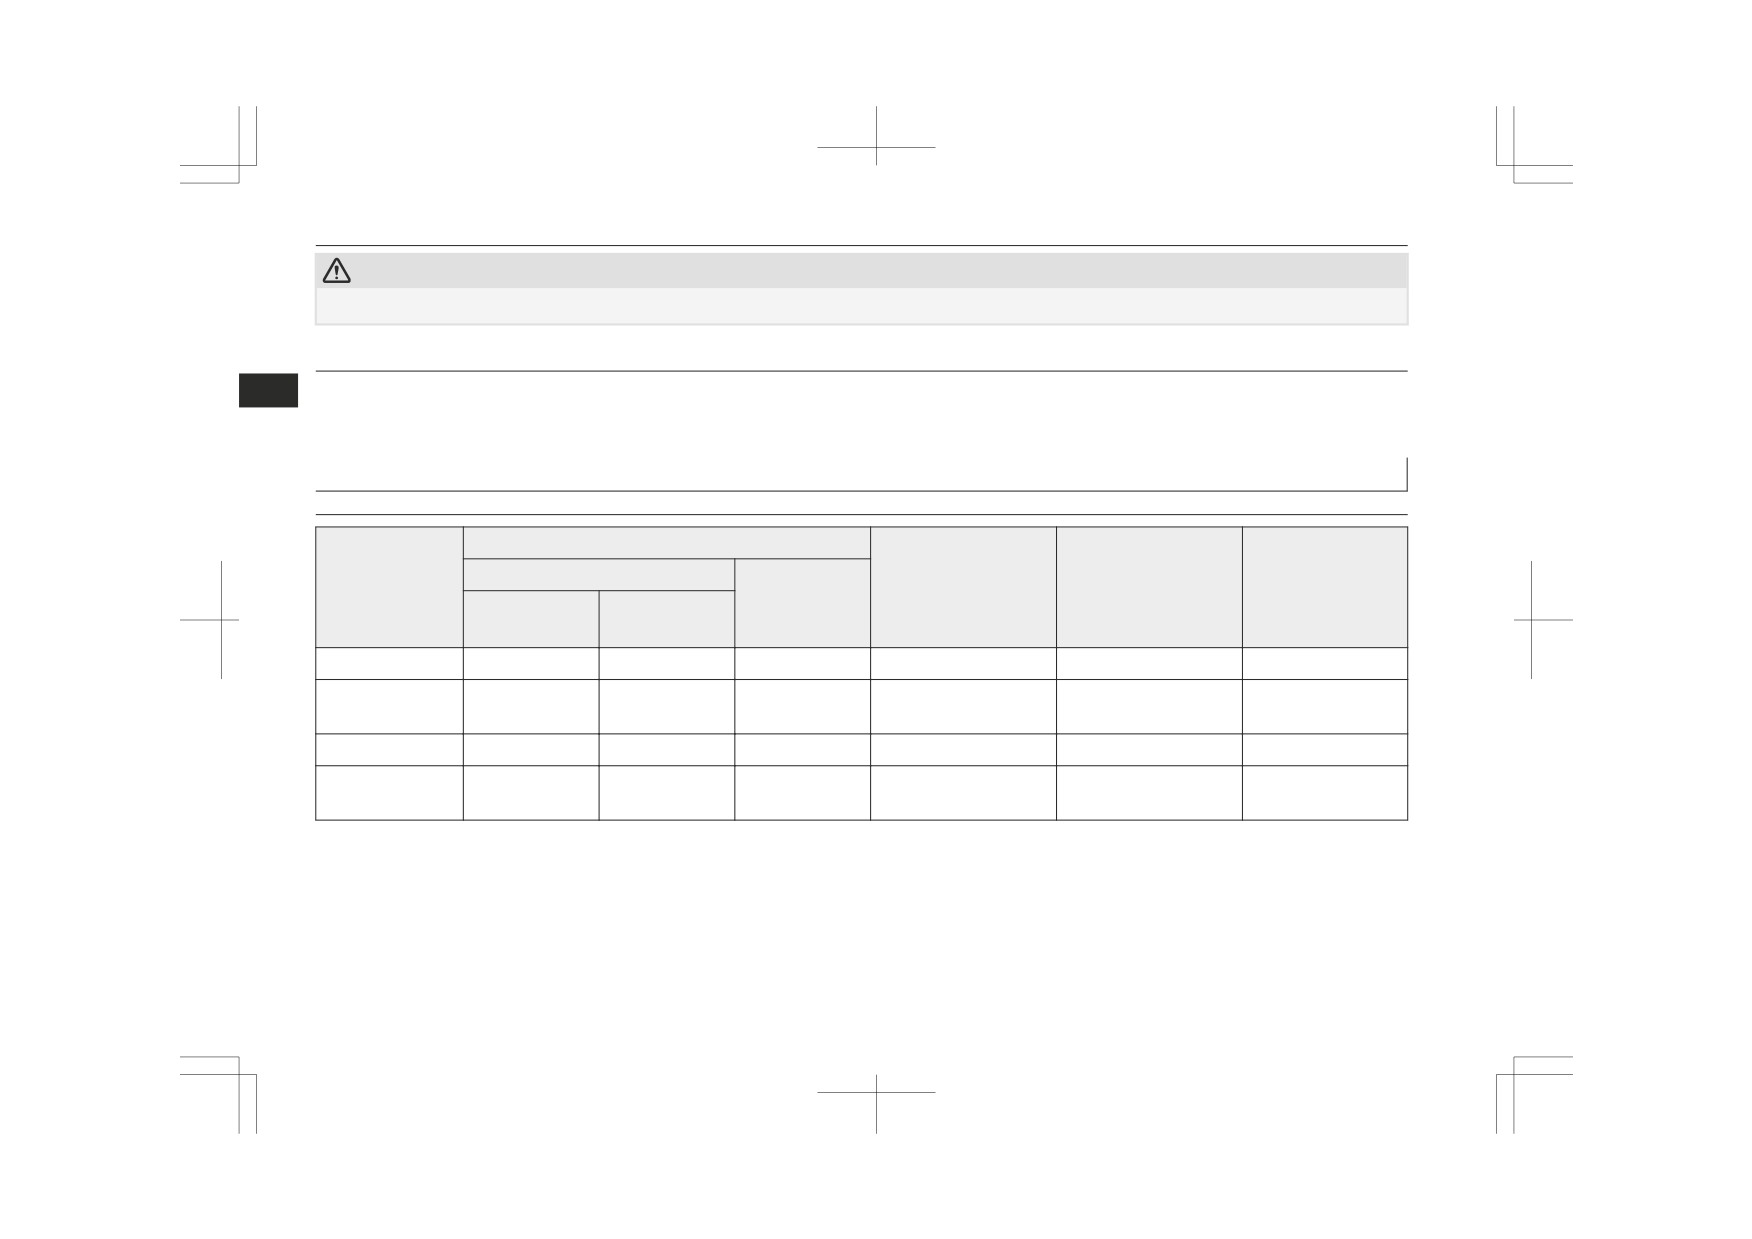
Suitability for various seating positions
Club cab
Seating position
Front passenger
Recommended Child
UN-R44
UN-R129
Mass group
Rear Out-
Restraint Systems*1
Approval No.
Approval No.
Activated air-
Deactivated
board
bag
airbag*2
0 - Up to 10 kg
X
U
X
—
—
—
0+ - Up to 13 kg
BABY-SAFE i-SIZE:
X
U, L#
X
—
E1-000008
MZ315055
I - 9 kg to 18 kg
X
U, L#
X
DUO plus: MZ313045
E1-04301133
—
II & III - 15 kg to
KIDFIX XP:
X
U*3, L#
X
E1-04301304
—
36 kg
MZ315025
*1: MITSUBISHI MOTORS Europe B.V. reserves the right to changes without any prior announcement.
For detailed information, consult your MITSUBISHI MOTORS Authorized Service Point.
*2: The front passenger’s airbag is deactivated by using the front passenger’s airbag ON-OFF switch.
*3: Do not remove the head restraint when installing a booster cushion.
4-16
Seat and seat belts