Mitsubishi Outlander GS45X. Manual - part 502


  Index      Mitsubishi     Mitsubishi Outlander GS45X - service repair manual


Search            


Content   ..  500  501  502  503   ..


Mitsubishi Outlander GS45X. Manual - part 502


OIL PAN AND OIL STRAINER

TSB Revision

ENGINE MECHANICAL <3.0L ENGINE>

11C-45

INSTALLATION SERVICE POINTS

.

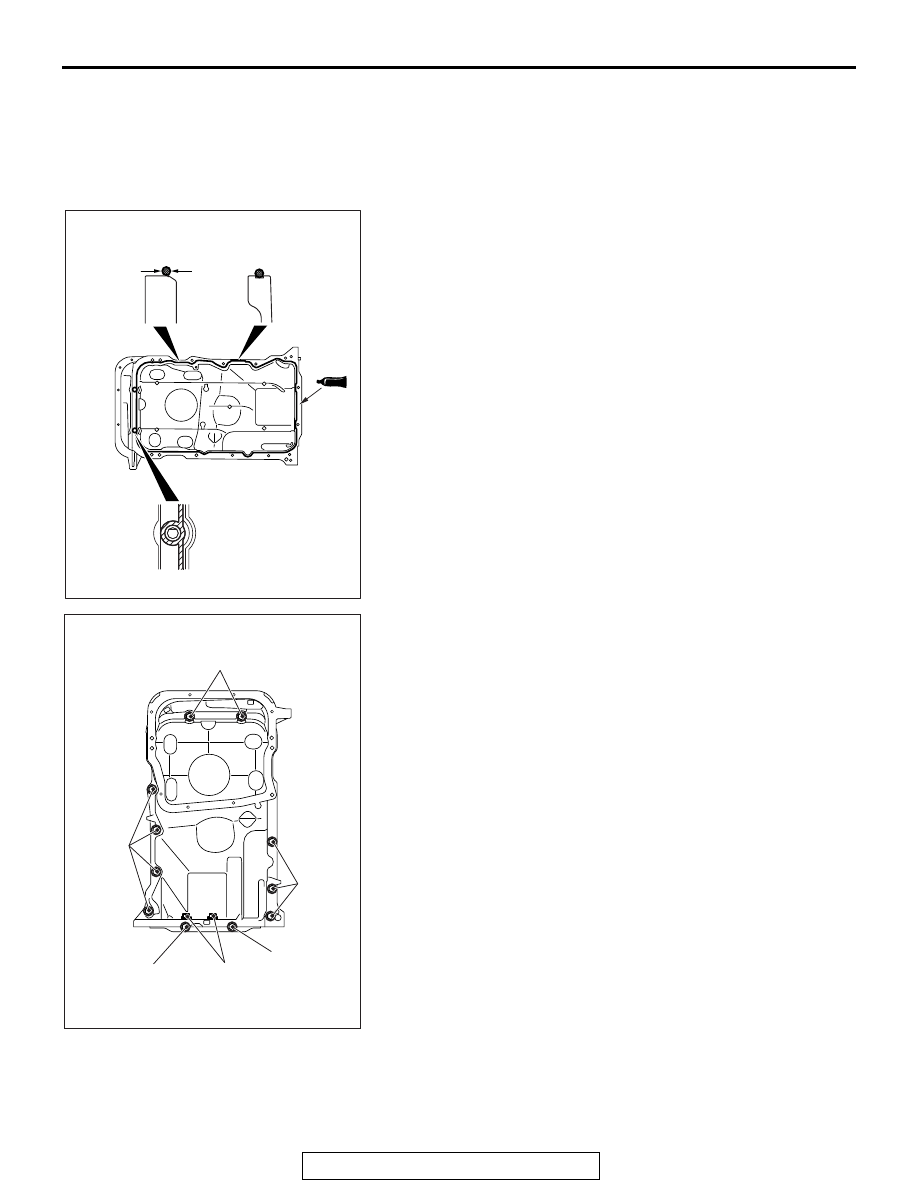
>>A<< ENGINE UPPER OIL PAN/COVER INSTAL-
LATION

1. Remove sealant from the oil pan and cylinder block mating 

surfaces.

2. Apply a bead of the sealant to the cylinder block mating 

surface of the engine oil pan as shown.

Specified sealant: ThreeBond 1227D or equivalent

NOTE: Install the engine lower oil pan immediately after 
applying sealant.

3. Assemble the oil pan to the cylinder block to the engine 

upper oil pan.

4. Install the bolts to the engine upper oil pan and cover as 

shown, and tighten them to the specified torque.

Tightening torque: 9.5 

± 2.5 Nm (85 ± 22 in-lb)

.

AC703031

Ø2 mm or Ø3 mm
(Ø0.08 in or Ø0.12 in)

AB

AC703032AB

Bolt specifications

Thread diameter × Length mm

M6 × 20

M6 × 20

M6 × 20

M6 × 10

M6 × 124

M6 × 124

OIL PAN AND OIL STRAINER

TSB Revision

ENGINE MECHANICAL <3.0L ENGINE>

11C-46

>>B<< ENGINE LOWER OIL PAN INSTALLATION

1. Remove sealant from the engine lower oil pan and engine 

upper oil pan.

2. Degrease the sealant-coated surface and the engine lower 

oil pan mating surface.

3. Apply a bead of the sealant to the mating surface of the 

engine lower oil pan as shown.

Specified sealant: ThreeBond 1227D or equivalent

NOTE: Install the engine lower oil pan immediately after 
applying sealant.

4. Assemble the engine lower oil pan to the engine upper oil 

pan.

CAUTION

After the installation, until a sufficient period of time (one 
hour or more) elapses, do not apply the engine oil or water 
to the sealant application area or start the engine.
5. Install the bolts to the lower oil pan as shown, and tighten 

them to the specified torque.

Tightening torque: 9.5 

± 2.5 Nm (85 ± 22 in-lb)

.

>>C<< ENGINE OIL PAN DRAIN PLUG 
INSTALLATION

Replace the gasket with a new gasket. Install the new gasket in 
the direction shown in the illustration.

AC703033AB

Ø2 mm or Ø3 mm
(Ø0.08 in or 
Ø0.12 in)

AC703034

Bolt specifications

Thread diameter × Length mm

M6 × 10

M6 × 10

M6 × 91

M6 × 91

M6 × 10

AB

AC703071

Engine lower 
oil pan side

AB

CRANKSHAFT FRONT OIL SEAL

TSB Revision

ENGINE MECHANICAL <3.0L ENGINE>

11C-47

INSPECTION

M1112008400224

• Check the engine oil pan for cracks.

• Check the engine oil pan sealant-coated surface for dam-

age and deformation.

• Check the oil strainer for cracked, clogged or damaged wire 

net and pipe.

CRANKSHAFT FRONT OIL SEAL

REMOVAL AND INSTALLATION

M1112003400661

Required Special Tool:

• MD998382: Crankshaft Front Oil Seal Installer

Pre-removal and Post-installation Operation
• Timing Belt Removal and Installation (Refer to 

P.11C-55

).

AC703045

Engine oil

3

1

2

3

N

AB

Removal steps 

>>B<<

1.

Crankshaft sprocket

2.

Key

>>A<<

3.

Crankshaft front oil seal

Removal steps (Continued)

CRANKSHAFT FRONT OIL SEAL

TSB Revision

ENGINE MECHANICAL <3.0L ENGINE>

11C-48

INSTALLATION SERVICE POINTS

.

>>A<< CRANKSHAFT FRONT OIL SEAL INSTAL-
LATION

1. Apply a small amount of engine oil to the oil seal lip and then 

insert the o-ring.

2. Using special tool MD998382, tap the oil seal into the front 

case.

.

>>B<< CRANKSHAFT SPROCKET INSTALLATION

Clean the crankshaft and crankshaft sprocket, and mount 
them.

AC703081

MD998382

Crankshaft

Oil seal

AB

AC703038

: Clean

Crankshaft sprocket

Crankshaft

AB


Content   ..  500  501  502  503   ..