Mitsubishi Outlander GS45X. Manual - part 98


  Index      Mitsubishi     Mitsubishi Outlander GS45X - service repair manual


Search            


Content   ..  96  97  98  99   ..


Mitsubishi Outlander GS45X. Manual - part 98


RADIO AND CD PLAYER

TSB Revision

CHASSIS ELECTRICAL

54A-389

STEP 2. Checking with audio speaker check.
Perform the audio speaker check, and check which speaker 
does not output the sound. Refer to 

P.00E-2

.

Q: Is the check result normal?

YES <normal for all> : The trouble can be an intermittent 

malfunction (Refer to GROUP 00, How to Cope with 
Intermittent Malfunction 

P.00-15

).

NO <abnormal for all> : Refer to Inspection Procedure 2 

"No sound is heard" 

P.00E-2

.

NO <only front door speaker (RH) is abnormal> : Go to 

Step 3.

NO <only front door speaker (LH) is abnormal> : Go to 

Step 9.

NO <only rear door speaker (RH) is abnormal> : Go to 

Step 15.

NO <only rear door speaker (LH) is abnormal> : Go to 

Step 19.

NO <only tweeter (RH) is abnormal> : Go to Step 23.
NO <only tweeter (LH) is abnormal> : Go to Step 27.
NO <only subwoofer is abnormal> : Go to Step 31.

STEP 3. Check front door speaker (RH) connector E-04 for 
loose, corroded or damaged terminals, or terminals 
pushed back in the connector.
Q: Is front door speaker (RH) connector E-04 in good 

condition?
YES : 
Go to Step 4.
NO :  Repair or replace the damaged component(s). Refer 

to GROUP 00E, Harness Connector Inspection 

P.00E-2

.

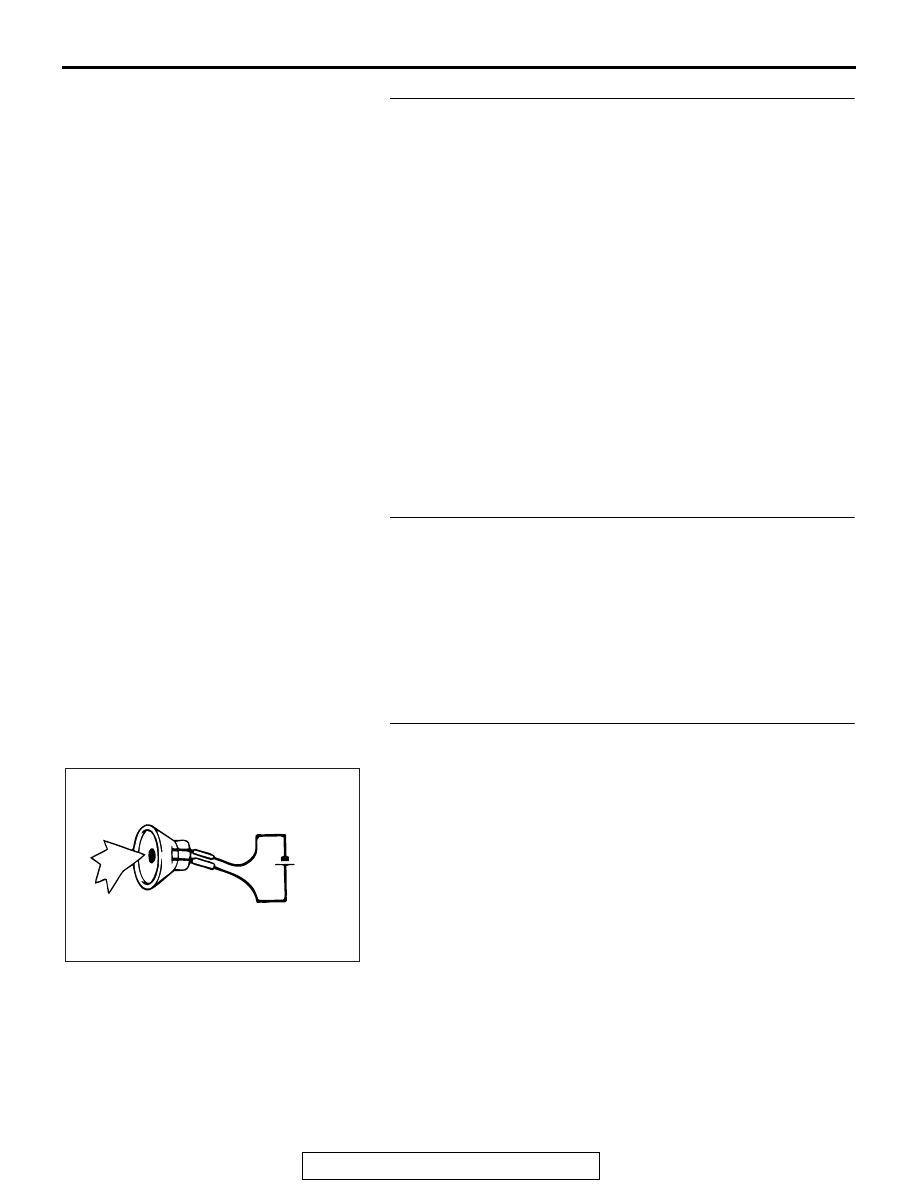
STEP 4. Check the front door speaker (RH).
(1) Remove the front door speaker (RH). Refer to 

P.00-15

.

(2) Check that the front door speaker (RH) outputs the noise 

when the voltage of five volts is applied to the front door 
speaker (RH) connector terminal.

Q: Does the front door speaker (RH) output the noise?

YES : Go to Step 5.
NO :  Replace the front door speaker (RH).

AC703723AB

5 volts

RADIO AND CD PLAYER

TSB Revision

CHASSIS ELECTRICAL

54A-390

STEP 5. Check audio amplifier connector D-126 for loose, 
corroded or damaged terminals, or terminals pushed back 
in the connector.
Q: Is audio amplifier connector D-126 in good condition?

YES : Go to Step 6.
NO :  Repair or replace the damaged component(s). Refer 

to GROUP 00E, Harness Connector Inspection 

P.00E-2

.

STEP 6. Check the wiring harness between audio amplifier 
connector D-126 (terminal 27, 37) and front door speaker 
(RH) connector E-04 (terminal 1, 2).
NOTE: Also check intermediate connectors C-20 and C-112 for 
loose, corroded, or damaged terminals, or terminals pushed 
back in the connector. If intermediate connector C-20 or C-112 
is damaged, repair or replace the connector as described in 
GROUP 00E, Harness Connector Inspection 

P.00E-2

.

• Check the communication lines for open circuit and short 

circuit.

Q: Is the wiring harness between audio amplifier connector 

D-126 (terminal 27, 37) and front door speaker (RH) 
connector E-04 (terminal 1, 2) in good condition?
YES : 
Go to Step 7.
NO :  The wiring harness may be damaged or the 

connector(s) may have loose, corroded or damaged 
terminals, or terminals pushed back in the connector. 
Repair the wiring harness as necessary. 

STEP 7. Check radio and CD player connector C-104 and 
audio amplifier connector C-16 for loose, corroded or 
damaged terminals, or terminals pushed back in the 
connector.
Q: Are radio and CD player connector C-104 and audio 

amplifier connector C-16 in good condition?
YES : 
Go to Step 8.
NO :  Repair or replace the damaged component(s). Refer 

to GROUP 00E, Harness Connector Inspection 

P.00E-2

.

RADIO AND CD PLAYER

TSB Revision

CHASSIS ELECTRICAL

54A-391

STEP 8. Check the wiring harness between radio and CD 
player connector C-16 (terminal 26, 36) and audio amplifier 
connector D-127 (terminal 10, 11).
NOTE: Also check intermediate connector C-22 for loose, cor-
roded, or damaged terminals, or terminals pushed back in the 
connector. If intermediate connector C-22 is damaged, repair or 
replace the connector as described in GROUP 00E, Harness 
Connector Inspection 

P.00E-2

.

• Check the communication lines for open circuit and short 

circuit.

Q: Is the wiring harness between radio and CD player 

connector C-16 (terminal 26, 36) and audio amplifier 
connector D-127 (terminal 10, 11) in good condition?
YES : 
Check the trouble symptom, and go to Step 35.
NO :  The wiring harness may be damaged or the 

connector(s) may have loose, corroded or damaged 
terminals, or terminals pushed back in the connector. 
Repair the wiring harness as necessary. 

STEP 9. Check front door speaker (LH) connector E-17 for 
loose, corroded or damaged terminals, or terminals 
pushed back in the connector.
Q: Is front door speaker (LH) connector E-17 in good 

condition?
YES : 
Go to Step 10.
NO :  Repair or replace the damaged component(s). Refer 

to GROUP 00E, Harness Connector Inspection 

P.00E-2

.

STEP 10. Check the front door speaker (LH).
(1) Remove the front door speaker (LH). Refer to 

P.54A-692

.

(2) Check that the front door speaker (LH) outputs the noise 

when the voltage of five volts is applied to the front door 
speaker (LH) connector terminal.

Q: Does the front door speaker (LH) output the noise?

YES : Go to Step 11.
NO :  Replace the front door speaker (LH).

STEP 11. Check audio amplifier connector D-126 for loose, 
corroded or damaged terminals, or terminals pushed back 
in the connector.
Q: Is audio amplifier connector D-126 in good condition?

YES : Go to Step 12.
NO :  Repair or replace the damaged component(s). Refer 

to GROUP 00E, Harness Connector Inspection 

P.00E-2

.

AC703723AB

5 volts

RADIO AND CD PLAYER

TSB Revision

CHASSIS ELECTRICAL

54A-392

STEP 12. Check the wiring harness between audio 
amplifier connector D-126 (terminal 28, 38) and front door 
speaker (LH) connector E-17 (terminal 1, 2).
NOTE: Also check intermediate connectors C-20 and C-126 for 
loose, corroded, or damaged terminals, or terminals pushed 
back in the connector. If intermediate connectors C-20 and 
C-126 is damaged, repair or replace the connector as 
described in GROUP 00E, Harness Connector Inspection 

P.00E-2

.

• Check the communication lines for open circuit and short 

circuit.

Q: Is the wiring harness between audio amplifier connector 

D-126 (terminal 28, 38) and front door speaker (LH) 
connector E-17 (terminal 1, 2) in good condition?
YES : 
Go to Step 13.
NO :  The wiring harness may be damaged or the 

connector(s) may have loose, corroded or damaged 
terminals, or terminals pushed back in the connector. 
Repair the wiring harness as necessary. 

STEP 13. Check radio and CD player connector C-16 and 
audio amplifier connector C-127 for loose, corroded or 
damaged terminals, or terminals pushed back in the 
connector.
Q: Is radio and CD player connector C-16 and audio 

amplifier connector C-127 in good condition?
YES : 
Go to Step 14.
NO :  Repair or replace the damaged component(s). Refer 

to GROUP 00E, Harness Connector Inspection 

P.00E-2

.

STEP 14. Check the wiring harness between radio and CD 
player connector C-16 (terminal 28, 38) and audio amplifier 
connector D-127 (terminal 4, 12)

• Check the communication lines for open circuit and short 

circuit.

NOTE: Also check intermediate connector C-22 for loose, cor-
roded, or damaged terminals, or terminals pushed back in the 
connector. If intermediate connector C-22 is damaged, repair or 
replace the connector as described in GROUP 00E, Harness 
Connector Inspection 

P.00E-2

.

Q: Is the wiring harness between radio and CD player 

connector C-16 (terminal 28, 38) and audio amplifier 
connector D-127 (terminal 4, 12) in good condition?
YES : 
Check the trouble symptom, and go to Step 35.
NO :  The wiring harness may be damaged or the 

connector(s) may have loose, corroded or damaged 
terminals, or terminals pushed back in the connector. 
Repair the wiring harness as necessary. 


Content   ..  96  97  98  99   ..