Mitsubishi Outlander GS45X. Manual - part 69


  Index      Mitsubishi     Mitsubishi Outlander GS45X - service repair manual


Search            


Content   ..  67  68  69  70   ..


Mitsubishi Outlander GS45X. Manual - part 69


FOG LIGHT

TSB Revision

CHASSIS ELECTRICAL

54A-273

BULB REPLACEMENT

M1540400400643

CAUTION

Don't touch the bulb surface with bare hands or dirty 
gloves. If the bulb surface (glass part) gets dirty, clean it 
with alcohol or thinner immediately and dry well, and then 
install it.
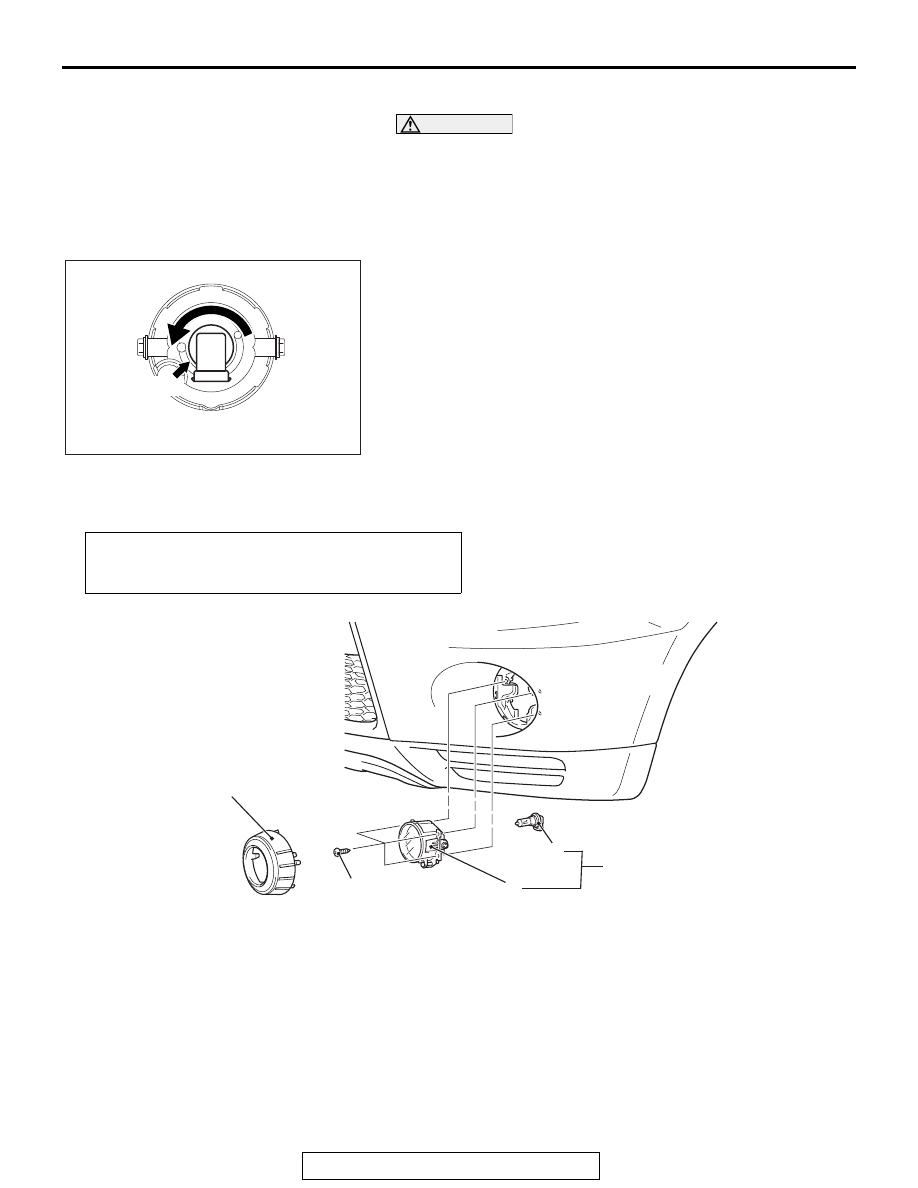
1. Remove the front fog light bezel and the front fog light 

assembly. (Refer to 

P.54A-273

.)

2. Disconnect the connector and withdraw the bulb.
3. After replacing the bulb, securely connect the connector, 

and install the front fog light assembly and the front fog light 
bezel.

REMOVAL AND INSTALLATION

M1540400500338

AC800929

Fog light bulb

AF

Post-installation operation
Check the beam direction of the fog light (Refer to Front Fog 
Light Aiming 

P.54A-271

).

AC900461AC

1

2

4

3

0.9 ± 0.1 N·m 
8.0 ± 1.0 in-lb

Removal steps 


<<

A

>>

1.

Fog light bezel 

2.

Fog light assembly

3.

Bulb

4.

Fog light unit

Removal steps (Continued)

FOG LIGHT

TSB Revision

CHASSIS ELECTRICAL

54A-274

REMOVAL SERVICE POINT

.

<<A>> FOG LIGHT BEZEL REMOVAL

1. Turn the fog light bezel until it is locked.
2. Remove the fog light bezel from the front bumper.

INSPECTION

FOG LIGHT RELAY CHECK

M1540400700097

AC900214 AC

Fog light bezel

Battery voltage

Terminal 
number

Normal 
condition

Not energized

− 4

No 
continuity

With current supply 
[terminal 2 (+), terminal 1 
(

−)]

Continuity 
exists (2 
ohms or 
less)

AC703275

2

3

4

1

AB

Fog light relay

Fog light relay

A-14X

SIDE TURN-SIGNAL LIGHT

TSB Revision

CHASSIS ELECTRICAL

54A-275

SIDE TURN-SIGNAL LIGHT

REMOVAL AND INSTALLATION

M1541800200394

<SIDE TURN-SIGNAL LIGHT 
INTEGRATED IN DOOR MIRROR TYPE>

Refer to GROUP 51 

− Outside Mirror 

P.51-120

.

REMOVAL SERVICE POINT <FENDER PANEL 
ATTACHMENT TYPE SIDE TURN-SIGNAL LIGHT>

.

Push the side turn-signal light toward the vehicle rear to bend 
the hook, and then remove by disengaging the tab from the 
fender panel.

INSTALLATION SERVICE POINT <FENDER 
PANEL ATTACHMENT TYPE SIDE TURN-SIGNAL 
LIGHT>

.

Engage the claw to the fender panel to install the side turn sig-
nal light.

AC506856

Side turn-signal light

AC

Push

Forward of vehicle

AC506857

Hook

Claw

Fender 
panel

AC

Forward of vehicle

REAR SIDE-MARKAER LIGHT

TSB Revision

CHASSIS ELECTRICAL

54A-276

REAR SIDE-MARKAER LIGHT

REMOVAL AND INSTALLATION

M1544600100013

AC703293AC

A

A

Section A – A

Claw

Claw

2

1

1.5 ± 0.2 N·m
14 ± 1 in-lb

3

1

Removal Steps 

Rear corner bumper (Refer to 
GROUP 51, Rear Bumper 
Assembly 

P.51-7

.)

1.

Rear side-marker light unit

2.

Socket assembly

3.

Bulb

Removal Steps (Continued)


Content   ..  67  68  69  70   ..