Mitsubishi Montero Sport (2004+). Manual - part 585


  Index      Mitsubishi     Mitsubishi Montero Sport - service repair manual 2004 year


Search            


Content   ..  583  584  585  586   ..


Mitsubishi Montero Sport (2004+). Manual - part 585


ON-VEHICLE SERVICE

TSB Revision

ENGINE COOLING

14-7

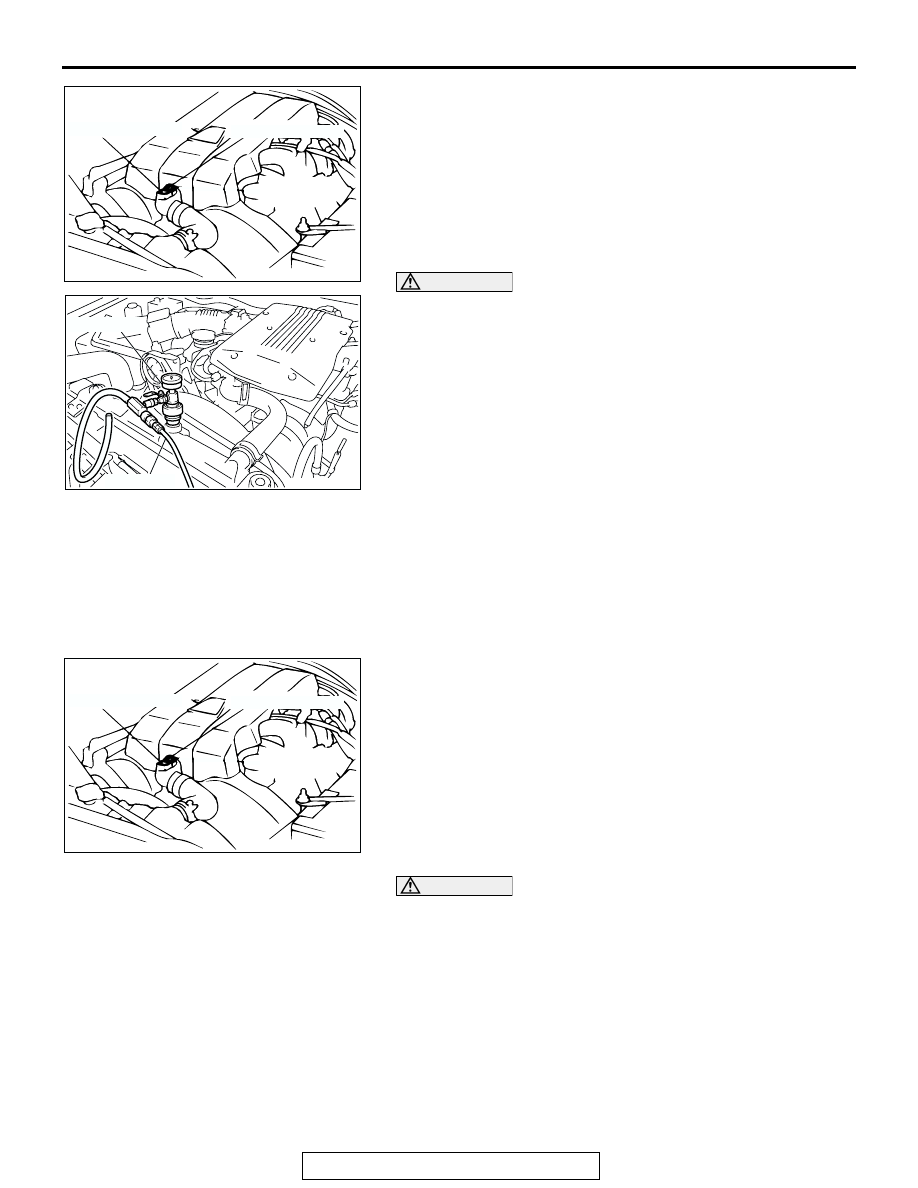
7. Loosen the air bleed bolt.

CAUTION

Do not use alcohol or methanol anti-freeze or any engine 
coolants mixed with alcohol or methanol anti-freeze. The 
use of an improper anti-freeze can cause the corrosion of 
the aluminum components.
8. By referring to the section on coolant, select an appropriate 

concentration for safe operating temperature within the 
range of 30 to 60%. Use special tool MB991871 to refill the 
coolant. A convenient mixture is a 50% water and 50% 
antifreeze solution [freezing point: 

−31°C (−32.8 °F)].

Recommended antifreeze: 

Recommended antifreeze: Long Life Antifreeze 

Coolant or an equivalent

Quantity: 

Without rear heater 9.0 cm

3

 (9.5 quarts)

With rear heater 10.0 cm

3

 (10.6 quarts)

NOTE: For the usage of special tool MB991871, refer to the 
instructions enclosed with the special tool.

9. Pour in coolant until it overflows from the air bleed bolt hole, 

and then tighten the air bleed bolt.

Tightening torque: 12 

 15Nm (106  133 in-lb)

10.Reinstall the radiator cap.
11.Start the engine and let it warm up until the thermostat 

opens.

12.After repeatedly revving the engine up to 3,000 r/min 

several times, then stop the engine.

13.Remove the radiator cap after the engine has become cold, 

and pour in coolant up to the brim. Rein stall the cap.

CAUTION

Do not overfill the tank.
14.Add coolant to the reserve tank between the "FULL" and 

"LOW" mark if necessary.

ENGINE COOLANT CONCENTRATION TEST

M1141001100415

Refer to GROUP 00, Recommended Lubricants and Lubricant 
Capacities Table 

P.00-37

.

DRIVE BELT TENSION CHECK AND 
ADJUSTMENT

M1141004500092

Refer to GROUP 00, Maintenance Service 

P.00-46

.

AC003372 AD

CAUTION LABEL

AIR BLEED BOLT

AC203208 AB

MB991871

AIR HOSE

AC003372 AD

CAUTION LABEL

AIR BLEED BOLT

RADIATOR

TSB Revision

ENGINE COOLING

14-8

RADIATOR

REMOVAL AND INSTALLATION

M1141001500554

REMOVAL SERVICE POINTS

.

<<A>> RADIATOR UPPER HOSE/RADIATOR LOWER HOSE 
DISCONNECTION
Make mating marks on the radiator hose and the hose clamp. 
Disconnect the radiator hose.

.

Pre-removal Operation
• Under Cover Removal

• Engine Coolant Draining (Refer to GROUP 00, Mainte-

nance Servic

P.00-54

).

Post-installation Operation
• Transmission Fluid Refilling and Level Check (Refer to 

GROUP 00, Maintenance Service 

P.00-52

).

• Engine Coolant Refilling and Level Check (Refer to 

GROUP 00, Maintenance Service 

P.00-54

).

AC309250AB

12 N·m

106 in-lb

12 N·m

106 in-lb

4.9 N·m

43 in-lb

4.9 N·m

43 in-lb

9

9

1

5

7

3

4

2

8

10

11

11

8

6

N

REMOVAL STEPS

1.

RADIATOR CAP

2.

DRAIN PLUG

3.

RUBBER HOSE

4.

RESERVE TANK ASSEMBLY

<<A>> >>A<<

5.

RADIATOR UPPER HOSE

6.

SHROUD ASSEMBLY

<<A>> >>A<<

7.

RADIATOR LOWER HOSE

<<B>>

8.

A/T OIL COOLER HOSE 
CONNECTION

9.

RADIATOR SUPPORT

10. RADIATOR
11. LOWER INSULATOR

REMOVAL STEPS (Continued)

ACX01828

MATING MARKS

AB

COOLING FAN

TSB Revision

ENGINE COOLING

14-9

<<B>> A/T OIL COOLER HOSE REMOVAL
After removing the hose from the radiator, plug the hose and 
the radiator nipple to prevent dust or foreign particles from get-
ting in.

INSTALLATION SERVICE POINT

.

>>A<< RADIATOR LOWER HOSE/RADIATOR UPPER HOSE 
CONNECTION
1. Insert each hose as far as the projection of the water inlet 

fitting.

2. Align the mating marks on the radiator hose and hose 

clamp, and then connect the radiator hose.

COOLING FAN

REMOVAL AND INSTALLATION

M1141002100098

ACX01829AB

PROJECTION

WATER OUTLET
FITTING

MATING
MARKS

AC004453

1

2

3

5

6

4

2

4.9 N·m

43 in-lb

10 - 12 N·m

89 - 106 in-lb

10 - 12 N·m

89 - 106 in-lb

AB

REMOVAL STEPS
1. SHROUD ASSEMBLY
2. DRIVE BELTS
3. COOLING FAN AND FAN CLUTCH 

ASSEMBLY

4. PULLEY
5. FAN CLUTCH
6. COOLING FAN

REMOVAL STEPS (Continued)

THERMOSTAT

TSB Revision

ENGINE COOLING

14-10

INSPECTION

M1141002200095

Cooling Fan Check

• Check the blades for damage and cracks.

• Check for cracks and damage around bolt holes in the fan 

hub.

• If any portion of the fan is damaged or cracked, replace the 

cooling fan.

Fan Clutch Check

• Check to ensure that fluid in the fan clutch is not leaking at 

the case joint and seals. If fluid quantity decreases due to 
leakage, the fan speed will decrease and engine overheat-
ing might result.

• When the fan attached to the engine is turned by hand, it 

should have some resistance. If the fan turns lightly or 
freely with no resistance, it is faulty.

• Check the bimetal strip for damage.

THERMOSTAT

REMOVAL AND INSTALLATION

M1141002400505

Pre-removal and Post-installation Operation
• Engine Coolant Draining and Refilling (Refer to GROUP 

00, Maintenance Servic

P.00-54

).

AC004454 AB

24 N·m

17 ft-lb

1

2

3

REMOVAL STEPS

1.

RADIATOR LOWER HOSE 
CONNECTION

2.

WATER INLET FITTING

>>A<<

3.

THERMOSTAT

REMOVAL STEPS (Continued)


Content   ..  583  584  585  586   ..