Mitsubishi Montero Sport (2004+). Manual - part 394


  Index      Mitsubishi     Mitsubishi Montero Sport - service repair manual 2004 year


Search            


Content   ..  392  393  394  395   ..


Mitsubishi Montero Sport (2004+). Manual - part 394


TRANSFER

TSB Revision

AUTOMATIC TRANSMISSION OVERHAUL

23B-79

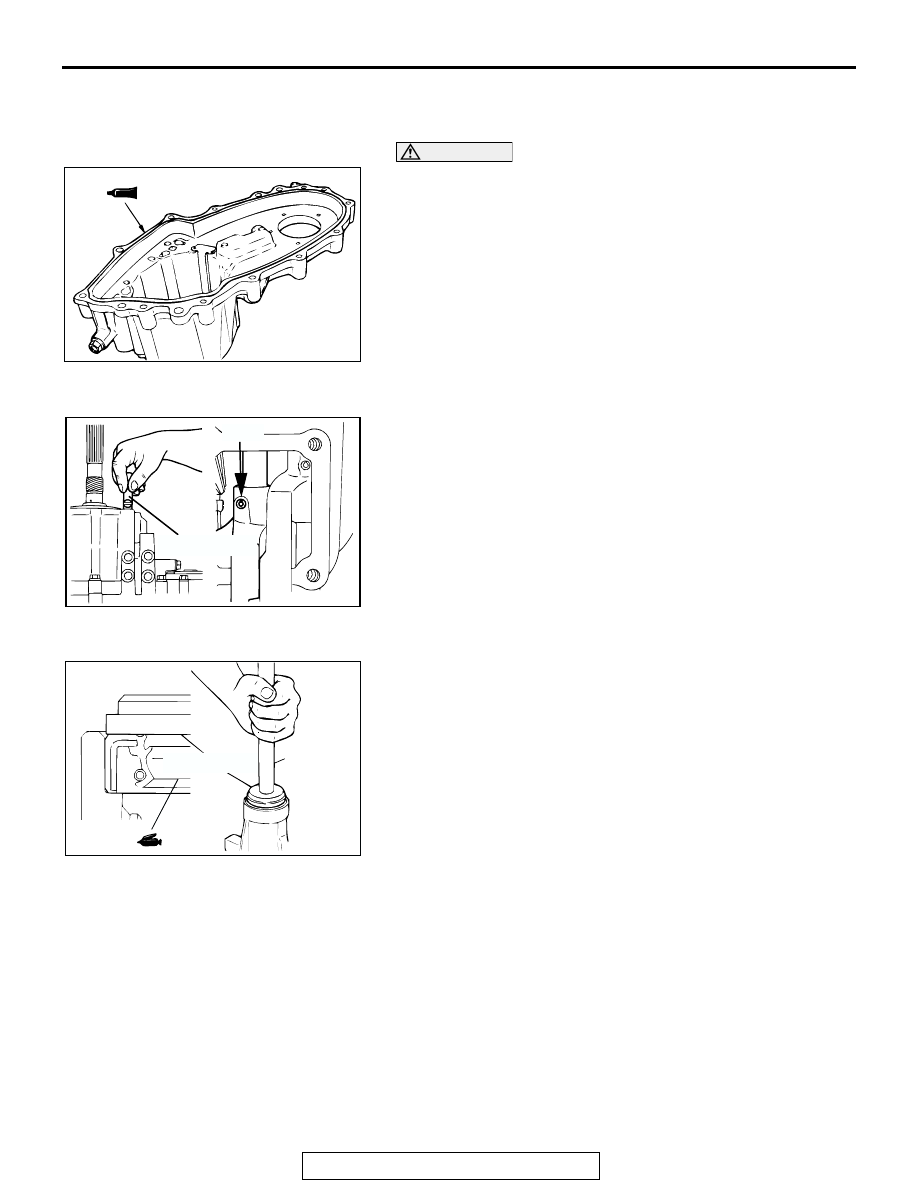
>>H<<INTERLOCK PLUNGER/CHAIN COVER 
INSTALLATION
1. Insert the interlock plunger into a position where it does not 

interfere with 2-4WD shift rail.

CAUTION

• Squeeze the sealant out evenly to apply it in an unbro-

ken, non-excessive quantity.

2. Apply sealant Mitsubishi genuine sealant Part number 

MD997740 or equivalent to the chain cover, and then install 
the chain cover.

.

>>I<<H-L SHIFT RAIL/SPRING PIN INSTALLATION
1. Insert the H-L shift rail from the H-L shift rail hole, paying 

attention to the direction of the shift rail.

2. Align the spring pin holes on the shift rail with the shift fork. 

Then tap in the spring pin so that the slit of the spring pin is 
facing the shaft center of the shift rail.

.

>>J<<OIL SEAL INSTALLATION
1. Use special tools MB990929 and MB990938 to install the oil 

seal.

2. Apply Mitsubishi genuine grease Part number 0101011 or 

equivalent to the lip of oil seal.

.

AKX00168

2 mm(0.1in)
DIAMETER

AB

AK000331

AB

H-L SHIFT RAIL

SLIT

AKX00170

MB990938

MB990929

AB

TRANSFER

TSB Revision

AUTOMATIC TRANSMISSION OVERHAUL

23B-80

>>K<<SPACER INSTALLATION
1. Measure projection A of the rear output shaft bearing and 

depth B of the second stage of the rear cover.

2. Subtract A from B and let the answer be C. Select a spacer 

so that the subtracted value will be the standard value 
shown below.

Standard value: 0 

 0.1 mm (0  0.004 inch)

.

>>L<< OIL COVER INSTALLATION
Install the oil cover so that the oil hole shown in the illustration.

.

>>M<<REAR COVER INSTALLATION

CAUTION

• Squeeze the sealant out evenly to apply it in an unbro-

ken, non-excessive quantity.

Apply sealant Mitsubishi genuine sealant Part number 
MD997740 or equivalent to the chain cover.

.

AKX00171

A

B

REAR COVER

SPACER

AB

AK000423

OIL HOLE

AB

OIL COVER

AKX00172

TRANSFER

TSB Revision

AUTOMATIC TRANSMISSION OVERHAUL

23B-81

>>N<<RETURN SPRING/SUPPORT PIN INSTALLATION
1. Insert the bent section of the return spring into the control 

housing as shown.

2. Apply sealant 3M

 ADD Part number 8672 or equivalent to 

the support pin section as shown, and Mitsubishi genuine 
adhesive Part number MB160450 or equivalent to the 
threads.

3. Insert the support pin and install the nut.

.

>>O<<CONTROL HOUSING INSTALLATION

CAUTION

• Squeeze the sealant out evenly to apply it in an unbro-

ken, non-excessive quantity.

Apply sealant Mitsubishi genuine sealant Part number 
MD997740 or equivalent to the control housing.

.

>>P<<SPACER INSTALLATION
Install the previously selected spacer (see ADJUSTMENT 
BEFORE ASSEMBLY).

.

>>Q<<TRANSFER CASE PLATE INSTALLATION
1. Face the notched section of the input gears in the direction 

shown in the illustration.

AKX00173

RETURN SPRING

AB

AKX00174

AK000033

2 mm (0.1 in)
DIAMETER

AC

AKX00178

NOTCHED
SECTION

COUNTER
SHAFT

AB

TRANSFER

TSB Revision

AUTOMATIC TRANSMISSION OVERHAUL

23B-82

CAUTION

• Squeeze the sealant out evenly to apply it in an unbro-

ken, non-excessive quantity.

2. Apply Mitsubishi genuine sealant Part number MD997740 or 

equivalent to the transfer case plate.

CAUTION

• The transfer case plate must be installed smooth and 

straight to get a good seal.

3. Install the transfer case plate together with the input gear. 

Slide the input gear tooth aligned in Step 1 along the tooth 
space of the countershaft gear.

.

>>R<<SPEEDOMETER DRIVEN GEAR SLEEVE ASSEMBLY 
INSTALLATION
Install the speedometer driven gear sleeve assembly into the 
rear cover as shown in the illustration.

.

>>S<<SPRING INSTALLATION
Install the spring with its tapered end toward the ball.

.

>>T<<PLUG INSTALLATION
Apply sealant 3M

 ADD Part number 8672 or equivalent to the 

threads.
NOTE: The new plug is precoated with sealant, so sealant 
does not need to be applied.

.

AKX00179

2 mm(0.1 in)
DIAMETER

AB

AK201070AB

MATING MARKS

AKX00181

AKX00177


Content   ..  392  393  394  395   ..