Mitsubishi Montero (2004+). Manual - part 683


  Index      Mitsubishi     Mitsubishi Montero - service repair manual 2004 year


Search            


Content   ..  681  682  683  684   ..


Mitsubishi Montero (2004+). Manual - part 683


SUNROOF ASSEMBLY

TSB Revision

BODY

42-63

9. After the registration is completed, carry out the following 

work.

CAUTION

Turn the ignition switch to the "LOCK" (OFF) position and 
then disconnect special tool MB991824 (V.C.I.) from the 
data link connector.
10.Disconnect special tool MB991824 (V.C.I.) from the data link 

connector.

11.Remove the ignition key from ignition key cylinder.
12.Close all of the doors.
13.Verify the keyless entry system operates normally.

SUNROOF ASSEMBLY

GENERAL DESCRIPTION

M1426000100182

A motor-driven inner slide-type glass sunroof with a 
tilt-up mechanism is provided as an option. Even 
when the sunroof is fully closed, a sufficient amount 
of lighting and a feeling of openness can still be 
obtained by opening the sunroof sunshade.

SUNROOF DIAGNOSIS

M1426000700021

The sunroof system is controlled by the Simplified 
Wiring System (SWS). For troubleshooting, refer to 
GROUP 54B, Diagnosis 
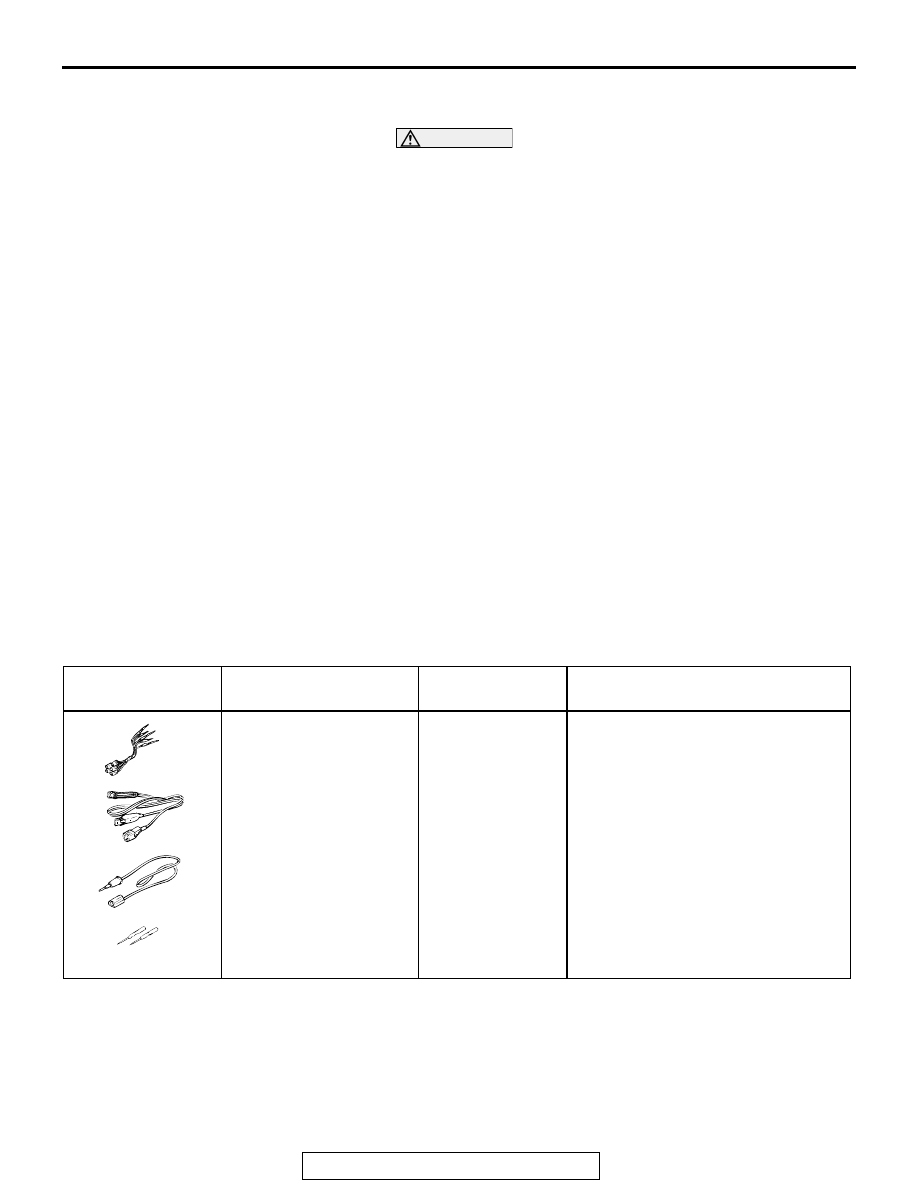
P.54B-22

.

SPECIAL TOOLS

M1426000600024

ON-VEHICLE SERVICE

WATER TEST

M1426000900036

Check if there are any leaks in the sunroof by the following pro-
cedure.
1. Fully close the roof lid glass.

TOOL

TOOL NUMBER AND 
NAME

SUPERSESSION

APPLICATION

MB991223 Harness set

• A: MB991219 Test 

harness

• B: MB991220 LED 

harness

• C: MB991221 LED 

harness adapter

• D: MB991222 Probe

MB991223

Measurement of terminal voltage

• A: Connector pin contact pressure 

inspection

• B: Power circuit inspection

• C: Power circuit inspection

• D: Commercial tester connection

MB991223

A

AB

B

C

D

SUNROOF ASSEMBLY

TSB Revision

BODY

42-64

2. Adjust the water pressure so that water comes out of the 

hose to a height of approximately 50 cm (19.7 inches) when 
the hose is held vertically facing upwards. 

3. Hold the end of the hose approximately 30 cm (11.8 inches) 

above the roof and let the water run onto the weatherstrip for 
5 minutes or more. 

4. With the water running on to the weatherstrip, check that 

there is no water leaking into the passenger compartment. 

SUNROOF FIT ADJUSTMENT

M1426001000199

1. Fully close the roof lid glass.
2. Fully open the sunshade.
3. Loosen the roof lid glass assembly mounting screws (six), 

and then slide the roof lid glass assembly along the slot in 
the roof lid glass assembly to adjust the height of the roof lid 
glass.

4. After adjustment, check to be sure that the sunroof operates 

smoothly.

OPERATION CHECK

M1426002600224

Check the following items. If faulty, reinstall or 
replace the appropriate component.

CAUTION

Check that the following items are normal before 
carrying out this operation check.

1. Installation condition of the sunroof assembly
2. Installation, condition and foreign material of 

the sunroof drive cable

3. Improper fit of sunroof glass
4. Sunroof switch and sunroof motor assembly

Basic operation

ACX00572AB

HOSE

APPROX
30 cm (11.8 in)

ACX00573AB

NO. SUNROOF 

FUNCTION

REQUIREMENTS FOR THE SUNROOF TO 
FUNCTION

NORMAL OPERATION

01

OPEN

1. Ignition switch: ON
2. Sunroof switch: OPEN

The sunroof opens fully and 
automatically.

02

CLOSE

1. Ignition switch: ON
2. Sunroof switch: CLOSE/TILT-DOWN 

The sunroof closes while the 
sunroof switch is pushed to 
the CLOSE/TILT-DOWN 
position.

03

TILT-UP

1. Ignition switch: ON
2. Sunroof switch: TILT-UP

The sunroof tilts up fully and 
automatically.

SUNROOF ASSEMBLY

TSB Revision

BODY

42-65

Jam preventing mechanism

Sunroof timer mechanism

In cases except the followings, the basic operation 
and jam preventing mechanism will be maintained 
for thirty seconds after the ignition switch is turned to 
the LOCK (OFF) position. (Sunroof timer function)

• If you open a door within that period (i.e. a door 

switch is on), the sunroof timer function will be 
cancelled immediately.

• If you closes the sunroof fully while the timer is 

working, the sunroof timer function is cancelled 
after that sunroof operation.

• If you turns the ignition switch to the LOCK (OFF) 

position while the timer is working, the sunroof 
will continue moving until it closes fully regardless 
of the time-out period.

04

TILT-DOWN

1. Ignition switch: ON
2. Sunroof switch: CLOSE/TILT-DOWN

The sunroof closes while the 
sunroof switch is pushed to 
the CLOSE/TILT-DOWN 
position.

05

AUTOMATIC 
OPERATION 
INTERRUPTION

A

1. Ignition switch: ON
2. Sunroof switch: TILT-UP or CLOSE/TILT 

DOWN (Push the sunroof switch to the 
CLOSE/TILT-DOWN position while the 
sunroof is automatically opening and release 
the switch within two seconds)

The sunroof stops the 
automatic opening operation.

B

1. Ignition switch: ON
2. Sunroof switch: CLOSE/TILT DOWN (Push 

the sunroof switch to the CLOSE/TILT-DOWN 
position more than two seconds while the 
sunroof is automatically opening)

The sunroof stops the 
automatic opening operation, 
and the sunroof closes while 
the sunroof switch is pushed 
to the CLOSE/TILT-DOWN 
position.

NO. SUNROOF 

FUNCTION

REQUIREMENTS FOR THE SUNROOF TO 
FUNCTION

NORMAL OPERATION

NO. SUNROOF 

FUNCTION

REQUIREMENTS FOR THE SUNROOF TO 
FUNCTION

NORMAL OPERATION

01

CLOSE

1. Ignition switch: ON
2. Sunroof switch: CLOSE/TILT-DOWN
3. Sunroof initial position: being closed or opened
4. Interrupt the sunroof operation before the sunroof 

is fully closed.

After you interrupts the 
sunroof operation, it opens by 
the predetermined distance 
and then stops automatically.

02

TILT-DOWN

1. Ignition switch: ON
2. Sunroof switch: CLOSE/TILT-DOWN 
3. Sunroof initial position: being tilting down
4. Interrupt the sunroof operation before the sunroof 

is fully close.

The sunroof tilts up 
automatically after it is 
interrupted.

SUNROOF ASSEMBLY

TSB Revision

BODY

42-66

SUNROOF ASSEMBLY

REMOVAL AND INSTALLATION

M1426001200364

Post-installation Operation <Roof lid glass assembly, Sunroof assembly>
• Sunroof Fit Adjustment (Refer to 

P.42-64

.)

• Sunroof Water Test (Refer to 

P.42-63

.)

ACX02405

1

2

3

4

5

6

7

8

AB

1. ROOF LID GLASS ASSEMBLY

SUNROOF SWITCH REMOVAL 
STEPS

2. SUNROOF SWITCH COVER
3. SUNROOF SWITCH

DRAIN HOSE REMOVAL STEPS

• HEADLINING (REFER TO GROUP 

52A 

P.52A-10

.)

• SPLASH SHIELD (FRONT DRAIN 

HOSE)

• INSTRUMENT PANEL ASSEMBLY 

(REFER TO GROUP 52A 

P.52A-3

.)

4. DRAIN HOSE (FRONT SIDE)
• PILLAR DUCT (PASSENGER'S 

SIDE) (REFER TO GROUP 55A 

P.55A-149

.)

• REAR QUARTER DUCT 

(PASSENGER'S SIDE) (REFER TO 
GROUP 55A 

P.55A-149

.)

<<A>> >>A<<

5. DRAIN HOSE (REAR SIDE)

SUNROOF MOTOR REMOVAL 
STEPS

• HEADLINING (REFER TO GROUP 

52A 

P.52A-10

.)

<<B>> >>B<<

6. SUNROOF MOTOR ASSEMBLY

SUNROOF ASSEMBLY REMOVAL 
STEPS

• HEADLINING (REFER TO GROUP 

52A 

P.52A-10

.)

4. DRAIN HOSE (FRONT SIDE)
• PILLAR DUCT (PASSENGER'S 

SIDE) (REFER TO GROUP 55 

P.55A-149

.)

• REAR QUARTER DUCT 

(PASSENGER'S SIDE) (REFER TO 
GROUP 55 

P.55A-149

.)

<<A>> >>A<<

5. DRAIN HOSE (REAR SIDE)
6. SUNROOF MOTOR ASSEMBLY
7. SET BRACKET


Content   ..  681  682  683  684   ..