Mitsubishi Montero (2004+). Manual - part 670
WINDOW GLASS
TSB Revision
BODY
42-11
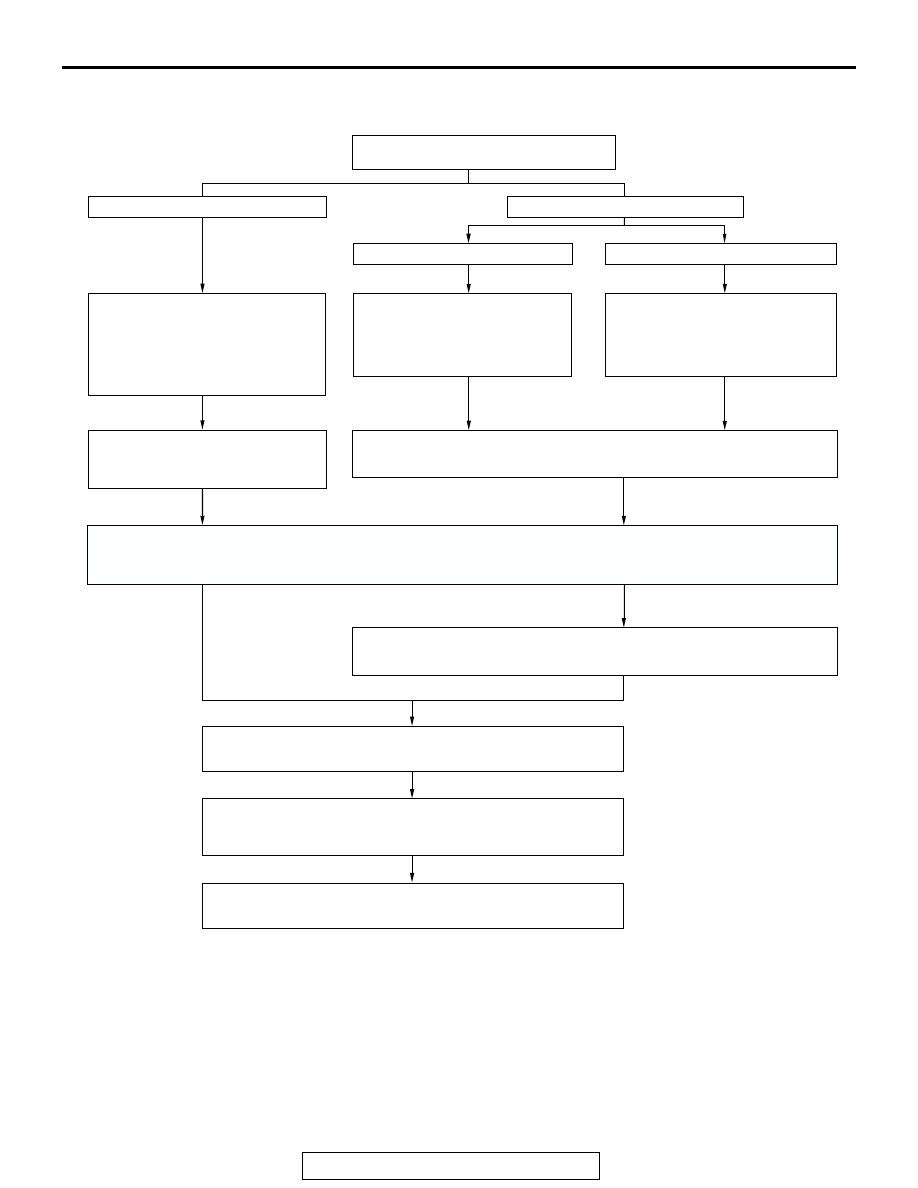
WINDOW GLASS INSTALLATION
WINDOW GLASS DIAGNOSIS
INTRODUCTION TO WINDOW GLASS DIAGNOSIS
M1422006700221
If water leaks from the windshield, the quarter win-
dow glass, the back door glass, or the seal or body
flange may be faulty.
AC306636
CLEANING OF ADHESION SURFACE
CUT OFF THE RESIDUAL ADHESIVE
UNTIL THE THICKNESS IS LESS THAN
2 mm (0.08 inch). CLEAN THE ADHESION
SURFACE WITH 3M™ AAD PART
NO. 8906 OR EQUIVALENT, AND LET
DRY FOR 3 MINUTES OR MORE.
CLEANING OF ADHESION SURFACE
COMPLETELY CUT OFF ALL OF THE
RESIDUAL ADHESIVE. CLEAN THE
ADHESIVE SURFACE WITH 3M™ AAD
PART NO. 8906 OR EQUIVALENT, AND
LET DRY FOR 3 MINUTES OR MORE.
CLEANING OF ADHESION SURFACE
CLEAN OFF ANY DIRT ADHERING TO
THE ADHESION SURFACE WITH 3M™
AAD PART NO. 8906 OR EQUIVALENT,
AND LET DRY FOR 3 MINUTES OR
MORE.
ATTACHING OF WINDOW SPACER
ATTACH THE WINDOW SPACER TO SET
THE POSITIONS FOR THE GLASS TO BE
INSTALLED.
GLUING OF WINDOW DAM AND WINDOW SPACER
GLUE THE WINDOW DAM AND WINDOW SPACER TO THE GLASS, FOLLOWING THE
STANDARD POSITION ALL THE WAY AROUND THE INSIDE EDGE OF THE GLASS.
APPLICATION OF ADHESIVE
WITHIN 30 MINUTES AFTER APPLYING THE PRIMER, APPLY THE ADHESIVE EVENLY
ALL THE WAY AROUND THE INSIDE EDGE OF THE GLASS.
INSTALLING THE GLASS
AFTER APPLYING THE ADHESIVE, LIGHTY PRESS THE GLASS
EVENLY SO THAT IT ADHERES COMPLETELY.
CLEANING
AFTER REMOVING EXCESS ADHESIVE FROM THE BODY OR
GLASS WITH A SPATULA, ETC. CLEAN OFF WITH 3M™ AAD
PART NO. 8906 OR EQUIVALENT.
CHECKING FOR WATER LEAKS
CARRY OUT A SHOWER TEST TO CHECK THAT NO WATER
LEAKS THROUGH.
REPLACE THE GLASS
REUSING THE GLASS
WINDOW GLASS INSTALLATION
PROCEDURE
BODY SIDE
WINDOW GLASS SIDE
APPLICATION OF PRIMER
DO NOT APPLY PRIMER ON RESIDUAL ADHESIVE AS DOING SO MAY AFFECT ADHESION. APPLY ENOUGH PRIMER ON ADHESION
SURFACE EVENLY TAKING CARE NOT TO APPLY IT ON THE RESIDUAL ADHESIVE. AFTER APPLYING PRIMER, LET IT DRY FOR
3 MINUTES OR MORE.
AB