Mitsubishi Montero (2004+). Manual - part 104


  Index      Mitsubishi     Mitsubishi Montero - service repair manual 2004 year


Search            


Content   ..  102  103  104  105   ..


Mitsubishi Montero (2004+). Manual - part 104


CAMSHAFT AND VALVE STEM SEAL

TSB Revision

ENGINE MECHANICAL

11A-21

INSTALLATION SERVICE POINTS

.

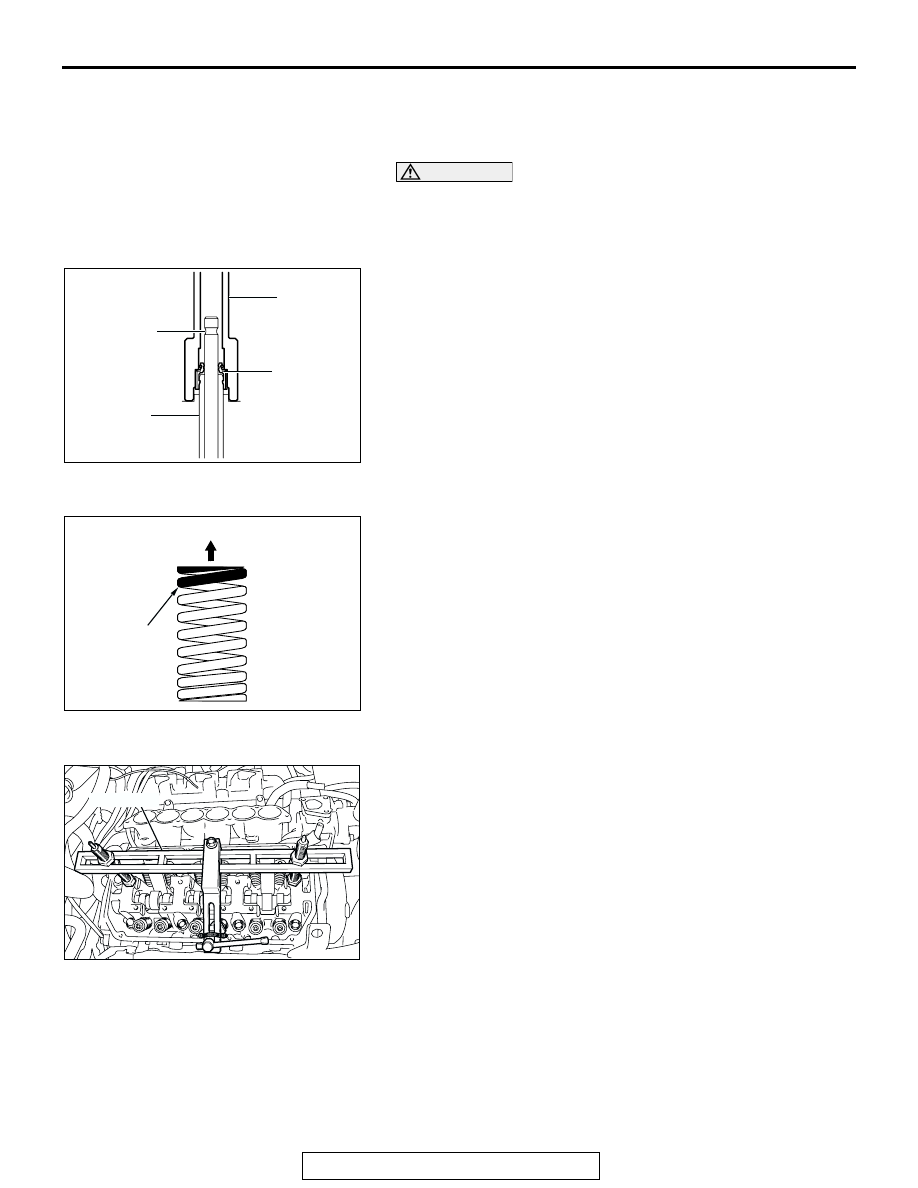
>>A<< VALVE STEM SEALS INSTALLATION
1. Apply a small amount of engine oil to the valve stem seals.

CAUTION

• Valve stem seals cannot be reused.
• Special tool MD998774 must be used to install the valve 

stem seal. Improper installation could result in oil leak-
ing past the valve guide.

2. Use special tool MD998774 to fill a new valve stem seal in 

the valve guide using the valve stem area as a guide.

.

>>B<< VALVE SPRINGS INSTALLATION
Install the valve springs with its identification color painted end 
facing the locker arm.

.

>>C<< VALVE SPRING RETAINER LOCKS INSTALLATION
Use special tool MD998772 to compress the valve spring in the 
same manner as removal.

.

>>D<< CAMSHAFT POSITION SENSOR SUPPORT 
INSTALLATION
1. Remove sealant from the camshaft position sensor support 

and cylinder head surfaces.

AC107414

AB

MD998774

VALVE

VALVE 
STEM 
SEAL

VALVE 
GUIDE

AC107415

AB

ROCKER ARM SIDE

IDENTIFICATION
COLOR

AC204066

MD998772

AB

CAMSHAFT AND VALVE STEM SEAL

TSB Revision

ENGINE MECHANICAL

11A-22

2. Apply the sealant to the camshaft position sensor support 

flange in a continuous bead as shown in the illustration.

Specified sealant: MITSUBISHI GENUINE PART 
MD970389 or equivalent

NOTE: Install the camshaft position sensor support within 
15 minutes after applying liquid gasket.

3. Install the camshaft position sensor support to the cylinder 

head.

CAUTION

Then wait at least one hour. Never start the engine or let 
engine oil or coolant touch the adhesion surface during 
that time.
4. Tighten the camshaft position sensor support mounting bolts 

to the specified torque.

Tightening torque: 14 

± 1 Nm (120 ± 13 in-lb)

.

>>E<< ROCKER ARM AND SHAFT ASSEMBLY 
INSTALLATION
1. Install the rocker arm, shaft and lash adjuster assembly.
2. Tighten the mounting bolts to the specified torque.

Tightening torque: 31 

± 3 Nm (23 ± 2 ft-lb)

3. Remove special tool MD998443.

4. Check that notches in the each rocker shaft are facing the 

direction shown in the illustration.

.

AC200026

AB

φ 3 mm
(0.12 in)

ACX00331AB

MD998443

AC204149

AB

NOTCH

NOTCH

ENGINE 
FRONT

NOTCH

NOTCH

<RIGHTBANK>

<LEFTBANK>

CAMSHAFT OIL SEAL

TSB Revision

ENGINE MECHANICAL

11A-23

>>F<< CAMSHAFT SPROCKET INSTALLATION
1. Use special tools MD998715 and MB990767 in the same 

way as during removal to install the camshaft sprocket.

2. Tighten the camshaft sprocket mounting bolt to the specified 

torque.

Tightening torque: 88 

± 10 Nm (65 ± 7 ft-lb)

CAMSHAFT OIL SEAL

REMOVAL AND INSTALLATION

M1112002200147

Required Special Tools:
MB990767: End Yoke Holder
MB991559: Camshaft Oil Seal Adapter

MD998713: Camshaft Oil Seal Installer
MD998715: Crankshaft Pulley Holder Pin

ACX00301AB

MB990767

MD998715

Pre-removal and Post-installation Operation
• Timing Belt Removal and Installation (Refer to 

P.11A-36

.)

ACX00375

ENGINE OIL

1

2

LIP PORTION

2

88 ± 10 N·m
65 ± 7 ft-lb

AC

REMOVAL STEPS

<<A>>

>>B<<

1.

CAMSHAFT SPROCKET

<<B>>

>>A<<

2.

CAMSHAFT OIL SEAL

CAMSHAFT OIL SEAL

TSB Revision

ENGINE MECHANICAL

11A-24

REMOVAL SERVICE POINTS

.

<<A>> CAMSHAFT SPROCKET REMOVAL
Use special tools MD998715 and MB990767 to remove the 
camshaft sprocket.

.

<<B>> CAMSHAFT OIL SEAL REMOVAL
1. Make a notch in the oil seal lip section with a knife, etc.

CAUTION

Be careful not to damage the camshaft and the cylinder 
head.
2. Cover the end of a flat-tipped screwdriver with a shop towel 

and insert into the notched section of the oil seal, and pry 
out the oil seal to remove it.

ACX00301AB

MB990767

MD998715

ACX00373AB

FLAT-TIPPED
SCREWDRIVER

CAMSHAFT

OIL SEAL

LIP 
SECTION


Content   ..  102  103  104  105   ..