Mitsubishi Montero (2002-2004). Manual - part 833


  Index      Mitsubishi     Mitsubishi Montero - service repair manual 2002-2004 year


Search            


Content   ..  831  832  833  834   ..


Mitsubishi Montero (2002-2004). Manual - part 833


TIMING BELT

TSB Revision

ENGINE MECHANICAL

11A-37

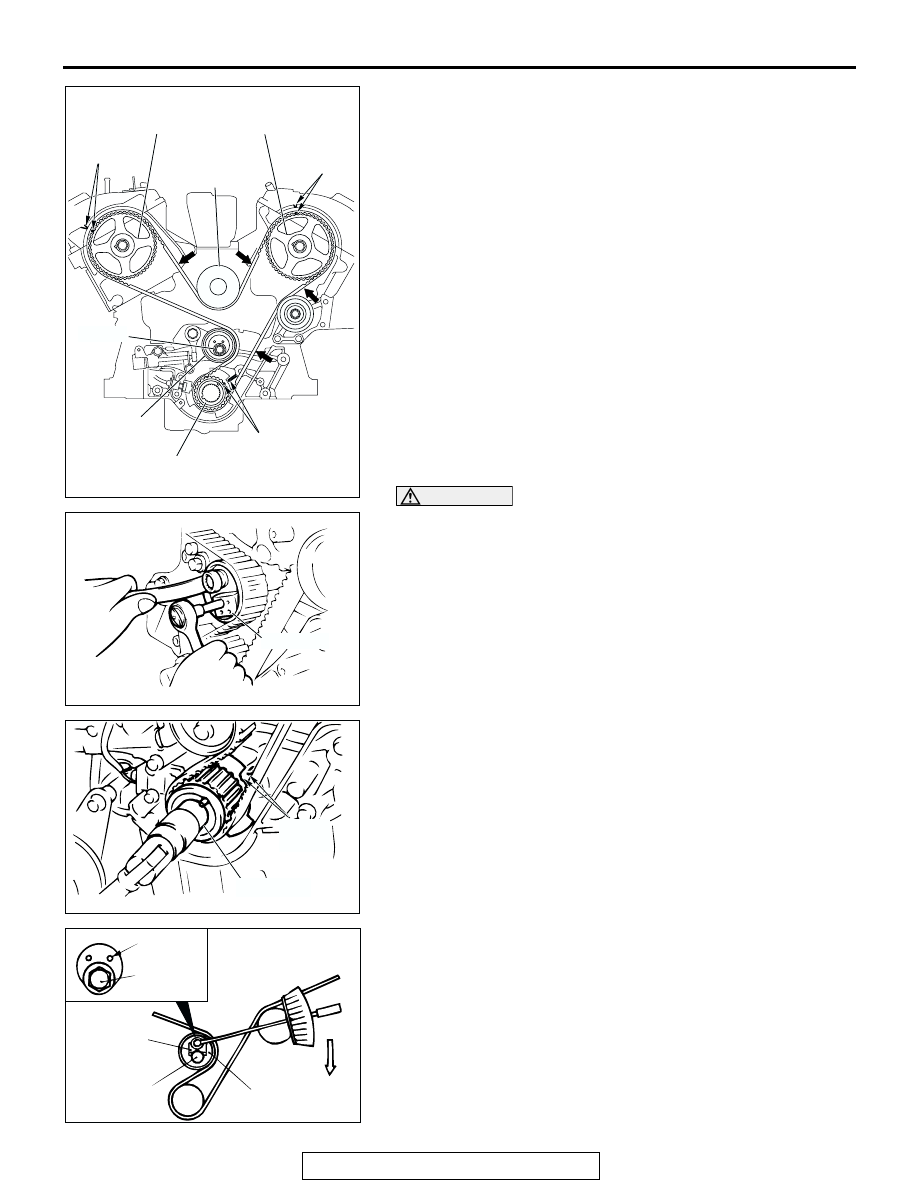
3. Turn the camshaft sprocket counterclockwise until the 

tension side of the timing belt is firmly stretched. Check all 
timing marks again.

CAUTION

When tightening the center bolt, be careful that the ten-
sioner pulley does not turn with the bolt.
4. Use special tool MD998767 to push the tensioner pulley into 

the timing belt, and then temporarily tighten the center bolt.

5. Use special tool MD998769 to turn the crankshaft 1/4 turn 

counterclockwise and then turn it again clockwise until the 
timing marks are aligned.

6. Loosen the center bolt of the tensioner pulley. Use special 

tool MD998767 and a torque wrench to apply the standard 
torque to the timing belt as shown in the illustration. Then 
tighten the center bolt to the specified torque.

• Standard value: 4.4 Nm (39 in-lb) <Timing belt ten-

sion torque>

• Tightening torque: 48 ± 6 Nm (36 ± 4 ft-lb)

ACX00537

TIMING 
MARK

TIMING 
MARK

TIMING 
MARK

CAMSHAFT 
SPROCKET 
(RIGHT BANK)

CAMSHAFT 
SPROCKET 
(LEFT BANK)

CRANKSHAFT 
SPROCKET

TENSION 
PULLEY

AC

CENTER 
BOLT

WATER
PUMP
PULLEY

ACX00335AB

MD998767

ACX00336AB

MD998769

TIMING 
MARK

ACX00756AB

CENTER 

BOLT

PIN HOLES

48 ± 6 N·m

36 ± 4 ft-lb

MD998767

TENSION 

PULLEY

4.4 N·m 

(39 in-lb)

TIMING BELT

TSB Revision

ENGINE MECHANICAL

11A-38

7. Remove the setting pin that has been inserted into the auto-

tensioner.

8. Turn the crankshaft two turns clockwise to align the timing 

marks.

9. Wait for at least five minutes, and then check that the auto-

tensioner pushrod extends within the standard value.

Standard value (A): 4.8 

 5.5 mm (0.19  0.22 inch)

10.If no, repeat the operation in steps (5) to (9) above.
11.Check again that the timing marks of each sprocket are 

aligned.

.

>>B<< AUTO-TENSIONER INSTALLATION
1. While holding the auto-tensioner by hand, press the end of 

the pushrod against a metal surface (such as the cylinder 
block) with a force of 98 

− 196 N (72 − 145 pound) and 

measure how far the pushrod is pushed in.

Standard value: Within 1 mm (0.04 inch)
A: Length when no force is applied
B: Length when force is applied

 B: Amount pushed in

CAUTION

• Place the auto-tensioner perpendicular to the jaws of 

the vice.

• If there is a plug at the base of the auto-tensioner, insert 

a plain washer onto the end of the auto-tensioner to 
protect the plug.

2. If it is not within the standard value, replace the auto-

tensioner.

3. Place two dolly blocks in a vice as shown in the illustration, 

and then place the auto-tensioner in the vice.

ACX00339 AB

SETTING PIN

ACX00339

A

AB

ACX00306AB

A

B

AUTO-TENSIONER

AMOUNT 
PUSHED IN

PUSHROD

ACX00333

PLUG

PLAIN 

WASHER

DOLLY BLOCKS

AB

TIMING BELT

TSB Revision

ENGINE MECHANICAL

11A-39

CAUTION

Never compress the pushrod too fast, or the pushrod may 
be damaged.
4. Slowly compress the pushrod of the auto-tensioner until pin 

hole A in the pushrod is aligned with pin hole B in the 
cylinder.

5. Insert the setting pin into the pin holes once they are 

aligned.
NOTE: If replacing the auto-tensioner, the pin will already be 
inserted into the pin holes of the new part.

CAUTION

Do not remove the setting pin from the auto-tensioner.
6. Install the auto-tensioner to the engine.

.

>>C<< CRANKSHAFT PULLEY INSTALLATION
Use special tools MB991800 and MB991802 to install the 
crankshaft pulley.

.

>>D<< ACCESSORY MOUNT ASSEMBLY INSTALLATION
Install the bolts to the shown positions, and tighten them to the 
specified torque. 

.

>>E<< DRIVE BELT AUTO TENSIONER INSTALLATION
1. Install the drive belt auto tensioner with the Allen wrench 

inserted. 

ACX00334 AB

PIN HOLE A

PIN HOLE B

ACX01675AB

MB991800

MB991802

Bolt (symbol)

Diameter 

× length 

mm (in)

Tightening 
torque N

m (ft-lb)

A

10 

× 100 (0.4 × 3.9) 41 ± 8 (30 ± 6)

B

10 

× 30 (0.4 × 1.2)

41 

± 8 (30 ± 6)

C

10 

× 100 (0.4 × 3.9) 44 ± 10 (33 ± 7)

D

12 

× 100 (0.5 × 3.9) 74 ± 9 (54 ± 7)

E

× 30 (0.3 × 1.2)

23 

± 3 (17 ± 2)

F

10 

× 100 (0.4 × 3.9) 49 ± 5 (36 ± 4)

ACX00757AB

A

E

D

C

B

B

F

A

A

SPECIFICATIONS

TSB Revision

ENGINE MECHANICAL

11A-40

2. After the drive belt has been installed, remove the Allen 

wrench while holding the drive belt auto tensioner with a 
socket wrench drive. Then release the drive belt auto 
tensioner slowly. 

INSPECTION

M1112004400255

AUTO-TENSIONER

• Check the auto-tensioner for possible leaks.

• Check the pushrod for cracks.

SPECIFICATIONS

FASTENER TIGHTENING SPECIFICATIONS

M1111003800268

ACX01376AB

ALLEN WRENCH

ACX00536

AUTO-TENSIONER

SPRING

PUSHROD

AB

ITEMS

SPECIFICATIONS

A/T fluid dipstick assembly attaching bolt

44 

± 8 N⋅m (33 ± 5 ft-lb)

A/T fluid dipstick assembly attaching bolt

24 

± 4 N⋅m (18 ± 3 ft-lb)

Accessory mount assembly mounting bolt (10 

× 100, 10 × 30)

41 

± 8 N⋅m (30 ± 6 ft-lb)

Accessory mount assembly mounting bolt (10 

× 100)

44 

± 10 N⋅m (33 ± 7 ft-lb)

Accessory mount assembly mounting bolt (12 

× 100)

74 

± 9 N⋅m (54 ± 7 ft-lb)

Accessory mount assembly mounting bolt (8 

× 30)

23 

± 3 N⋅m (17 ± 2 ft-lb)

Accessory mount assembly mounting bolt (10 

× 100)

49 

± 5 N⋅m (36 ± 4 ft-lb)

Accessory mount stay mounting bolt 

49 

± 9 N⋅m (36 ± 7 ft-lb)

Accessory mount stay mounting bolt 

24 

± 4 N⋅m (18 ± 3 ft-lb)

Auto tensioner mounting bolt 

23 

± 3 N⋅m (17 ± 2 ft-lb)

Cooling fan attaching nut

11 

± 1 N⋅m (98 ± 8 in-lb)

Cooling fan bracket assembly

41 

± 8 N⋅m (30 ± 6 ft-lb)

Camshaft position sensor support attaching bolt

14 

± 1 N⋅m (120 ± 13 in-lb)

Camshaft sprocket attaching bolt

88 

± 10 N⋅m (65 ± 7 ft-lb)

Crankshaft position sensor attaching bolt

8.5 

± 0.5 N⋅m (76 ± 4 in-lb)

Crankshaft pulley attaching bolt

185 

± 5 N⋅m (137 ± 3 ft-lb)


Content   ..  831  832  833  834   ..