Mitsubishi Montero (2002-2004). Manual - part 1068


  Index      Mitsubishi     Mitsubishi Montero - service repair manual 2002-2004 year


Search            


Content   ..  1066  1067  1068  1069   ..


Mitsubishi Montero (2002-2004). Manual - part 1068


FUEL SUPPLY DIAGNOSIS

TSB Revision

FUEL SUPPLY

13B-5

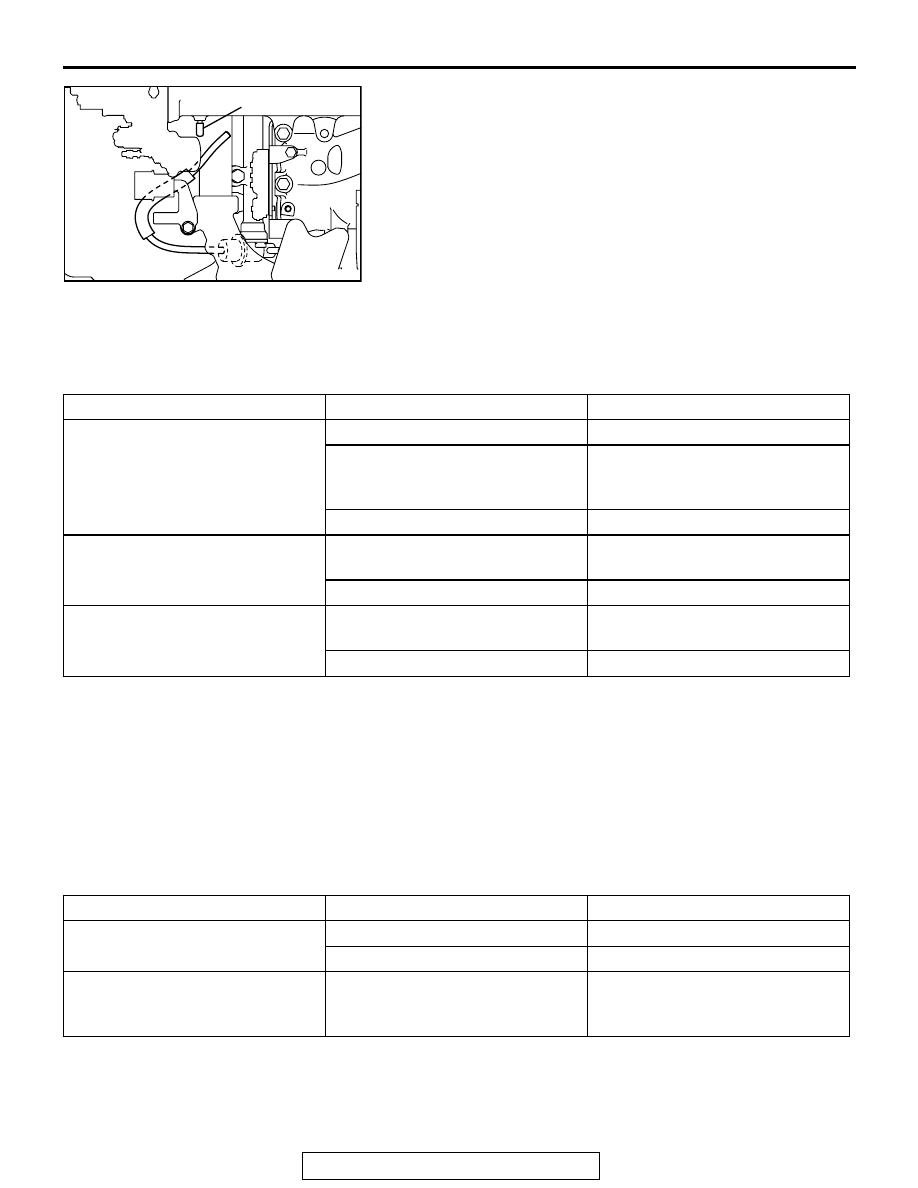
(9) Disconnect the vacuum hose from the fuel pressure 

regulator and measure fuel pressure with the hose end 
closed with your finger.

Standard value: 330 

 350 kPa (47  50 psi) at curb 

idle

(10)Check to see that fuel pressure at idle does not drop even 

after the engine has been revved several times.

(11)Revving the engine repeatedly, hold the fuel return hose 

lightly with your fingers to feel that fuel pressure is present 
in the return hose.
NOTE: If the fuel flow rate is low, there will be no fuel pres-
sure in the return hose.

(12)If any of fuel pressure measured in steps 10 to 13 is out of 

specification, troubleshoot and repair according to the table 
below.

(13)Stop the engine and observe fuel pressure gauge reading. 

It is normal if the reading does not drop within two minutes. 
If it does, observe the rate of drop and troubleshoot and 
repair according to the table below. Start, then stop the 
engine.
a. Squeeze the fuel return line closed to confirm leak-down 

occurs from defective fuel pressure regulator.

b. Squeeze the fuel supply line closed to confirm leak-

down occurs from defective fuel pump check valve.

c. If pressure continues to drop with both fuel lines 

squeezed closed, injector(s) are leaking.

(14)Release residual pressure from the fuel pipe line. (Refer to 

P.13Aa-15

.)

SYMPTOM

PROBABLE CAUSE

REMEDY

• Fuel pressure too low

• Fuel pressure drops after racing

• No fuel pressure in fuel return 

hose

Clogged fuel filter

Replace fuel filter

Fuel leaking to return side due to 
poor fuel regulator valve seating or 
settled spring

Replace fuel pressure regulator

Low fuel pump delivery pressure

Replace fuel pump

Fuel pressure too high

Binding valve in fuel pressure 
regulator

Replace fuel pressure regulator

Clogged fuel return hose or pipe

Clean or replace hose or pipe

Same fuel pressure when vacuum 
hose is connected and when 
disconnected

Damaged vacuum hose or 
clogged nipple

Replace vacuum hose or clean 
nipple

Defective fuel pressure regulator

Replace fuel pressure regulator

SYMPTOM

PROBABLE CAUSE

REMEDY

Fuel pressure drops gradually 
after engine is stopped

Leaky injector

Replace injector

Leaky fuel regulator valve seat

Replace fuel pressure regulator

Fuel pressure drops sharply 
immediately after engine is 
stopped

Check valve in fuel pump is held 
open

Replace fuel pump

AKX01459AB

NIPPLE

FUEL SUPPLY DIAGNOSIS

TSB Revision

FUEL SUPPLY

13B-6

WARNING

Cover the hose connection with shop towels to pre-
vent splash of fuel that could be caused by some 
residual pressure in the fuel pipe line.

(15)Remove the fuel pressure gauge or special tool 

MB991637, and special tools MD998709 and MD998742 
from the fuel rail.

(16)Replace the O-ring at the end of the high-pressure fuel 

hose with a new one.

(17)Fit the high-pressure fuel hose into the fuel rail and tighten 

the bolts to specified torque.

Tightening torque: 4.9 

± 1.0 Nm (44 ± 8 in-lb)

(18)Check for fuel leaks.

a. Use scan tool MB991502 to operate the fuel pump.
b. Check the fuel line for leaks, and repair as needed.

(19)Disconnect scan tool MB991502.
Q: Are the fuel pressure test in good condition?

YES : Go to Step 5.
NO :  Repair or replace. Then go to Step 3.

STEP 3. Check for bending, twisting or clogging of the fuel 
pipe or hose.
Q: Are the fuel pipe and hose in good condition?

YES : Go to Step 4.
NO :  Repair or replace. Then go to Step 6.

AKX01460AB

MD998709

FUEL 
RAIL

MD998742

HIGH-
PRESSURE
FUEL HOSE

FUEL SUPPLY DIAGNOSIS

TSB Revision

FUEL SUPPLY

13B-7

STEP 4. Check the fuel pump module operation.

CAUTION

To prevent damage to scan tool MB991502, always turn the 
ignition switch to the "LOCK" (OFF) position before con-
necting or disconnecting scan tool MB991502.
(1) Check the operating of the fuel pump by using scan tool 

MB991502 to force-drive the fuel pump.

(2) If the fuel pump will not operate, check by using the 

following procedure. If normal, check the fuel pump drive 
circuit.
a. Turn the ignition switch to the "LOCK" (OFF) position.
b. Remove the rear seat assembly (Refer to GROUP 52A 

P.52A-18

).

c. Remove the protector.
d. Disconnect the fuel pump module connector.
e. When the fuel pump drive connector is attached directly 

to the battery, check if the sound of the fuel pump 
operation can be heard.

NOTE: As the fuel pump is an in-tank type, the fuel 
pump sound is hard to hear. Remove the fuel tank 
filler tube cap and check from the tank inlet.

f. Check for fuel pressure by pinching the fuel hose with 

fingertips.

g. Connect the fuel pump module connector.
h. Install the protector and rear seat assembly (Refer to 

GROUP 52A 

P.52A-18

).

Q: Is the fuel pump module operation in good condition?

YES : Then go to Step 5.
NO :  Replace. Then go to Step 6.

STEP 5. Check the inside of the fuel tank for contamination 
and rust.
(1) Draining fuel.
(2) Fuel tank removal. (Refer to 

P.13B-11

.)

Q: Is the fuel tank in good condition?

YES : Go to Step 6.
NO :  Replace the fuel filter, and clean the fuel tank and fuel 

line. Then go to Step 6.

STEP 6. Check symptoms.
Q: Is the engine malfunction eliminated?

YES : Finish.
NO :  Return to Step 1.

ACX01539

16-PIN

MB991502

AC

SPECIAL TOOLS

TSB Revision

FUEL SUPPLY

13B-8

SPECIAL TOOLS

M1135000600032

ON-VEHICLE SERVICE

FUEL LEVEL SENSOR CHECK

M1135003100218

Refer to GROUP 54A 

P.54A-63

.

FUEL LEVEL SENSOR REPLACEMENT

M1135001400150

1. Tumble the second (middle) seat.
2. Remove the service hole cover (upper side) and the packing 

located under the second seat.

3. Remove the second seat, the rear scuff plate, the anchor 

bolts for the outer seat belt (second) and mounting screws of 
the lower quarter trim. Tear off the carpet. (Refer to GROUP 
52A 

P.52A-18

.)

4. Remove the service hole cover and the packing located 

between the front seat and the second seat.

TOOL

TOOL NUMBER AND 
NAME

SUPERSESSION

APPLICATION

MB991502
Scan tool <MUT-II>

MB991496-OD

• Reading diagnostic 

trouble code

• MFI system inspection

MD998709
Adaptor hose

MIT210196

Measurement of fuel 
pressure

MD998742
Hose adaptor

MD998742-01

MB991637
Fuel pressure gauge set

Tool not available

MB991348 Test harness 
set

MB991348-01

Fuel tank differential 
pressure sensor check

B991502

MB991637

MB991348


Content   ..  1066  1067  1068  1069   ..