Mitsubishi Galant (2004+). Manual - part 1479


  Index      Mitsubishi     Mitsubishi Galant - service repair manual 2004 year


Search            


Content   ..  1477  1478  1479  1480   ..


Mitsubishi Galant (2004+). Manual - part 1479


RADIO WITH CD PLAYER

TSB Revision

CHASSIS ELECTRICAL

54A-159

DIAGNOSIS

Required Special Tool:

• MB991223: Harness set

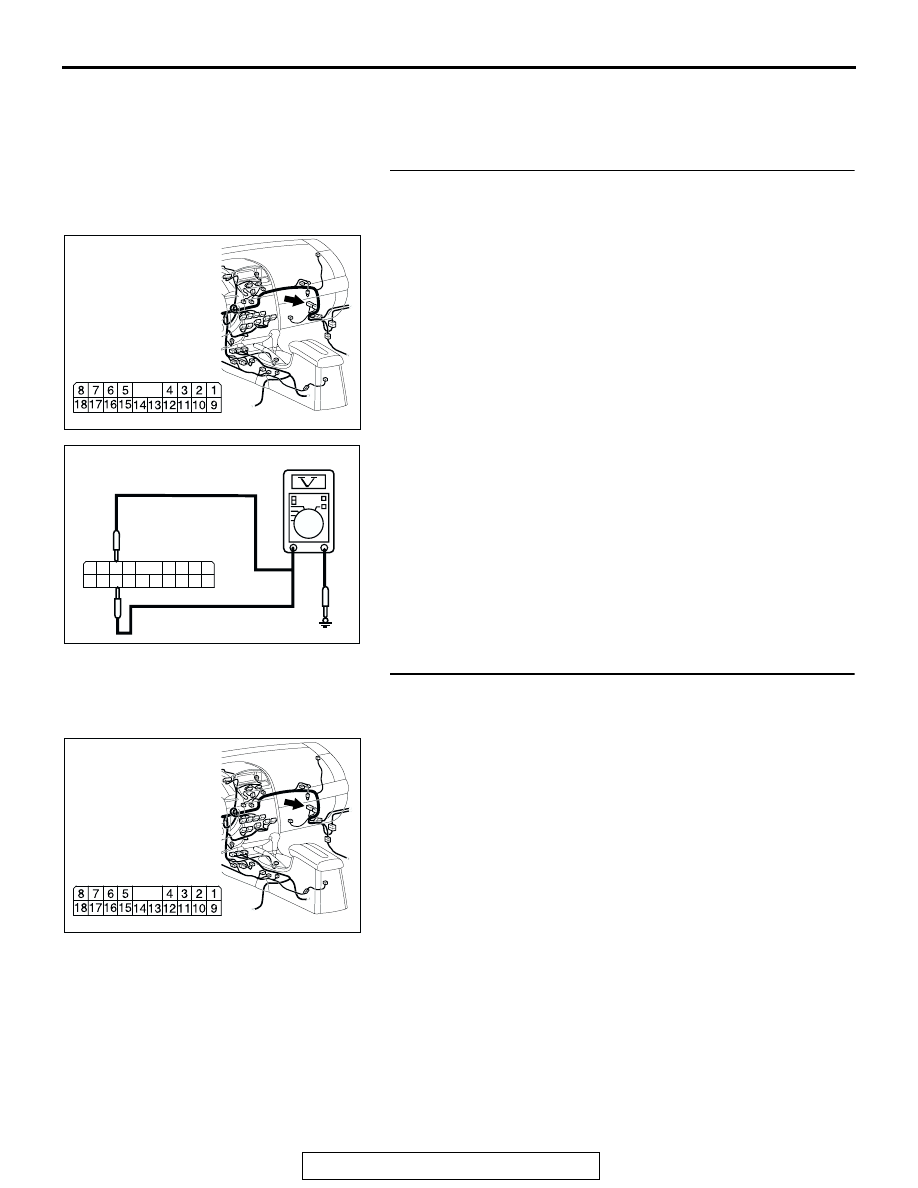
STEP 1. Measure the voltage at audio amplifier connector 
C-113 in order to check the battery circuit of power supply 
system to the audio amplifier.
(1) Disconnect audio amplifier connector C-113, and measure 

at the wiring harness side.

(2) Measure the voltage between terminal 6 and ground.

• The voltage should measure approximately 12 volts 

(battery positive voltage).

(3) Measure the voltage between terminal 16 and ground.

• The voltage should measure approximately 12 volts 

(battery positive voltage).

Q: Is the measured voltage approximately 12 volts (battery 

positive voltage)?
YES : 
Go to Step 4.
NO :  Go to Step 2.

STEP 2. Check audio amplifier connector C-113 for loose, 
corroded or damaged terminals, or terminals pushed back 
in the connector.
Q: Is audio amplifier connector C-113 in good condition?

YES : Go to Step 3.
NO :  Repair or replace the component(s). Refer to GROUP 

00E, Harness Connector Inspection 

P.00E-2

. The 

speakers should sound.

AC305233CC

CONNECTOR: C-113

HARNESS SIDE

AC204738FK

13

10 9

1

2

1211

3

4

18

8

1514

5

1716

7 6

CONNECTOR C-113 
(HARNESS SIDE)

AC305233CC

CONNECTOR: C-113

HARNESS SIDE

RADIO WITH CD PLAYER

TSB Revision

CHASSIS ELECTRICAL

54A-160

STEP 3. Check the wiring harness between audio amplifier 
connector C-113 (terminal 6 and 16) and the battery.

NOTE: Also check intermediate connector C-29 for loose, cor-
roded, or damaged terminals, or terminals pushed back in the 
connector. If intermediate connectors C-29 is damaged, repair 
or replace the connector as described in GROUP 00E, Harness 
Connector Inspection 

P.00E-2

.

Q: Is the wiring harness between audio amplifier connector 

C-113 (terminal 6 and 16) and the battery in good 
condition?
YES : 
There is no action to be taken.
NO :  Repair the wiring harness. The speakers should 

sound.

STEP 4. Measure the resistance at audio amplifier 
connector C-113 in order to check the ground circuit to the 
audio amplifier.
(1) Disconnect audio amplifier connector C-113, and measure 

at the wiring harness side.

(2) Measure the resistance between terminal 7 and ground.

• The resistance should be 2 ohms or less.

(3) Measure the resistance between terminal 17 and ground.

• The resistance should be 2 ohms or less.

Q: Is the measured resistance 2 ohms or less?

YES : Go to Step 7.
NO :  Go to Step 5.

AC305233CC

CONNECTOR: C-113

HARNESS SIDE

AC305231AI

CONNECTOR: C-29

AC305233CC

CONNECTOR: C-113

HARNESS SIDE

AC204738FL

13

10 9

1

2

1211

3

4

18

8

1514

5

1716

7 6

CONNECTOR C-113 
(HARNESS SIDE)

RADIO WITH CD PLAYER

TSB Revision

CHASSIS ELECTRICAL

54A-161

STEP 5. Check audio amplifier connector C-113 for loose, 
corroded or damaged terminals, or terminals pushed back 
in the connector.
Q: Is audio amplifier connector C-113 in good condition?

YES : Go to Step 6.
NO :  Repair or replace the component(s). Refer to GROUP 

00E, Harness Connector Inspection 

P.00E-2

. The 

speakers should sound.

STEP 6. Check the wiring harness between audio amplifier 
connector C-113 (terminal 7 and 17) and ground.
Q: Is the wiring harness between audio amplifier connector 

C-113 (terminal 7 and 17) and ground in good 
condition?
YES : 
There is no action to be taken.
NO :  Repair the wiring harness. The speakers should 

sound.

AC305233CC

CONNECTOR: C-113

HARNESS SIDE

AC305233CC

CONNECTOR: C-113

HARNESS SIDE

RADIO WITH CD PLAYER

TSB Revision

CHASSIS ELECTRICAL

54A-162

STEP 7. Check radio, CD player and CD changer connector 
C-116 and audio amplifier connector C-114 for loose, 
corroded or damaged terminals, or terminals pushed back 
in the connector.
Q: Are radio, CD player and CD changer connector C-116 

and audio amplifier connector C-114 in good condition?
YES : 
Go to Step 8.
NO :  Repair or replace the component(s). Refer to GROUP 

00E, Harness Connector Inspection 

P.00E-2

. The 

door speaker (LH) should sound.

STEP 8. Check the wiring harness between CD player and 
CD changer connector C-116 (terminals 21, 24, 23, 31, 30 
and 22) and audio amplifier connector C-114 (terminals 22, 
23, 30, 24 and 31).
Q:  Do the speakers sound normally?

YES : The procedure is complete.
NO :  Repair or replace the audio amplifier.

AC305234

CONNECTORS: C-114, C-116

C-114

C-116

HARNESS SIDE

C-114

HARNESS SIDE

C-116

21

22

23

24

25

26

27

28

29

30

31

32

21

22

23

24

25

26

27

28

29

30

31

32

33

34

AV

AC305234

CONNECTORS: C-114, C-116

C-114

C-116

HARNESS SIDE

C-114

HARNESS SIDE

C-116

21

22

23

24

25

26

27

28

29

30

31

32

21

22

23

24

25

26

27

28

29

30

31

32

33

34

AV


Content   ..  1477  1478  1479  1480   ..