Mitsubishi Galant 9G. Manual - part 1559


  Index      Mitsubishi     Mitsubishi Galant 9G - service repair manual


Search            


Content   ..  1557  1558  1559  1560   ..


Mitsubishi Galant 9G. Manual - part 1559


HEADLIGHT, FRONT SIDE MARKER LIGHT AND POSITION LIGHT ASSEMBLY

TSB Revision

CHASSIS ELECTRICAL

54A-108

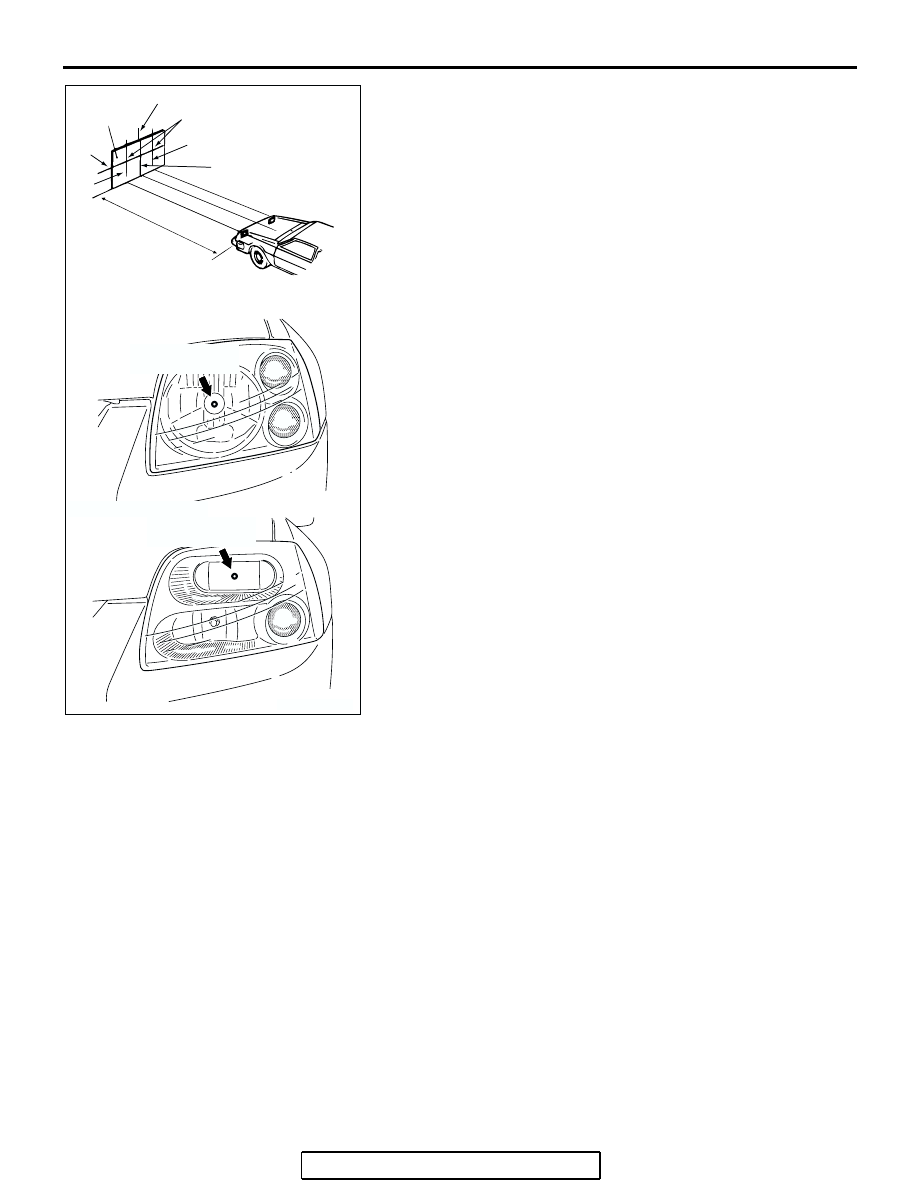
10.Set the distance between the screen and the bulb center 

marks of the headlight as shown in the illustration.

11.Four lines of adhesive tape (or equivalent markings) are 

required on screen or wall:

(1) Position a vertical tape or mark so that it is aligned with 

the vehicle center line.

(2) Measure the distance from the center-marks on the 

headlight lens to the floor [ (reference value: 675 mm 
(26.6 inches) <except for projector type>, 732 mm (28.8 
inches) <projector type>]. Transfer the measurement to 
the screen. Horizontal tape or mark on the screen is for 
reference of vertical adjustment.

(3) Measure the distance from the center line of the vehicle 

to the center of each headlight. Transfer the 
measurement to the screen. Vertical tape or mark on the 
screen with reference to the center line of each headlight 
bulb.

HEADLIGHT ADJUSTMENT

NOTE: When adjusting headlight, disconnect the other 
headlight harness.

1. The low beam headlight will project on the screen upper 

edge of the beam (cut-off).

AC307658

(1)

(2)

(3)

HEADLIGHT CENTER

VEHICLE CENTER  
LINE

SCREEN

(3)

7.62 m (25.0 ft)

THE CENTER 
OF HEADLIGHTS 

AC

<EXCEPT FOR PROJECTOR TYPE>

<PROJECTOR TYPE>

THE CENTER 
OF HEADLIGHTS 

HEADLIGHT, FRONT SIDE MARKER LIGHT AND POSITION LIGHT ASSEMBLY

TSB Revision

CHASSIS ELECTRICAL

54A-109

2. Turn the adjusting screws to achieve the specified low-beam 

cut-off location on the aiming screen.

Standard value:
(Vertical direction) Horizontal center line 

± 50.5 mm (± 

2.0 inches) (0.38 degrees angle)

CAUTION

Do not cover a headlight for more than three minutes to 
prevent the plastic headlight lens deformation.
NOTE: There is no horizontal aim adjustment. Horizontal aim is 
preset and does not require adjustment. High-beam pattern 
should be correct when the low-beams are adjusted properly.

LUMINOUS INTENSITY MEASUREMENT

M1542001000486

1. Set the headlights to high-beam
2. Using a photometer, and following its manufacturer's 

instruction manual, measure the headlight center intensity 
and check to be sure that the limit value is satisfied.

Limit: 40,000 cd or more {When a screen is set 18.3m 
(60 feet) ahead of the vehicle}

NOTE: When measuring the intensity, maintain an engine 
speed of 2,000 r/min, with the battery fully charged.
There may be special local regulations pertaining to headlight 
intensity. Be sure to make any adjustments necessary to satisfy 
such regulations.
If an illuminometer is used to make the measurements, convert 
its values to photometer values by using the following formula.

I =E x r

2

 Where:

• I = intensity (cd)

• E = illumination (lux)

• r = distance (m) from headlights to illuminometer

AC307659AC

VERTICAL 
ADJUSTMENT

<PROJECTOR TYPE>

<EXCEPT FOR PROJECTOR TYPE>

VERTICAL 
ADJUSTMENT

AC211806

DISTANCE OF

VERTICAL

DIRECTION

(H)

(V)

mm (in)

AC

50.5 (2.0)

50.5 (2.0)

HIGH INTENSITY ZONE

CUT OFF 

LINE

HEADLIGHT, FRONT SIDE MARKER LIGHT AND POSITION LIGHT ASSEMBLY

TSB Revision

CHASSIS ELECTRICAL

54A-110

 BULB REPLACEMENT <EXCEPT FOR 
PROJECTOR TYPE>

M1542001300681

Headlight Bulb

1. When replacing the headlight bulb on the left side, remove 

the relay box.

2. Disconnect the headlight connector.
3. Remove the locking cap by twisting it counterclockwise as 

shown.

4. Remove the headlight bulb with holder.

CAUTION

Do not touch the surface of the bulb with hands or  dirty 
gloves as the bulb may fail after a short time. If the surface 
does become dirty, clean it with alcohol or thinner, and let 
it dry thoroughly before installing.
5. Install a new locking cap with bulb to the headlight by 

twisting it clockwise.

Front Turn-signal and Parking Light Bulb

1. Disconnect the front turn-signal light and parking light 

connector.

2. Remove the socket with the bulb by turning it 

counterclockwise as shown.

CAUTION

Do not touch the surface of the bulb with hands or  dirty 
gloves as the bulb may fail after a short time. If the surface 
does become dirty, clean it with alcohol or thinner, and let 
it dry thoroughly before installing.
3. Twist bulb counterclockwise and pull out the bulb from the 

socket, and then replace the bulb.

4. Install the socket to the headlight by push and twisting it 

clockwise.

Front Side-marker Light Bulb

1. Disconnect the front side-marker light connector.

AC307145

AB

LOCKING CAP

AC307144

HEADLIGHT

AB

AC307146

FRONT TURN-SIGNAL 
AND PARKING LIGHT

AB

HEADLIGHT, FRONT SIDE MARKER LIGHT AND POSITION LIGHT ASSEMBLY

TSB Revision

CHASSIS ELECTRICAL

54A-111

2. Remove the socket with the bulb by turning it 

counterclockwise as shown.

CAUTION

Do not touch the surface of the bulb with hands or  dirty 
gloves as the bulb may fail after a short time. If the surface 
does become dirty, clean it with alcohol or thinner, and let 
it dry thoroughly before installing.
3. Pull out the bulb from the socket, and then replace the bulb.
4. Install the socket to the headlight by push and twisting it 

clockwise.

 BULB REPLACEMENT <PROJECTOR TYPE>

M1542001300711

Headlight Bulb (Low Beam)

1. Disconnect the headlight connector.
2. Remove the headlight bulb by turning it counterclockwise as 

shown.

CAUTION

Do not touch the surface of the bulb with hands or  dirty 
gloves as the bulb may fail after a short time. If the surface 
does become dirty, clean it with alcohol or thinner, and let 
it dry thoroughly before installing.
3. Install the headlight bulb to the headlight by push and 

twisting it clockwise.

Headlight Bulb (High Beam)

1. When replacing the headlight bulb on the left side, remove 

the relay box.

2. Remove the entire socket and bulb assembly by twisting it 

counterclockwise as shown.

3. Disconnect the headlight connector.

CAUTION

Do not touch the surface of the bulb with hands or  dirty 
gloves as the bulb may fail after a short time. If the surface 
does become dirty, clean it with alcohol or thinner, and let 
it dry thoroughly before installing.
4. Connect the headlight bulb to the headlight connector and 

install it to the headlight by push and twisting clockwise.

Front Turn-signal Light and Parking Light Bulb

1. Disconnect the front turn-signal light and parking light 

connector.

AC307143

AB

FRONT SIDE-MAKER LIGHT

AC307141

HEADLIGHT (LOW BEAM)

AB

AC307142

AB

HEADLIGHT (HIGH BEAM)


Content   ..  1557  1558  1559  1560   ..