Mitsubishi Evolution X. Manual - part 500


  Index      Mitsubishi     Mitsubishi Evolution X - service repair manual 2008 year


Search            


Content   ..  498  499  500  501   ..


Mitsubishi Evolution X. Manual - part 500


DOOR

TSB Revision

BODY

42A-103

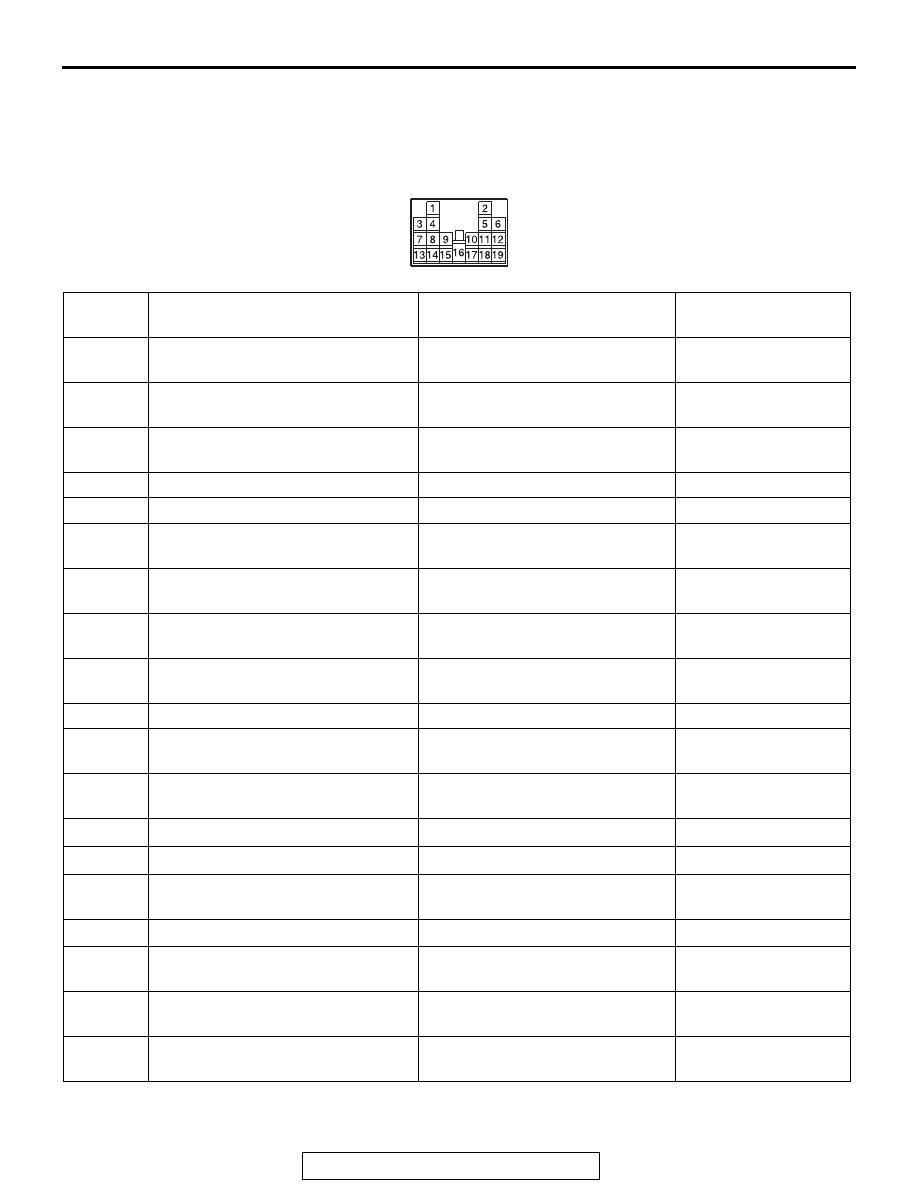
CHECK AT ECU TERMINAL

M1429013600238

POWER WINDOW SWITCH TERMINAL CHECK

.

POWER WINDOW MAIN SWITCH

AC609433

E-15

AD

Terminal 
No.

Check items

Check conditions

Normal conditions

1

Output to power window motor 
(Passenger’s side)

2

Output to power window motor 
(Driver’s side)

3

Output to power window motor 
(Passenger’side)

4

Power supply

Power window relay: ON

Battery voltage

5

Power supply

Always

Battery voltage

6

Output to power window motor 
(Driver’s side)

7

LIN communication line (between 
ETACS-ECUs)

Always

0 to 12 V (pulse signal)

8

Input from power window motor 
(pulse sensor signal) 

When the power windows are 
operating

0 to 5 V (pulse signal)

9

Input from power window motor 
(pulse sensor ground) 

0 V

10

Ground

Always

0 V

11

Input from power window motor 
(pulse sensor signal) 

When the power windows are 
operating

0 to 5 V (pulse signal)

12

Input from power window motor 
(power supply to pulse sensor)

When the power windows are 
operating

5 V

13

14

15

Output to power window motor 
(Rear right side)

16

17

Output to power window motor 
(Rear right side)

18

Output to power window motor 
(Rear left side)

19

Output to power window motor 
(Rear left side)

DOOR

TSB Revision

BODY

42A-104

DOOR DIAGNOSIS

INTRODUCTION TO GLASS AND DOOR DIAGNOSIS

M1423007300285

Glass and door faults include water leaks and 
improper opening and closing. Causes for these 
faults can include faults in the glass, weatherstrip, 
drain hole, waterproof film or door installation.

GLASS AND DOOR DIAGNOSTIC TROUBLESHOOTING STRATEGY

M1423006700343

Use these steps to plan your diagnostic strategy. If 
you follow them carefully, you will be sure that you 
have exhausted most of the possible ways to find a 
glass and door fault.
1. Gather information from the customer.

2. Verify that the condition described by the 

customer exists.

3. Find the malfunction by following the Symptom 

Chart.

4. Verify malfunction is eliminated.

SYMPTOM CHART

M1423007000400

SYMPTOM PROCEDURES

INSPECTION PROCEDURE 1: Water Leak Through Door Window Glass

DIAGNOSIS

STEP 1. Check the door window glass 
installation.

Q: Is the door window glass installed correctly?

YES : 

Go to Step 2.

NO : 

Assemble the door window glass again.  
Refer to 

P.42A-121

Then go to Step 3. 

STEP 2. Check the clearance at the top of the 
door window glass.

Q: Is the clearance at the top of the door window 

glass correct?
YES : 

Go to Step 3.

NO : 

Adjust the door window glass.  Refer to 

P.42A-114

. Then go to Step 3.

STEP 3. Retest the system.

Q: Is any water leaking?

YES : 

Return to Step 1.

NO : 

The procedure is complete.

Symptom

Inspection 
procedure

Reference page

Water leak through door window glass

1

P.42A-104

Door window malfunction

2

P.42A-105

Water leak through door edge

3

P.42A-105

Water leak from door center

4

P.42A-105

Door hard to open

5

P.42A-106

Door does not open or close completely

6

P.42A-106

Uneven gap between body

7

P.42A-106

Wind noise around door

8

P.42A-107

DOOR

TSB Revision

BODY

42A-105

INSPECTION PROCEDURE 2: Door Window Glass Malfunction

DIAGNOSIS

STEP 1. Check the door window glass 
installation condition.

Q: Is the door window glass installed correctly?

YES : 

Go to Step 2.

NO : 

Assemble the door window glass again. 
(Refer to 

P.42A-124

.) Then go to Step 4.

STEP 2. Check the door sash.

Q: Is the door sash in good condition?

YES : 

Go to Step 3.

NO : 

Repair or replace the door sash, then go to 
Step 4.

STEP 3. Inspect the window regulator assembly.

Q: Is the window regulator assembly in good 

condition?
YES : 

Go to Step 4.

NO : 

Repair or replace the window regulator 
assembly, then go to Step 4.

STEP 4. Retest the system.

Q: Does the door window glass operate correctly?

YES : 

The procedure is complete.

NO : 

Return to Step 1.

INSPECTION PROCEDURE 3: Water Leak Through Door Edge

DIAGNOSIS

STEP 1. Check the weatherstrip.

Q: Is the weatherstrip in good condition?

YES : 

Go to Step 2.

NO : 

Replace the weatherstrip, then go to Step 3.

STEP 2. Check the door fit (alignment).

Q: Is the door fit (alignment) correct?

YES : 

Go to Step 3.

NO : 

Adjust the door fit. Refer to 

P.42A-111

Then go to Step 3.

STEP 3. Retest the system.

Q: Is any water leaking?

YES : 

Return to Step 1.

NO : 

The procedure is complete.

INSPECTION PROCEDURE 4: Water Leak from Door Center

DIAGNOSIS

STEP 1. Check the drain hole.

Q: Is the drain hole clogged?

YES : 

Clean the drain hole, then go to Step 3.

NO : 

Go to Step 2.

STEP 2. Check the weatherstrip.

Q: Is the weatherstrip in good condition?

YES : 

Go to Step 3.

NO : 

Repair or replace the weatherstrip, then go 
to Step 3.

STEP 3. Retest the system.

Q: Is any water leaking?

YES : 

Return to Step 1.

NO : 

The procedure is complete.

DOOR

TSB Revision

BODY

42A-106

INSPECTION PROCEDURE 5: Door Hard to Open

DIAGNOSIS

STEP 1. Adjust the latch and striker engagement.
Refer to 

P.42A-111

.

Q: Is the latch and striker engagement adjusted?

YES : 

Go to Step 2.

NO : 

Adjust the latch and striker. Refer to 

P.42A-111

. Then go to Step 4.

STEP 2. Check for lock rod damage.

Q: Is the lock rod damaged?

YES : 

Repair or replace the lock rod, then go to 

Step 4.

NO : 

Go to Step 3.

STEP 3. Check the door handle flexibility 
(amount of movement of handle required to open 
door).

Q: Is the door handle flexibility good?

YES : 

Go to Step 4.

NO : 

Adjust the door handle. Refer to 

P.42A-118


and 

P.42A-119

Then go to Step 4.

STEP 4. Retest the system.

Q: Does the door open easily?

YES : 

The procedure is complete.

NO : 

Return to Step 1.

INSPECTION PROCEDURE 6: Door does not Open or Close Completely

DIAGNOSIS

STEP 1. Check the door hinge position.

Q: Is the door hinge correct?

YES : 

Go to Step 2.

NO : 

Adjust the door hinge. Refer to 

P.42A-111

Then go to Step 4.

STEP 2. Check the door.

Q: Is the door in good condition?

YES : 

Go to Step 3.

NO : 

Repair or replace door, then go to Step 4.

STEP 3. Check the grease.

Q: Is the door check or door hinge grease sufficient?

YES : 

Go to Step 4.

NO : 

Apply the grease, then go to Step 4.

STEP 4. Retest the system.

Q: Does the door open and close correctly?

YES : 

The procedure is complete.

NO : 

Return to Step 1.

INSPECTION PROCEDURE 7: Uneven Gap Between Body

.

DIAGNOSIS

Adjust the door fit. Refer to 

P.42A-111

. Then check 

that the gap has been improved.


Content   ..  498  499  500  501   ..