Mitsubishi Evolution X. Manual - part 1288


  Index      Mitsubishi     Mitsubishi Evolution X - service repair manual 2008 year


Search            


Content   ..  1286  1287  1288  1289   ..


Mitsubishi Evolution X. Manual - part 1288


AUTO A/C DIAGNOSIS

TSB Revision

HEATER, AIR CONDITIONING AND VENTILATION

55-103

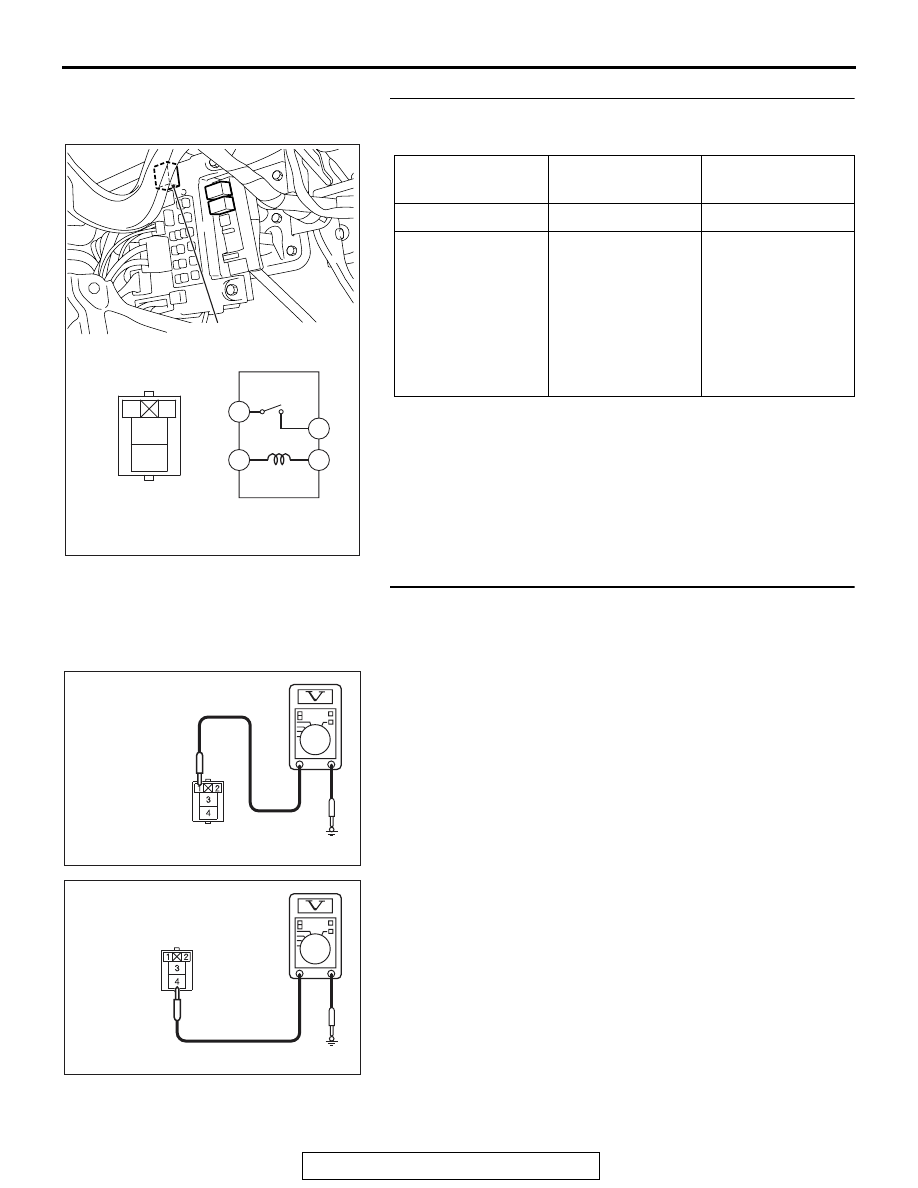
STEP 2. Check the blower relay continuity.
Follow the table below to check the blower relay for continuity.

Q: Is the blower relay in good condition?

YES : Go to Step 3.
NO :  Replace the rear window defogger relay.

STEP 3. Measure the voltage at blower relay connector 
C-303.
(1) Disconnect blower relay connector C-303, and measure the 

voltage at the junction block side.

(2) Measure the voltage between terminals 1 and ground.

• The measured value should be approximately 12 volts 

(battery positive voltage).

(3) Measure the voltage between terminals 4 and ground.

• The measured value should be approximately 12 volts 

(battery positive voltage).

Q: Is the measured voltage approximately 12 volts?

YES :  Go to Step 5.
NO :   Go to Step 4.

Battery voltage

Tester connection Specified 

condition

Not applied

3 

− 4

Open circuit

• Connect 

terminal 1 to the 
positive battery 
terminal

• Connect 

terminal 2 to the 
negative battery 
terminal

3 

− 4

Less than 2 ohms

AC605627

AC609984

AB

Blower relay

4

1

2

3

4

1

3

2

AC608254 AW

Connector C-303
(Junction block side)

AC608254 AX

Connector C-303
(Junction block side)

AUTO A/C DIAGNOSIS

TSB Revision

HEATER, AIR CONDITIONING AND VENTILATION

55-104

STEP 4. Check the wiring harness between blower relay 
connector C-303 (terminals 1 and 4) and the fusible link 
(37).
NOTE: Also check ETACS-ECU connector C-309 for loose, 
corroded, or damaged terminals, or terminals pushed back in 
the connector. If ETACS-ECU connector C-309 is damaged, 
repair or replace the connector as described in GROUP 00E, 
Harness Connector Inspection 

P.00E-2

.

Q: Is the wiring harness between blower relay connector 

C-303 (terminals 1 and 4) and the fusible link (37) in 
good condition?
YES : 
It can be assumed that this malfunction is intermittent. 

Refer to GROUP 00, How to Use 
Troubleshooting/Inspection Service Points 

− How to 

Cope with Intermittent Malfunctions 

P.00-15

.

NO :  Repair or replace the wiring harness. Refer to 

GROUP 00E, Harness Connector Inspection 

P.00E-2

.

STEP 5. Check blower relay connector C-115 for loose, 
corroded or damaged terminals, or terminals pushed back 
in the connector.
Q: Is blower relay connector C-115 in good condition?

YES : Go to Step 6.
NO :  Repair or replace the connector. Refer to GROUP 

00E, Harness Connector Inspection 

P.00E-2

.

STEP 6. Check the wiring harness between blower relay 
connector C-303 (terminal 3) and blower motor connector 
C-115 (terminal 1).
NOTE: Also check ETACS-ECU connector C-315 for loose, 
corroded, or damaged terminals, or terminals pushed back in 
the connector. If ETACS-ECU connector C-315 is damaged, 
repair or replace the connector as described in GROUP 00E, 
Harness Connector Inspection 

P.00E-2

.

Q: Is the wiring harness between blower relay connector 

C-303 (terminal 3) and blower motor connector C-115 
(terminal 1) in good condition?
YES : 
It can be assumed that this malfunction is intermittent. 

Refer to GROUP 00, How to Use 
Troubleshooting/Inspection Service Points 

− How to 

Cope with Intermittent Malfunctions 

P.00-15

.

NO :  Repair or replace the wiring harness. Refer to 

GROUP 00E, Harness Connector Inspection 

P.00E-2

.

AUTO A/C DIAGNOSIS

TSB Revision

HEATER, AIR CONDITIONING AND VENTILATION

55-105

DATA LIST REFERENCE TABLE

M1554005100846

Scan tool display

Item 
No.

Inspection status

The display content under 
normal condition

Engine speed

17

−

Displays correct engine 
speed.

Ambient temperature sensor

19

−

Ambient temperature is the 
same as scan tool displayed 
temperature

Air thermo sensor

20

−

Evaporator outlet 
temperature is the same as 
scan tool displayed 
temperature.

Interior temperature sensor

21

−

Interior temperature is the 
same as scan tool displayed 
temperature

Temperature setting

23

Displays air conditioning set 
temperature.

ETC sensor

24

−

Engine coolant temperature 
is the same as scan tool 
displayed temperature.

Vehicle speed

26

−

Displays vehicle speed.

A/C Compressor drive request 27

Compressor ON

ON

Compressor OFF

OFF

Air conditioning switch

28

Air conditioning switch ON

ON

Air conditioning switch OFF

OFF

Refrigerant leak

29

−

Normal

Idel up request

34

−

Displays idle-up request 
signal.

Rear heater SW light*

35

−

−

PTC heater 1*

36

−

−

PTC heater 2*

37

−

−

PTC heater 3*

38

−

−

In/out select damp poten 
(target)

45

−

Displays outside/inside air 
selection damper target 
position.

In/out select damp 
potentiometer

46

−

Displays outside/inside air 
selection damper position.

Air outlet c/o potentiometer

55

−

Displays air outlet 
changeover damper 
position.

Air outlet c/o potentio. (Target) 56

−

Displays air outlet 
changeover damper target 
position.

Low pressure judgment

57

−

Normal

AUTO A/C DIAGNOSIS

TSB Revision

HEATER, AIR CONDITIONING AND VENTILATION

55-106

Rear defogger switch

60

Rear window defogger switch ON

ON

Rear window defogger switch OFF OFF

Pressure sensor

61

−

Displays refrigerant 
pressure.

Air mix potentiometer

63

−

Displays the air mix damper 
position.

Photo sensor

67

−

Displays sunload.

Front blower fan

68

−

Displays blower motor 
condition.

Front blower fan (Target)

69

−

Displays blower motor 
target value.

Refrigerant pressure

73

−

Displays refrigerant 
pressure status.

Condenser fan

74

−

Displays condenser fan 
running condition.

Temp. set dial position

76

−

Displays the set 
temperature output value on 
the control panel.

A/C Panel type

77

−

Dial/Auto/RHD

Fan set dial position

78

−

Displays the air volume 
output value on the control 
panel.

Air outlet c/o set dial position

79

−

Displays output value to the 
air outlet changeover dial on 
the control panel.

Fan set dial operation flag

80

−

ON when the air volume 
adjusting dial is operated

A/C SW operation flag

81

−

ON when the air 
conditioning switch is 
operated

Temp. set dial operation flag

82

−

ON when the air 
conditioning switch is 
operated

Defogger flag

83

−

ON when the air outlet 
changeover dial is set to the 
DEF position.

In/out air c/o SW operation 
flag

84

−

ON when the inside 
air/outside air changeover 
switch is operated

Rear defogger SW operation 
flag

87

−

ON when the rear window 
switch is operated

Rear defogger SW light

88

−

Displays rear window switch 
indicator status.

A/C SW light

89

−

Displays air conditioning 
switch indicator status.

Scan tool display

Item 
No.

Inspection status

The display content under 
normal condition


Content   ..  1286  1287  1288  1289   ..