Mitsubishi Evolution X. Manual - part 7


  Index      Mitsubishi     Mitsubishi Evolution X - service repair manual 2008 year


Search            


Content   ..  5  6  7  8   ..


Mitsubishi Evolution X. Manual - part 7


BODY REPAIR

TSB Revision

BASE OF BODY REPAIR

9-25

2. Align the silencer layer in the position where it is to be 

installed, and then press it down with a roller or a block of 
wood so that it adheres well.
NOTE: An infrared light can also be used to heat both the 
silencer layer and the body panels (be sure to wear gloves).

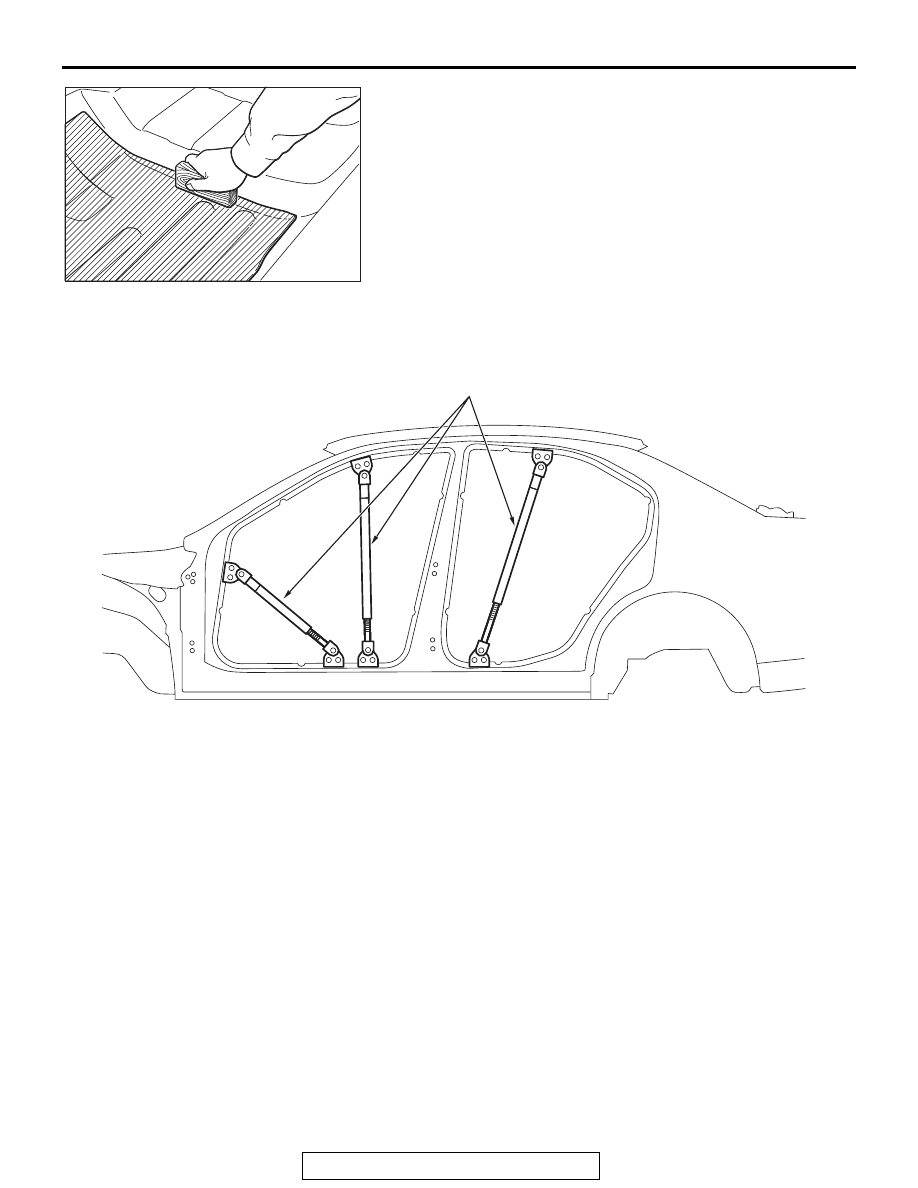
POSITIONING DIMENSIONS FOR OPENINGS

M4090010000045

When replacing the panel of the opening of the front 
pillar, center pillar and other openings, make a point 
to securely bite the poltapower, etc. so the position of 
the opening is not off-center. Upon assembling, 
adjust the opening dimensions to the standard speci-
fications and then weld.

AB200099

AB200100

Porta power

AD

BODY REPAIR

TSB Revision

BASE OF BODY REPAIR

9-26

STANDARD PROCEDURES FOR SHEET METAL WORK

M4090012000030

REPAIRS USING A HAMMER AND DOLLY

It a damaged external panel, etc., can be reused, the 
usual way to repair it is by using a hammer and dolly 
to hammer out the damaged area. The following 
describes these repair procedures.

.

1. Check whether or not there is foreign material (mud, etc.) on 

the panel surface. If so, clean it away.

CAUTION

The surface of the hammer and dolly must be free of scars, 
etc.
2. Select the appropriate hammer and dolly to be used 

according to the panel shape.

CAUTION

Care should be taken, as far as possible, not to permit the 
panel plates to become elongated.
3. Use the hammer and dolly to repair the dents and other 

uneven surfaces of the panel.

(1) First repair the larger areas of damage so that they are as 

close as possible to the original condition before the 
damage occurred.

(2) Next repair the areas of moderate damage.
(3) Finally, smooth the surface out.

AB200101

(1)

(2)

(3)

BODY REPAIR

TSB Revision

BASE OF BODY REPAIR

9-27

CAUTION

• Be careful not to file too much; this will reduce the 

strength and rigidity of the panel.

• Do not use the file in one direction only; alternate use 

in two directions diagonally opposite each other.

4. Next, file the area so that convex and concave parts are no 

longer clearly visible, and at the same time remove small 
projections.

5. After once again smoothing the clearly visible dents and 

projections by using the hammer and dolly, follow step 4 
above.
Alternately repeat hammering and filing until there are file 
traces over the entire repair area.

6. Make a solder build-up at the repair.
7. Finally, finish up the solder build-up using a body file.

USING A FRAME STRAIGHTENER

M4090013000044

For serious and extensive damage, when for exam-
ple the damage extends to the frame of members, it 
is necessary to first use a frame straightener to make 
a rough, overall repair of the body, and then to pro-
ceed to careful repairs of each individual area of 
damage. When a frame straightener is used for body 
repairs, it is a fundamental principle that the pulling 
should be in the direction from which the impact was 
sustained, and from the opposite direction. If this is, 
in error, not done, previously undamaged compo-
nents will be deformed, and repair may become 
impossible.
It is for that reason that it is important to decide upon 
the method of repair, especially regarding the initial 
overall repair, by following the steps below.

OVERALL ROUGH REPAIRS

1. First, analyze the impact. This means analysis 

and consideration of the point of collision, the 
speed at the time of collision, and the strength, 
weight and shape of the object hit.

2. Then get a complete understanding of the 

condition of the existing damage. In particular, if 
the damage extends to the suspension installation 
components, an inspection must be made to 
determine whether or not there is any deviation of 
the frame or body alignment.

3. Finally, determine what repair methods should be 

used.

• To what extent will frame straightening and other 

overall repairs be necessary in order to restore 
the damaged areas to the way they were?

• At what stage of the repairs should panels adjoin-

ing the components to be frame straightened, 
etc., be removed?

• Decide upon the work steps and restoration 

methods to be followed after the rough, overall 
repairs are completed.

Select the frame straightener based upon the results 
of above, and use it to pull in the appropriate direc-
tion. More than one direction may be appropriate, 
depending upon the damage.
If the damage is of a moderate degree or less, it may 
be possible to do all that is necessary in one pull.
If, however, the damage is major, that is to say if 
repairs must be made to components of the passen-
ger compartment such as the dash panel, etc., it may 
be necessary, after completing the first pull, to set up 
the frame straightener at a different position and use 
it again at that position.

AB200102

BODY REPAIR

TSB Revision

BASE OF BODY REPAIR

9-28

FRAME STRAIGHTENING NOTES

• For safety, no one must be standing in the direction of the 

pull.

• Wires or chains should be used for protection in the event 

of an accident.

• For frame straightening of body with frame, care should be 

taken regarding the position (body mount) of installation to 
the frame. The reason for this is that usually mounting rub-
ber pieces are used at the installation part in order to 
improve vibration prevention, and these mounting rubber 
pieces might be deformed if there is a deviation of the 
installation position.

• If the part to be pulled is made of high-tensile steel (which 

has a higher tensional strength and yield point than ordinary 
steel), the pulling must be done with care in order to avoid 
"over pull" and "spring back". It is particularly important for 
the pulling of sidemembers and other reinforcement compo-
nents made of high-tensile steel that the pulling not be all 
done at one time; pull gradually while using a hammer to 
repair distorted areas as the pulling is done.

FRAME REPAIR PROCEDURES

M4090014000047

The frame is subjected to the following types of 
loads.

• Vertical loads: Vertical loads may occur either 

while stopped or during travel.

• Lateral (horizontal) loads: This type of loads 

occurs during turning, start-off and braking.

• Torsional loads: Torsional loads occur while trav-

eling on roads with poor surface conditions.

These various types of loads are compounded under 
various conditions, and are applied to the frame.
As a result, it is important, before attempting to repair 
the frame, to carefully observe the shape of the dam-
aged part and to in that way fully understand the 
cause of the damage.

CHECKING FOR FRAME CRACKING OR 
FLAKING

Check, by using a test hammer, for flaking or cracking of the 
welded surface of the sidemembers, crossmembers and brack-
ets.

REPAIRING CRACKS

If the check reveals a crack(s) in the frame, repair as described 
bellow.

AB200103AD

Wires for 
protection

AB200127AD

Test hammer

Sidemember


Content   ..  5  6  7  8   ..