Mitsubishi Evolution X. Manual - part 4
WELDING
TSB Revision
BASE OF BODY REPAIR
9-13
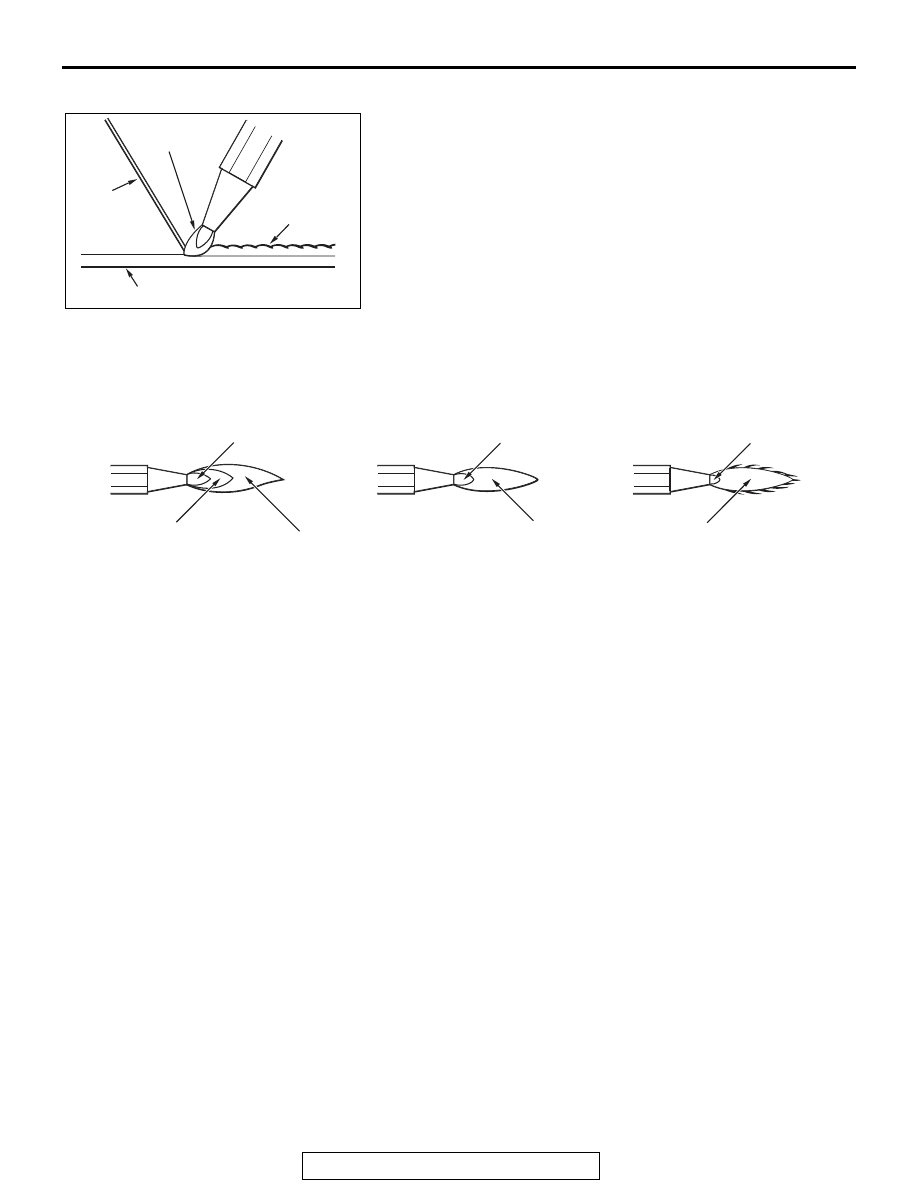
GAS WELDING
Gas welding is a method in which a high temperature flame is
used to melt both a welding rod and the base metal (panels) to
make a fused joint. Oxy-acetylene is the most common type of
gas welding. However, because of the extremely high tempera-
ture of the fused joint, the strength of the steel plate deterio-
rates, and there is a higher possibility of warping. This method,
therefore, is not very suitable for body repair.
.
The flame in gas welding can be classified according
to the ratio of acetylene and oxygen.
1. Carburizing flame (acetylene-rich flame)
This flame has an excess of acetylene or a defi-
ciency of oxygen. The incomplete combustion
gives off a black smoke, and two flame cores can
be seen inside the deformed yellow flame. The
flame itself is large, but the temperature is rela-
tively low, making this flame unsuitable for weld-
ing.
2. Standard flame (neutral-mixture flame)
This flame has approximately equal amounts of
acetylene and oxygen. The length is shorter than
that of the carburizing flame; the flame core is
rounded; and it is clear and bright.
The carbon in the acetylene is burned completely,
resulting in the maximum obtainable temperature.
This is the flame most commonly used for weld-
ing.
3. Peroxide flame (oxygen-rich flame)
This flame has an excess of oxygen or a defi-
ciency of acetylene. The flame core is shorter
and sharper, and the entire flame has a black-
ish-purplish color. The combustion is unstable,
and the flame flickers continuously.
.
Notes with regard to gas welding
1. Handle the oxygen and acetylene tanks carefully.
2. Adjust the flame in accordance with the type of
metal being welded.
3. Select a nozzle to match the work to be done.
Avoid overheating and adhesion of foreign matter
(dirt, etc.)
4. The following points are particularly important
when welding mild steel plate.
• Melt a sufficient amount of welding rod, but be
careful not to melt the base metal. Use the
same amount of welding rod on both sides.
• Use the correct amount of welding rod in
accordance with the melting point of the base
metal.
• Avoid welding over places which have been
welded before.
• In order to avoid warping, do only the amount
of tack welding that is absolutely required.
AB200049
Deposite
Base metal
Welding
rod
Oxy-acetylene
flame
AD
AB200050
Flame core
Outer flame
Acetylene cone
AE
1. Carburizing flame
Outer flame
Outer flame
Flame core
Flame core
2. Standard flame
3. Peroxide flame