Mitsubishi Lancer Evolution 8. Manual - part 104


  Index      Mitsubishi     Mitsubishi Lancer Evolution 8 - service repair manual


Search            


Content   ..  102  103  104  105   ..


Mitsubishi Lancer Evolution 8. Manual - part 104


MANUAL TRANSMISSION - CENTRE DIFFERENTIAL

22-41

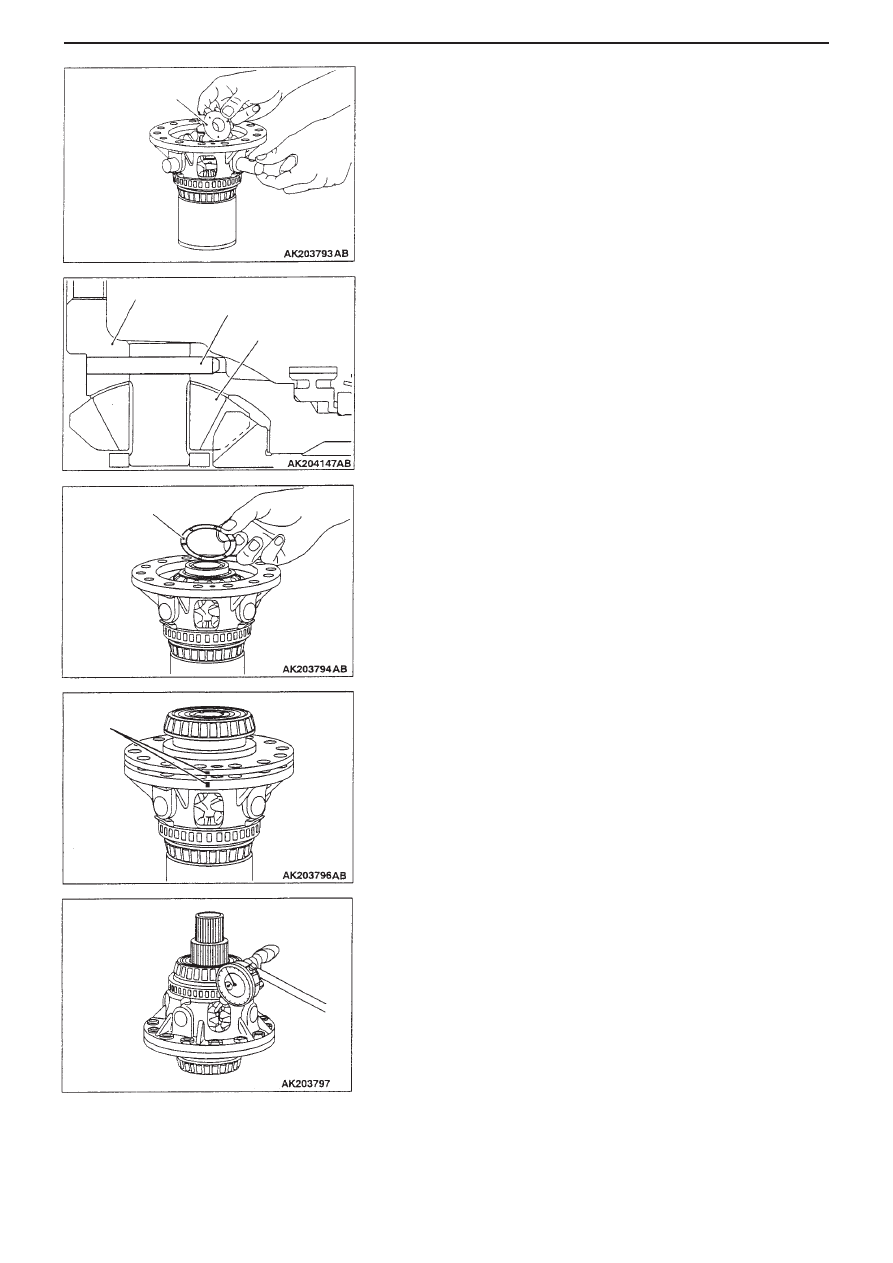
2. Fit washers on rear surface of pinion and engage

4 pinions to side gear. Rotate them and locate
correctly, then fit the pinion shaft holder.

3. Insert the pinion shafts.

4. Fit lock pins in direction indicated in drawing.

5. Fit front output shaft to side gear and fit snap ring.
6. Fit spacer to side gear, then the fit side gear

inside the centre differential case.
NB: If fitting a new side gear, use a medium
thickness (0.66 ~ 0.73 mm) spacer.

7. Align marks made when dismantling, fit centre

differential flange and temporarily tighten machine
screws (4 places).

8. Measure backlash on side gear and pinion.

Standard range: 0.025 ~ 0.150 mm

9. If backlash is outside standard range, select a

spacer, fit it and re-measure backlash.
NB: Adjust till backlash is the same on both sides.

Washer

Differential case

Spacer

Marks

Lock pin

Pinion gear

MANUAL TRANSMISSION - CENTRE DIFFERENTIAL

22-42

>>C<< Fitting tapered roller bearing
Using the installer adaptor (Special tool No.
MD990936), fit tapered roll bearing.

>>D<< Fitting centre differential drive gear
1. Smear sealant over the whole of the thread on the

bolts.
Sealant brand:
0110106 or Locktight 648 or equivalent

2. Tighten bolts, in the order shown in the drawing,

to the specified torque, 158 ± 7 N

m

MANUAL TRANSMISSION - TRANSFER

22-43

TRANSFER

Dismantling / Assembling

Dismantling Order

Dismantling Order (continued)

1.  Dust shield guard

>>B<<

7.  Oil seal

>>F<<

2. Oil seal

>>A<<

8.  O ring

>>E<<

3. Oil seal

9.  Plug

>>D<<

4. O ring

10. Magnet plug

>>A<<

5. O ring

11. Gasket

>>C<<

6. Oil seal

Key Points for Assembly
>>A<< Fitting O ring
Smear grease on O ring and fit it.
Grease brand:
Sunlight No. 2, Retinax A or equivalent

MANUAL TRANSMISSION - TRANSFER

22-44

>>B<< Fitting oil seal
1. Smear grease on lip of oil seal.

Grease brand:
Sunlight 2, Retinax 648 or equivalent

2. Using the oil seal installer (Special tool No.

MD998800),fit oil seal.

>>C<< Fitting oil seal
1. Smear grease on lip of oil seal.

Grease brand:
Sunlight 2, Retinax 648 or equivalent

2. Fit oil seal, using the following special tools:
• Installer adaptor (MB990937)
• Handle (MB990938)

>>D<< Fitting O ring
Apply grease to O ring and fit it.
Grease brand:
Sunlight 2, Retinax 648 or equivalent

>>E<< Fitting oil seal
1. Smear grease on lip of oil seal.

Grease brand:
Sunlight 2, Retinax 648 or equivalent

2. Fit oil seal, using the following special tools:
• Arm bush remover and installer ring (MB990887)
• Bush remover and installer base (MB990891)

>>F<< Fitting oil seal
1. Smear grease on lip of oil seal.

Grease brand:
Sunlight 2, Retinax 648 or equivalent

2. Using the installer adaptor (Special tool No.

MB990936), fit oil seal.

RJDB301023-60


Content   ..  102  103  104  105   ..