Mitsubishi Lancer Evolution 7. Manual - part 356
 

  Index      Mitsubishi     Mitsubishi Lancer Evolution 7 - service repair manual


Search            


Content   ..  354  355  356  357   ..


Mitsubishi Lancer Evolution 7. Manual - part 356


INTERIOR -

Trims

52A-15

TRIMS

REMOVAL AND INSTALLATION

NOTE

Refer to GROUP42 for more information regarding door trim.

8

44 ± 10 Nm

11

1

2

6

4

9

5

10

13

12

3

7

15

16

14

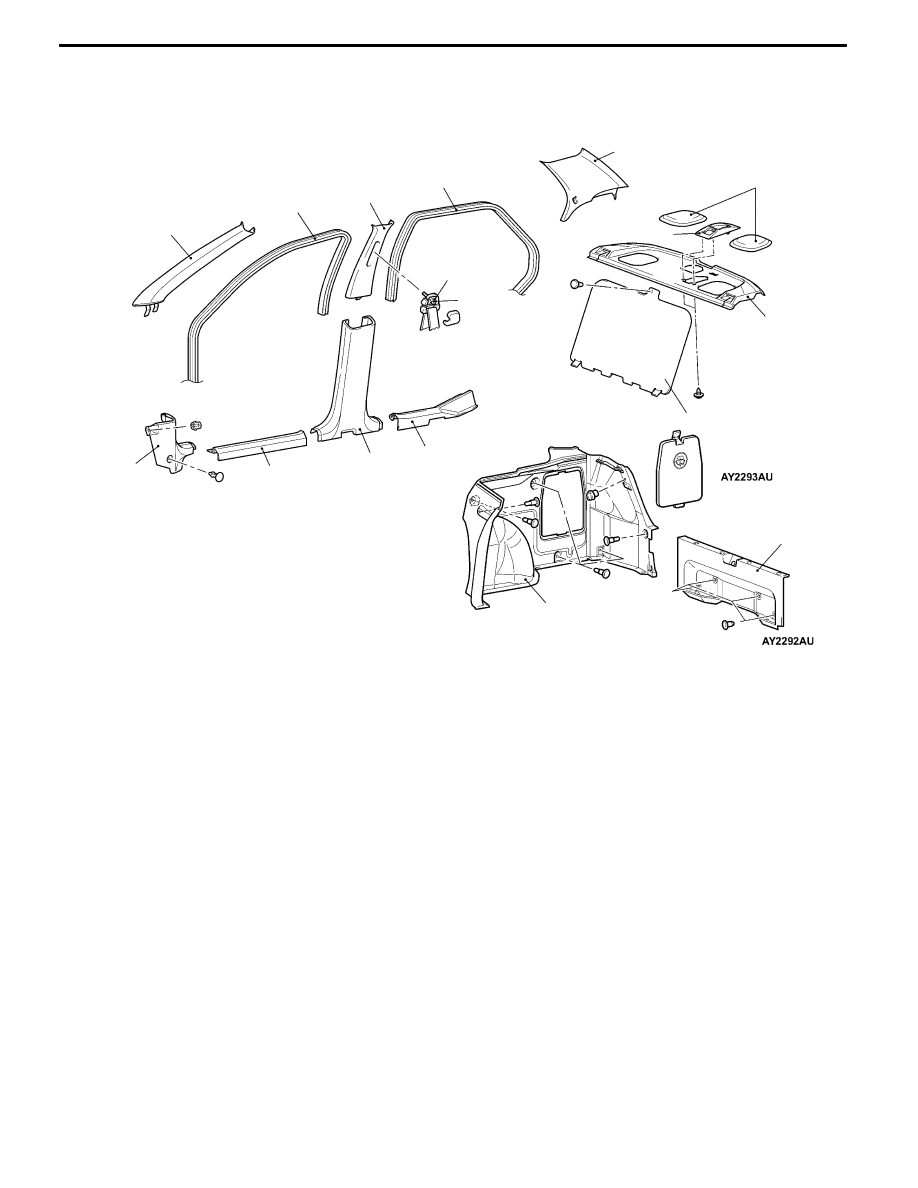
Removal steps

1. Front scuff plate

2. Cowl side trim

3. Rear scuff plate

4. Front door opening trim

5. Rear door opening trim

A

A"

6. Front pillar trim

7. Center pillar trim, lower

8. Front seat belt connection

9. Center pillar trim, upper

10. Rear pillar trim

11. Rear shelf trim

12. Speaker garnish <RS-Ⅱ>

13. Retractor trim

14. Partition board

15. Rear end trim

16. Trunk side trim <RS-Ⅱ>

INTERIOR -

Trims

52A-16

CLIP POSITION

NOTE

: Clip position

: Claw position

Section B - B

Section C - C

Section D - D

Section E - E

Section A - A

A

A

B

B

C

C

C

C

D

Clip

Front pillar trim

Rear pillar trim

Front scuff plate,

Rear scuff plate

Speaker garnish

Section F - F

Rear shelf

trim

E

E

Front pillar trim,

Center pillar trim,

upper,

Rear pillar trim

Headlining

B

B

B

D

F

F

B

G

G

Section G - G

Rear end trim

Clip

Clip

Clip

Clip

Clip

Clip

H

H

I

I

Section H - H

Section I - I

Retractor trim

Retractor trim

Craw

Craw

INTERIOR -

Trims/Headlining

52A-17

REMOVAL SERVICE POINT

A

AFRONT PILLAR TRIM REMOVAL

Release the clip to pull towards the direction shown in the

illustration and remove the front pillar trim.

HEADLINING

REMOVAL AND INSTALLATION

Pre-removal and Post-installation Operation

Removal and Installation of Front Pillar Trim, Center

Pillar Trim, upper, Rear Pillar Trim (Refer to P.52A-15.)

1

2

3

4

5

6

4

5

Removal steps

1. Assist grip

2. Room lamp assembly

3. Front room lamp

A

A"

4. Sunvisor holder

5. Sunvisor assembly

D

Front floor console assembly

(Refer to P.52A-10.)

A

B"

6. Headlining

Section A – A

Front pillar trim

A

A

Front pillar trim

Instrument

panel

INTERIOR -

Headlining

52A-18

REMOVAL SERVICE POINTS

A

ASUNVISOR HOLDER REMOVAL

Insert the special tool into sides claws of the sunvisor holder

through the both sides of the sunvisor holder to remove the

hinges.

A

BHEADLINING REMOVAL

Bend the headlining to remove from the front passenger’s

door.

Sunvisor holder

MB990784

MB990784


Content   ..  354  355  356  357   ..