Mitsubishi Lancer Evolution VI. Manual - part 59


  Index      Mitsubishi     Mitsubishi Lancer Evolution VI - service repair manual


Search            


Content   ..  57  58  59  60   ..


Mitsubishi Lancer Evolution VI. Manual - part 59


REAR AXLE – 

Troubleshooting <AYC>

27-30

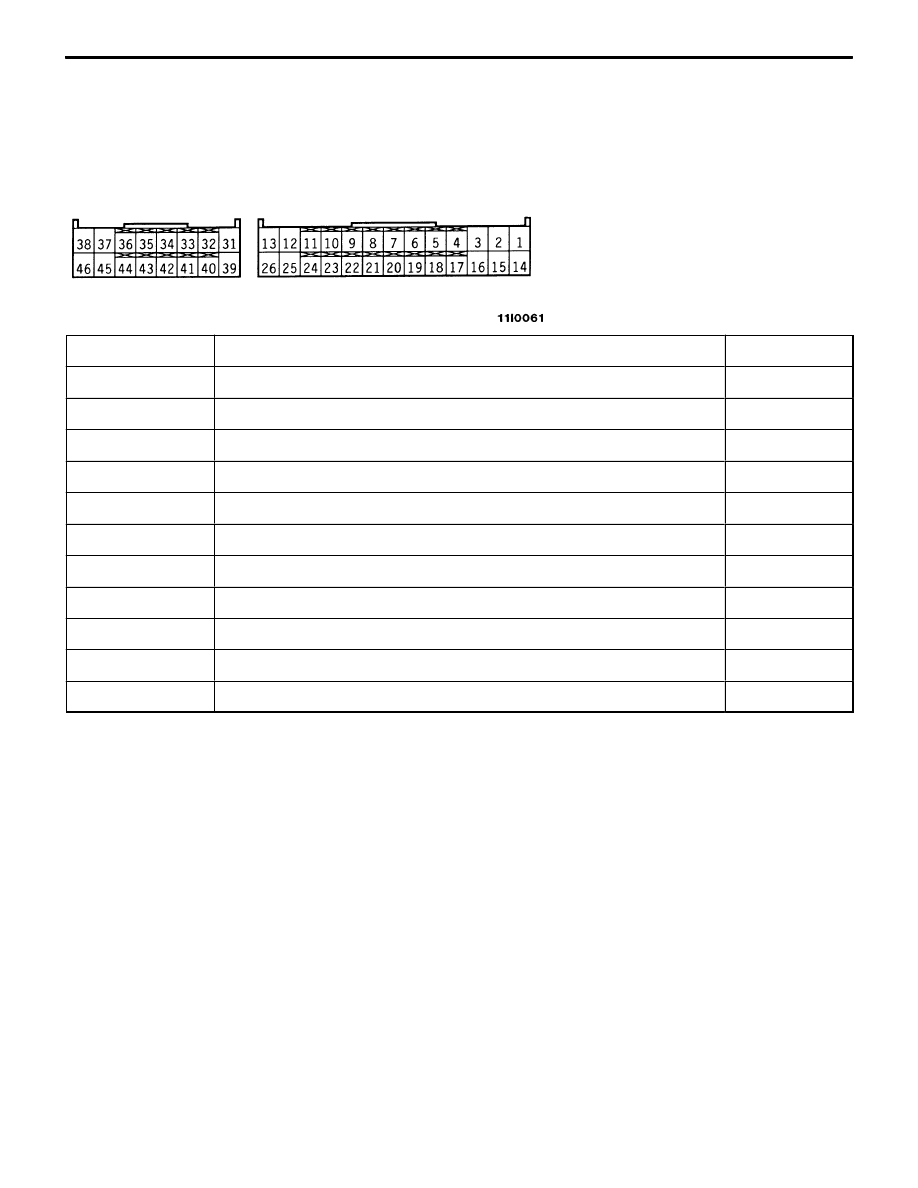
LISTING OF RESISTANCE AND CONTINUITY ACROSS CONNECTOR TERMINALS ON HARNESS
SIDE

D

Measure the resistance and check for continuity with the ignition switch in the “OFF” position and
AYC-ECU connector disconnected.

D

Measure the resistance and check for continuity across terminals listed below.

D

Fig. below shows the arrangement of terminals.

Terminal No.

Signal name

Normally

2 – body ground

Longitudinal acceleration sensor ground, lateral acceleration sensor ground

Conducting

26 – body ground

ECU ground

Conducting

35 – body ground

AYC motor relay

Conducting

37 – body ground

Directional control valve (right)

15.4 – 16.4 

38 – body ground

Proportioning valve

3.4 – 4.0 

45 – body ground

Directional control valve (left)

15.4 – 16.4 

46 – body ground

ECU ground

Conducting

6 – 19*

2

Speed sensor (front, RH)

1.4 – 1.8 k

7 – 20*

2

Speed sensor (front, LH)

1.4 – 1.8  k

8 – 21*

2

Speed sensor (rear, RH)

1.4 – 1.8 k

9 – 22*

2

Speed sensor (rear, LH)

1.4 – 1.8 k

NOTE
*2: Indicates the vehicles without ABS.

REAR AXLE – 

On-vehicle Service <Vehicles with AYC>

27-31

ON-VEHICLE SERVICE 
<VEHICLES WITH AYC>

REAR AXLE TOTAL BACKLASH CHECK

If the drive system roars or the vehicle vibrates, use the
following procedure to measure total backlash in the rear
axle. Based on the measurement taken, determine whether
the differential carrier assembly needs to be removed or not.
1.

Place the shift lever in the neutral position and operate
the parking brake.

2.

Turn the propeller shaft fully clockwise and make an
alignment mark on the companion flange dust cover and
gear carrier.

3.

Turn the propeller shaft fully counterclockwise and
measure the deviation between the alignment marks.

Limit: 5 mm

4.

If the backlash exceeds the limit, replace the differential
carrier assembly.

GEAR OIL LEVEL CHECK

DIFFERENTIAL

1.

Remove the filler plug.

2.

Check that the gear oil level is within the specified range
from the bottom end of the filler plug hole.

Standard value (A): 6 mm

3.

If the gear oil level exceeds the standard value, add the
specified gear oil up to the bottom end of the filler plug
hole.

Specified gear oil: 

Hypoid gear oil API classification GL-5 or higher
SAE viscosity Number 90, 80W.

NOTE
10

_

C or more: #90, less than 10

_

C: #80

4.

Fit the filler plug and tighten it to the specified torque.

Alignment marks

Filler plug 
49 Nm

Gear oil

Upper
limit
Lower
limit

REAR AXLE

  – On-vehicle Service <Vehicles with AYC>

27-32

TORQUE TRANSFER MECHANISM

1.

Remove the filler plug.

2.

Check that the gear oil level is up to the bottom end
of the filler plug hole.

3.

If the gear oil level is lower than the bottom end of the
filler plug hole, add the specified gear oil up to the bottom
end of the filler plug hole.

Specified gear oil: 

MITSUBISHI GENUINE DIA QUEEN SUPER AYC
FLUID

4.

Fit the filler plug and tighten it to the specified torque.

GEAR OIL CHANGE

DIFFERENTIAL

1.

Remove the drain plug to discharge the gear oil.

2.

Fit the drain plug and tighten it to the specified torque.

Tightening torque: 49 Nm

3.

Remove the filler plug and add the specified gear oil
up to the bottom end of the filler plug hole.

Specified gear oil:

Hypoid gear oil API classification GL-5 or higher
SAE viscosity Number 90, 80W.

Quantity used: 0.41 

±

 0.02 

ȏ

NOTE
10

_

C or more: #90, less than 10

_

C: #80

4.

Fit the filler plug and tighten it to the specified torque.

Filler plug 
49 Nm

Gear oil

Filler plug 
49 Nm

Gear oil

Drain plug

REAR AXLE

  – On-vehicle Service <Vehicles with AYC>

27-33

TORQUE TRANSFER MECHANISM

1.

Remove the drain plug to discharge the gear oil.

2.

Fit the drain plug and tighten it to the specified torque.

3.

Remove the filler plug.

4.

Pour the specified gear oil up to the bottom end of the
filler plug hole using an oil syringe (recommended tool)
through the gap between the body and the differential
support arm.

Specified gear oil:

MITSUBISHI GENUINE DIA QUEEN SUPER AYC
FLUID

Quantity used: 0.70

)

0

*

0.05

ȏ

5.

Fit the filler plug and tighten it to the specified torque.

FLUID LEVEL CHECK

1.

Remove the maintenance lid located in the luggage
compartment.

2.

<When MUT-

II

 is not used>

If the vehicle has been run, leave it for 5 min. or more
in an ordinary temperature (10

_

C to 30

_

C) to allow the

accumulator internal pressure to drop.

NOTE
If the ambient temperature is less than 10

_

C or less,

allow more time to leave the vehicle to stand idle.

<When MUT-

II

 is used>

Connect the MUT-

II

 to the 16-pin diagnosis connector.

Turn on the ignition switch. Operate the MUT-II (Item
No.11) to activate the hydraulic unit forcibly for removing
the pressure from inside the accumulator.

Caution 
Before connecting or disconnecting the MUT-

II

,

always turn off the ignition switch.

NOTE
(1) The forced activation (oil level check mode) will be

automatically canceled as soon as the directional
valve in the hydraulic unit is activated to the left and
right 20 times.
It can also be canceled forcibly by operating the clear
key on the MUT-

II

.

(2) While this function is being disabled by the fail-safe

function, the forced activation of the hydraulic unit
can not be executed.

3.

Check that the fluid level in the oil reservoir is in the
range between MAX and MIN.

4.

If the fluid level is lower than MIN, add the specified
fluid.

Specified fluid: Dia Queen ATF SP 

II

 or equivalent

5.

Reinstall the maintenance lid.

Gear oil

Drain plug
49 Nm

Oil syringe
(Recommended tool)

Filler plug
49 Nm


Content   ..  57  58  59  60   ..