Mitsubishi Eclipse. Manual - part 728


  Index      Mitsubishi     Mitsubishi Eclipse - service repair manual 2004 year


Search            


Content   ..  726  727  728  729   ..


Mitsubishi Eclipse. Manual - part 728


MAINTENANCE SERVICE

TSB Revision

GENERAL

00-55

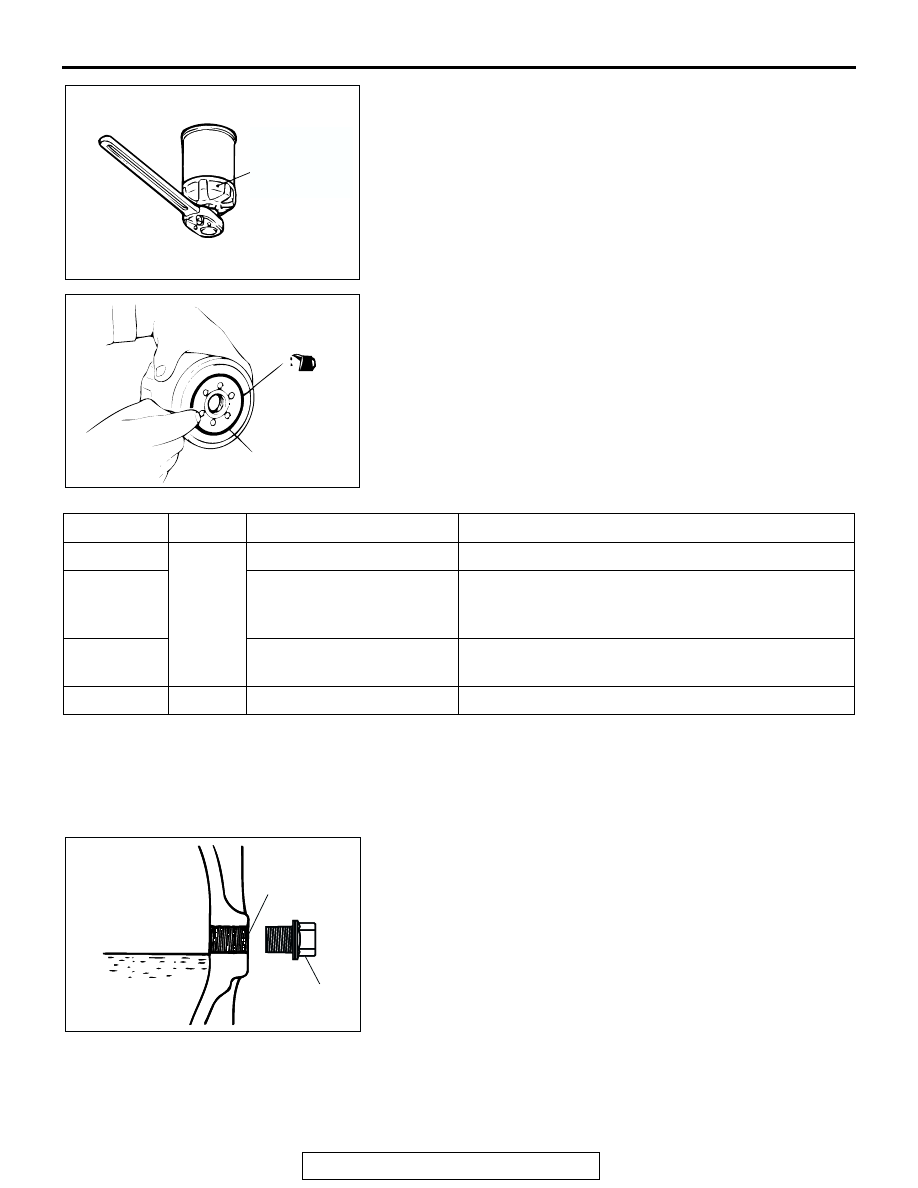
4. Use the respective tool in the following table to remove the 

engine oil filter.

5. Clean the filter bracket side mounting surface and ensure 

the old O-ring has been removed.

6. Apply a small amount of engine oil to the O-ring of the new 

oil filter.

7. Once the O-ring of the oil filter is touching the flange, use the 

respective tool in the following table to tighten to the 
specified torque.

8. Install the drain plug and refill engine oil. (Refer to Engine 

Oil Replacement 

P.12-3

.) 

9. Race the engine a few times, and check to be sure that no 

engine oil leaks from the installation section of the oil filter.

12. MANUAL TRANSAXLE OIL

M1001002800201

Inspect each component for evidence of leakage. Check the oil 
level by removing the filler plug.

CEHCK OIL LEVEL

1. Remove the filler plug.
2. Check that the oil level is up to the lower edge of the filler 

plug hole.

3. Check that the oil is not noticeably dirty.
4. Tighten the filler plug to the specified torque.

Tightening torque: 32 

± 2 Nm (24 ± 1 ft-lb)

AC000093

MB991396 OR
GENERAL
SERVICE
TOOL

AE

ACX00396

O-RING

AB

NUMBER

ENGINE SPECIAL TOOL

TIGHTENING TORQUE

MD360935

2.4L

MB991396 or equivalent

Approximately one turn [14 

± 2 N⋅m (124 ± 18 in-lb)]

MD325714, 
MD332687, 
MD365876

MB991396 or equivalent

Approximately 3/4 turn [16 

± 4 N⋅m (12 ± 3 ft-lb)]

MD136466, 
MD322508

General service tool

Approximately 3/4 turn [17 

± 3 N⋅m (13 ± 2 ft-lb)]

MD352626

3.0L

General service tool

Approximately 3/4 turn [14 

± 2 N⋅m (124 ± 18 in-lb)]

AC102278

AC102278AC

FILLER PLUG

TRANSAXLE
OIL

FILLER PLUG
HOLE

MAINTENANCE SERVICE

TSB Revision

GENERAL

00-56

CHANGE OIL

1. Remove the filler plug.
2. Remove the drain plug and drain the oil.
3. Tighten the drain plug to the specified torque.

Tightening torque: 32 

± 2 Nm (24 ± 1 ft-lb)

4. Fill with gear oil API classification GL-4 SAE 75W 

− 85W or 

75W 

− 90 until the level comes to the lower portion of filler 

plug hole.

Quantity:

<F5M42> 2.2 dm

3

 (2.3 quarts)

<F5M51> 2.8 dm

3

 (3.0 quarts)

5. Tighten the filler plug to the specified torque.

Tightening torque: 32 

± 2 Nm (24 ± 1 ft-lb)

13. AUTOMATIC TRANSMISSION FLUID

M1001002900327

CHECKING TRANSMISSION FLUID LEVEL

1. Drive the vehicle until the transmission fluid temperature 

rises to the normal temperature [70 

− 80°C (158 − 176°F)].

NOTE: The transmission fluid temperature is measured with 
scan tool MB991958 (MUT-III sub assembly).
NOTE: If it takes some amount of time until the transmission 
fluid reaches its normal operating temperature [70 

 80

°

(158 

 176

°

F)], check the transmission fluid level by refer-

ring to the left diagram.

2. Park the vehicle on a level surface.
3. Move the selector lever through all positions to fill the torque 

converter and the hydraulic circuits with fluid, and then move 
the selector lever to the "N" position.

4. After wiping off any dirt around the dipstick, remove the 

dipstick and check the condition of the transmission fluid.
NOTE: If the transmission fluid smells as if it is burnt, it 
means that the transmission fluid has been contaminated by 
fine particles from the bushings and friction materials. A 
transaxle overhaul and cooler line flushing may be neces-
sary.

5. Check that the transmission fluid level is at the "HOT" mark 

on the dipstick. If the transmission fluid level is less than 
this, add DIAMOND ATF SP III or equivalent transmission 
fluid until the level reaches the "HOT" mark.
NOTE: If the transmission fluid level is too low, the oil pump 
will draw in air along with the transmission fluid, which will 
cause bubbles to form. If the transmission fluid level is too 
high, rotating components inside the transaxle will churn the 
fluid and air into a foamy liquid. Both conditions (level too 
low or too high) will cause the hydraulic pressure to drop, 
which will result in late shifting and slipping of the clutches 
and brakes.

AC001597

DRIVESHAFT <LH>

DRAIN PLUG

FILLER PLUG

AC

AC002477

80

DIPSTICK

60

40

(176)

(140)

(104)

FLUID TEMPERATURE [˚C (˚F)]

– 30 (– 1.2)

– 20 (– 0.8)

– 10 (– 0.4)

0 (0)

10 (0.4)

FLUID LEVEL [mm (in)]

AB

AC106828AB

MAINTENANCE SERVICE

TSB Revision

GENERAL

00-57

NOTE: In either case, air bubbles can interfere with normal 
valve, clutch, and brake operation. Also, foaming can cause 
transmission fluid to escape from the transaxle vent where it 
may be mistaken for a leak.

6. Securely insert the dipstick.

NOTE: The transmission fluid should always be replaced 
under the following conditions:

.

When troubleshooting the transaxle.

When overhauling the transaxle.

When the transmission fluid is noticeably dirty or burnt 
(driving under severe conditions).

CHANGE A/T FLUID

If you have an transmission fluid changer, use this changer to 
replace the transmission fluid. If you do not have an transmis-
sion fluid changer, replace the transmission fluid by the follow-
ing procedure.
1. Disconnect the hose shown in the illustration which 

connects the transaxle and the oil cooler (inside the 
radiator). Place a container under the hose to collect the 
discharge.

CAUTION

The engine should be stopped within one minute after it is 
started. If all the transmission fluid has drained out before 
then, the engine should be stopped at that point.
2. Start the engine and let the transmission fluid drain out.

(Running conditions: "N" range with engine idling)

Approximately 3.5 dm

3

 (3.7 quarts) of transmission 

fluid should be removed.

3. Remove the drain plug from the bottom of the transaxle case 

to drain the transmission fluid.

Approximately 2.0 dm

3

 (2.1 quarts) of transmission 

fluid should be removed.

4. Install the drain plug with a new gasket, and tighten it to the 

specified torque.

Tightening torque: 32 

± 2 Nm (24 ± 1 ft-lb)

CAUTION

Stop pouring if the full volume of transmission fluid cannot 
be added.
5. Add new transmission fluid (DIAMOND ATF SP III or 

equivalent) through the oil filter tube.

Approximately 5.5 dm

3

 (5.8 quarts) of transmission 

fluid should be added.

6. Repeat the procedure in Step 2. (to pump out the rest of the 

contaminated transmission fluid)

AC001889 AB

AC001890AB

MAINTENANCE SERVICE

TSB Revision

GENERAL

00-58

7. Add new transmission fluid (DIAMOND ATF SP III or 

equivalent) through the oil filter tube.

Approximately 3.5 dm

3

 (3.7 quarts) of transmission 

fluid should be added.

NOTE: Check for contamination or a burnt odor. If the trans-
mission fluid is still contaminated or burnt, repeat Steps 6 
and 7 before proceeding to Step 8.

8. Reconnect the hose which was disconnected in step 1 

above, and firmly replace the dipstick.

9. Start the engine and run it at idle for one to two minutes.
10.Move the selector lever through all positions, and then move 

it to the "N" position.

11.Check that the transmission fluid level is at the "COLD" 

mark on the dipstick. If the level is less than this, add 
transmission fluid.

12.Drive the vehicle until the transmission fluid temperature 

rises to the normal operating temperature [70 

− 80°C (158 − 

176

°F)], and then check the transmission fluid level again. 

The transmission fluid level must be at the "HOT" mark.
NOTE: The transmission fluid temperature is measured with 
scan tool MB991958 (MUT-III sub assembly).
NOTE: The "COLD" level is for reference only; the "HOT" 
level should be regarded as the standard level.
NOTE: If it takes some amount of time until the transmission 
fluid reaches its normal operating temperature [70 

 80

°

(158 

 176

°

F)], check the transmission fluid level by refer-

ring to the left diagram.

13.When the transmission fluid is less than the specified level, 

add transmission fluid.
When the transmission fluid is greater than the specified 
level, drain the excess fluid through the drain plug to adjust 
the transmission fluid to the specified level.

14.Firmly insert the dipstick into the oil filler tube.

14. ENGINE COOLANT (CHANGE)

M1001003100346

Check the cooling system parts such as the radiator, heater 
and oil cooler hoses, thermostat and the connections for leak-
age and damage.

CHANGING COOLANT

1. Turn the ignition switch to the "ON" position, and then rotate 

the heater control to the "MAX HOT" position.

2. Turn the ignition switch to the "LOCK" (OFF) position.

AC001889 AB

AC106828AB

AC002477

80

DIPSTICK

60

40

(176)

(140)

(104)

FLUID TEMPERATURE [˚C (˚F)]

– 30 (– 1.2)

– 20 (– 0.8)

– 10 (– 0.4)

0 (0)

10 (0.4)

FLUID LEVEL [mm (in)]

AB


Content   ..  726  727  728  729   ..