Mitsubishi Eclipse. Manual - part 246


  Index      Mitsubishi     Mitsubishi Eclipse - service repair manual 2004 year


Search            


Content   ..  244  245  246  247   ..


Mitsubishi Eclipse. Manual - part 246


MULTIPORT FUEL INJECTION (MFI) DIAGNOSIS

TSB Revision

MULTIPORT FUEL INJECTION (MFI) <2.4L>

13A-477

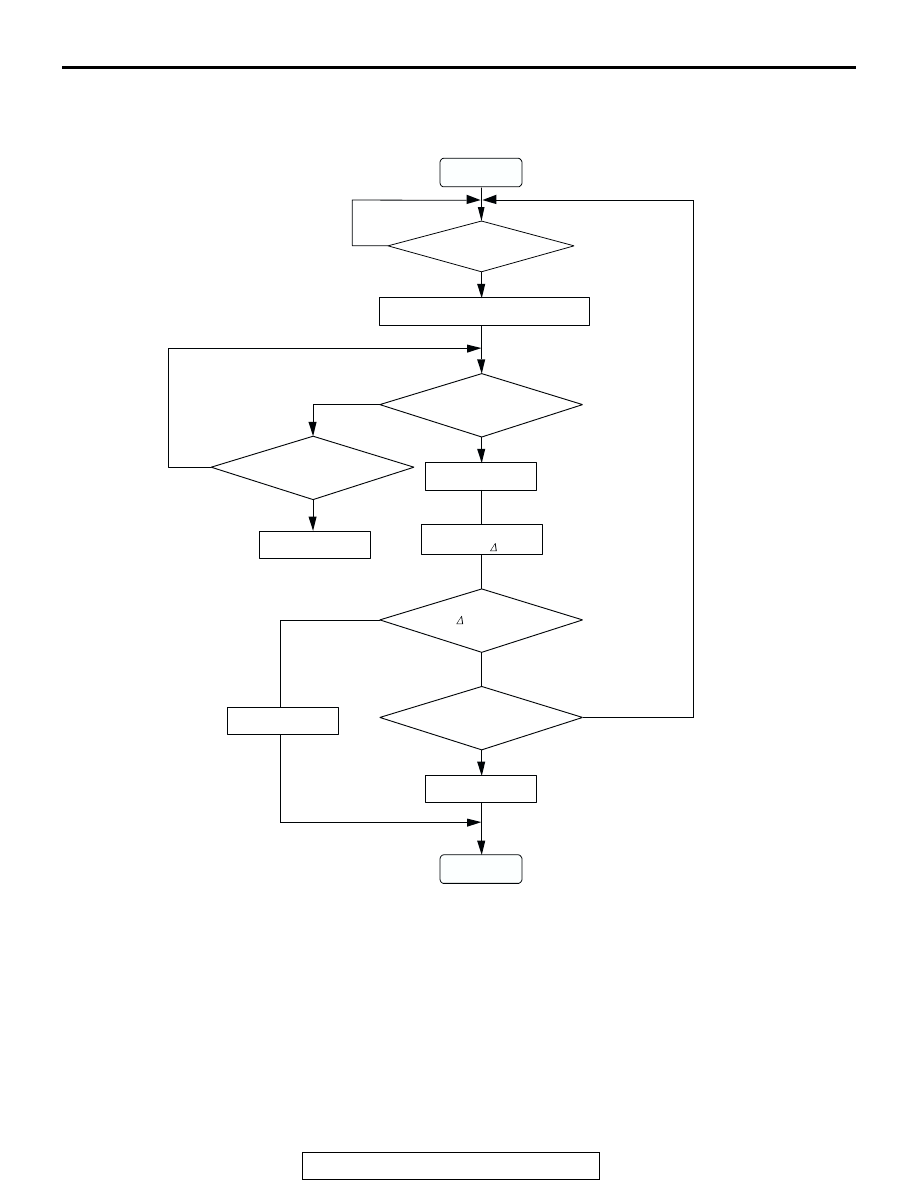
LOGIC FLOW CHARTS (Monitor Sequence)

.

DTC SET CONDITIONS
Remaining fuel amount is 15 

− 40 percent (fuel level 

sensor output voltage is 1.4 

− 2.4 volts)

Test Conditions A: At Start up

• Intake air temperature is 36°C (97°F) or less 

when the engine is started.

• The engine coolant temperature 36°C (97°F) or 

less when the engine is started.

Test Conditions B: For Test to Run

• Fuel temperature is less than 36°C (97°F), and 

with in 800 seconds have elapsed since the 
engine was started.

• Engine coolant temperature is higher than 60°C 

(140

°F).

• Power steering pressure switch: "OFF"

• Barometric pressure is above 76 kPa (11 psi).

START

END

MONITORING 
CONDITIONS?

GROSS LEAK

MONITORING CONDITIONS

SPECIFIED TIMES 

MONITORED

SPECIFIED TIMES 

HAVE PASSED

YES

NO

DEPRESSURIZE FUEL TANK PRESSURE

NO

YES

YES

YES

SHUT PURGE LINE

MALFUNCTION

MALFUNCTION

(GROSS LEAK)

GOOD

YES

NO

NO

NO

AC210304

0.04in, 0.02in GROSS LEAK MONITOR

MEASURE REVERTING
PRESSURE :    

PFT

PFT > PT

MULTIPORT FUEL INJECTION (MFI) DIAGNOSIS

TSB Revision

MULTIPORT FUEL INJECTION (MFI) <2.4L>

13A-478

• Fuel tank differential pressure sensor output 

mb991958voltage is 1 to 4 volts.

• Vehicle speed is 20 km/h (12.4 mph) or more.

Test Conditions C: For Test to Stop

• Intake air temperature is less than −10°C (14°F).

• When the evaporative emission purge solenoid 

and evaporative emission ventilation solenoid are 
closed, the pressure rises higher 451 Pa (0.065 
psi).

• The pressure fluctuation width is higher than 647 

Pa (0.094 psi).

• 10 seconds have elapsed from the start of the 

previous monitoring.

Judgment Criteria

• Internal pressure of the fuel tank has changed 

more than 785 Pa (0.114 psi) in 20 seconds after 
the tank and vapor line were closed.

• ECM monitors for this condition once during drive 

cycle.

NOTE: The monitoring time depends on the fuel 
level and the temperature in the fuel tank (75 

 125 

seconds).

.

DTC SET CONDITIONS
Remaining fuel amount is 40 

− 85 percent (fuel level 

sensor output voltage is 2.4 

− 3.7 volts)

Test Conditions A: At Start up

• Intake air temperature is 36°C (97°F) or less 

when the engine is started.

• The engine coolant temperature 36°C (97°F) or 

less when the engine is started.

Test Conditions B: For Test to Run

• The fuel tank temperature is 36°C (97°F) or less.

• Barometric pressure is above 76 kPa (11 psi).

• Fuel tank differential pressure sensor output volt-

age is 1 to 4 volts.

Test Conditions C: For Test to Stop

• Intake air temperature is less than −10°C (14°F).

• Engine coolant temperature is less than 20°C 

(68

°F).

• When the evaporative emission purge solenoid 

and evaporative emission ventilation solenoid are 
closed, the pressure rises higher 324 Pa (0.047 
psi).

• 10 seconds have elapsed from the start of the 

previous monitoring.

Judgment Criteria

• Internal pressure of the fuel tank has changed 

more than 1.9 kPa (0.28 psi) in 128 seconds after 
the tank and vapor line were closed.

• ECM monitors for this condition once during drive 

cycle.

NOTE: The monitoring time depends on the fuel 
level and the temperature in the fuel tank (10 

 14 

minutes).

.

OBD-ll DRIVE CYCLE PATTERN
Refer to Diagnostic Function 

− OBD-ll Drive Cycle − 

Procedure 1 

− Evaporative Emission System Leak 

Monitor 

P.13A-5

.

.

TROUBLESHOOTING HINTS

The most likely causes for this code to be set 

are:

• Loose fuel cap.

• Fuel cap relief pressure is incorrect.

• Evaporative emission canister seal is faulty.

• Fuel tank, purge line or vapor line seal failed.

• Evaporative emission ventilation solenoid failed.

.

OVERVIEW OF TROUBLESHOOTING

• To determine the cause of DTC P0442, a perfor-

mance test is needed. The performance test uses 
a mechanical vacuum gauge and scan tool 
MB991958 set on the fuel tank differential pres-
sure sensor (TANK PRES SNER 73.) The 
mechanical gauge reading is used to verify scan 
tool MB991958 reading. A comparison of the 
mechanical gauge to scan tool MB991958 deter-
mines the problem in the system.

• Prior to doing the performance test, several sim-

ple inspections are needed to exclude some pos-
sibilities of the symptom.

DIAGNOSIS

Required Special Tool:

• MB991958: Scan Tool (MUT-III Sub Assembly)

• MB991824: V.C.I.

• MB991827: MUT-III USB Cable

• MB991911: MUT-III Main Harness B

MULTIPORT FUEL INJECTION (MFI) DIAGNOSIS

TSB Revision

MULTIPORT FUEL INJECTION (MFI) <2.4L>

13A-479

STEP 1. Using scan tool MB991958, check evaporative 
emission system monitor test.

CAUTION

• To prevent damage to scan tool MB991958, always turn 

the ignition switch to the "LOCK" (OFF) position before 
connecting or disconnecting scan tool MB991958.

• With this monitor, the ECM <M/T> or PCM <A/T> auto-

matically increases the engine speed to 1,600 r/min or 
more. Check that the transaxle is set to "neutral" <M/T> 
or "P" <A/T> position.

(1) Connect scan tool MB991958 to the data link connector.
(2) Turn the ignition switch to the "ON" position.
(3) Erase the DTCs using the scan tool MB991958.
(4) Check that the fuel cap is securely closed (Tighten until 

three clicks are heard).

(5) Start the engine.
(6) Select "System Test," and press the "YES" key.
(7) Select "Evap Leak Mon," and press the "YES" key.
(8) During the monitor, keep the accelerator pedal at the idling 

position.
NOTE: If the engine speed does not reach 2,000 r/min dur-
ing the monitor test, adjustment of the Speed Adjusting 
Screw may be needed. Refer to 

P.13A-928

. And adjust to 

the standard value.

(9) Keep the engine speed and engine load within the specified 

range. When the monitor test starts, the "In Progress" item 
on scan tool MB991958 will change from "NO" to "YES."

(10)Turn the ignition switch to the "LOCK" (OFF) position, and 

disconnect scan tool MB991958.

Q: What is displayed on the scan tool MB991958?

"Evap Leak Mon. Completed Test Passed" : The 

evaporative emission system is working properly at 
this time. Explain to customer that improperly 
tightened fuel cap can cause MIL to turn on, and 
return the vehicle.

"Evap Leak Mon. Completed. Test Failed and DTCs Set" 

A malfunction has been detected during the monitor 
test. Go to Step 2.

"Evap Lead Mon. discontinued. Retest again from the 
first" : 
The monitor was discontinued for a certain reason 

(vehicle speed input from computer, engine speed 
and engine load deviating from specified range). Turn 
the ignition switch to the "LOCK" (OFF) position once, 
and repeat the monitoring from the Step 1.

AC303127

AB

MB991911

16-PIN

MB991827

MB991824 

MULTIPORT FUEL INJECTION (MFI) DIAGNOSIS

TSB Revision

MULTIPORT FUEL INJECTION (MFI) <2.4L>

13A-480

STEP 2. Check evaporative emission purge solenoid for 
leaks.
(1) Remove the battery.
(2) Remove the air intake hose. (Refer to GROUP 15, Air 

Cleane

P.15-6

.)

(3) Disconnect hose B from the evaporative emission purge 

solenoid side, and connect a hand vacuum pump to the 
nipple of the evaporative emission purge solenoid.

(4) Apply a pressure on the hand vacuum pump, and confirm 

that air is maintained.

(5) Disconnect the hand vacuum pump, and connect hose B to 

the evaporative emission purge solenoid.

Q: Is the evaporative emission purge solenoid in good 

condition?
YES : 
Go to Step 3.
NO :  Replace the evaporative emission purge solenoid. 

Then go to Step 18.

STEP 3. Check for leaks in the evaporator line hose A to 
hose C.

The leakage test with a hand vacuum pump on each hose 
from hose A to hose C.

Q: Are the hoses in good condition?

YES : Go to Step 4.
NO :  Replace the inferior hose. Then go to Step 18.

STEP 4. Check for leaks in the chamber.
(1) Connect a hand vacuum pump to the nipple.
(2) Plug the other nipple.
(3) Apply vacuum with the hand vacuum pump, and confirm 

that the applied vacuum does not fluctuate.

Q: Is the chamber in good condition?

YES : Go to Step 5.
NO :  Replace the chamber. Then go to Step 18.

AC000223

HOSE B

AD

THROTTLE 
BODY

AC000182

EVAPORATIVE EMISSION
PURGE SOLENOID

AB

AC000223

THROTTLE 
BODY

HOSE B

HOSE A

HOSE C

AE

AC000223

THROTTLE 
BODY

CHAMBER

AF


Content   ..  244  245  246  247   ..