Mitsubishi Eclipse. Manual - part 120


  Index      Mitsubishi     Mitsubishi Eclipse - service repair manual 2004 year


Search            


Content   ..  118  119  120  121   ..


Mitsubishi Eclipse. Manual - part 120


CAMSHAFT AND CAMSHAFT OIL SEAL

TSB Revision

ENGINE MECHANICAL <3.0L>

11C-29

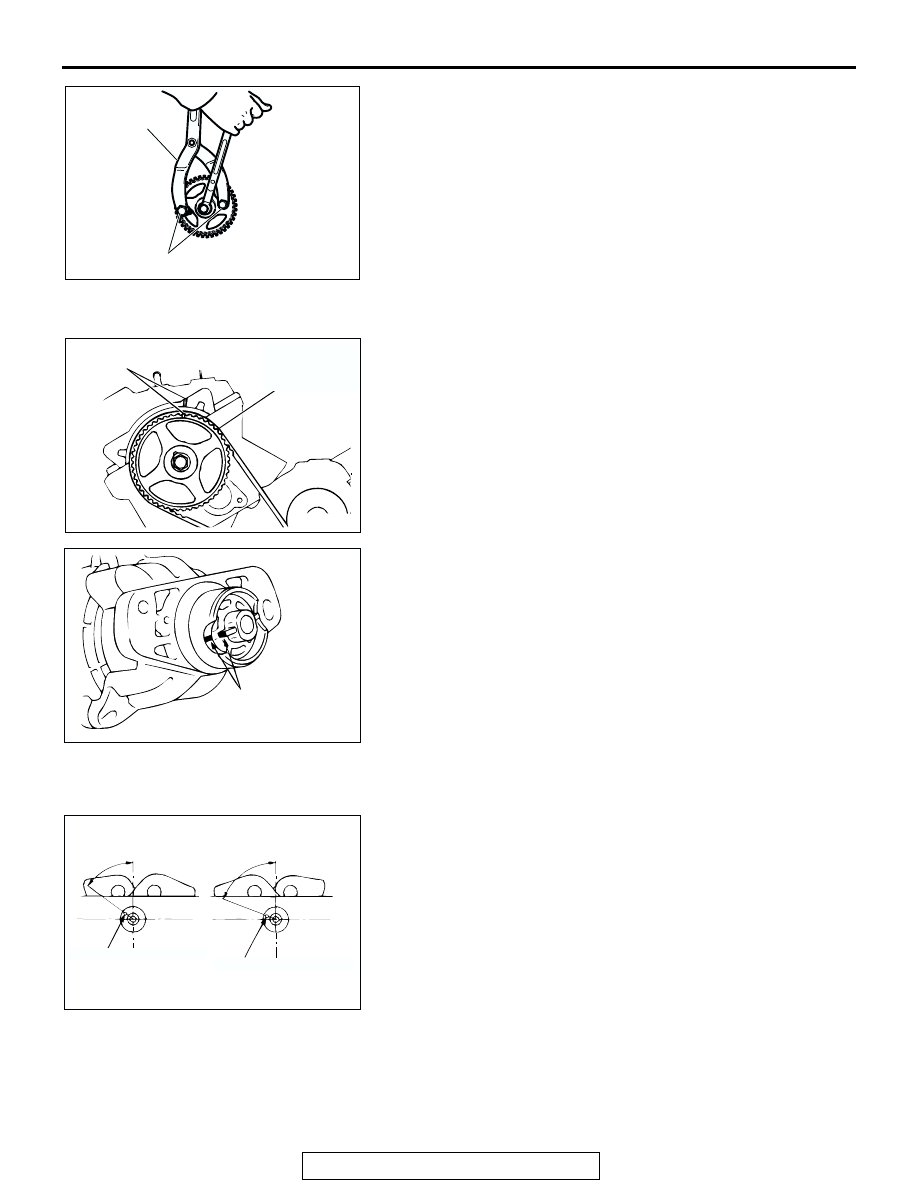
2. Use special tools MB990767 and MD998715 to tighten the 

camshaft sprocket mounting bolt to the specified torque.

Tightening torque: 88 

± 10 Nm (65 ± 7 ft-lb)

.

>>C<< DISTRIBUTOR INSTALLATION
1. Align the timing mark of the camshaft sprocket (right bank) 

with that of the cylinder head.

2. Align the mating marks on the distributor housing and 

coupling, then install the distributor to the engine.

.

>>D<< ROCKER ARM AND SHAFT ASSEMBLY 
INSTALLATION
1. Rotate the camshaft until the dowel pin on its front end is 

located as shown in the illustration.
NOTE: Placing the camshaft in the illustrated position mini-
mizes the amount of cam lift, making it easier to install the 
rocker arm and shaft assembly.

2. Temporarily tighten the rocker shaft with the bolts so that all 

rocker arms on the inlet valve side do not push the valves.

ACX00301AB

MB990767

MD998715

AC001720

TIMING
MARKS

CAMSHAFT 
SPROCKET
(RIGHT BANK)

AB

AC001721AB

MATING MARKS

AC001722

APPROXIMATELY 60˚

APPROXIMATELY 70˚

RIGHT BANK

LEFT BANK

AB

CAMSHAFT AND CAMSHAFT OIL SEAL

TSB Revision

ENGINE MECHANICAL <3.0L>

11C-30

3. Position the rocker shaft spring so that it takes a right angle 

against the plug guide.
NOTE: Set the rocker shaft spring before installing the 
rocker arm and shaft assembly on the exhaust side.

4. Tighten the rocker arm and shaft assembly mounting bolts to 

the specified torque.

Tightening torque: 31 

± 3 Nm (23 ± 2 ft-lb)

5. Remove special tool MD998443.

ACX00378

PLUG GUIDE

ROCKER SHAFT SPRING

ROCKER SHAFT 
SPRING

PLUG GUIDE

AB

OIL PAN

TSB Revision

ENGINE MECHANICAL <3.0L>

11C-31

OIL PAN

REMOVAL AND INSTALLATION

M1112002800677

REMOVAL SERVICE POINTS

.

<<A>> LOWER OIL PAN REMOVAL
1. Remove the oil pan, lower mounting bolts.

Pre-removal and Post-installation operation
• Engine Oil Draining and Refilling (Refer to GROUP 12, On-vehicle Service − Engine Oil Replacement 

P.12-3

.)

• Front Exhaust Pipe Removal and Installation (Refer to GROUP 15, Exhaust Pipe, Main Muffler and Catalytic Converter 

P.15-24

.)

AC001723 AB

48 ± 6 N·m
36 ± 4 ft-lb

30 ± 3 N·m
23 ± 2 ft-lb

30 ± 3 N·m
23 ± 2 ft-lb

35 ± 6 N·m
26 ± 4 ft-lb

5.9 ± 1.0 N·m
52 ± 9 in-lb

11 ± 1 N·m
96 ± 8 in-lb

39 ± 5 N·m
29 ± 4 ft-lb

1

2

3

4

5

6

7

8

9

7

9

SEALANT:
MITSUBISHI GENUINE PART
NO. MD970389 OR
EQUIVALENT

(ENGINE OIL)

GROOVE

BOLT HOLE

Ø 4 mm
(0.2 in)

LOWER OIL PAN REMOVAL 
STEPS

1.

DRAIN PLUG

>>C<<

2.

DRAIN PLUG GASKET

<<A>>

>>B<<

7.

LOWER OIL PAN
UPPER OIL PAN REMOVAL 
STEPS

1.

DRAIN PLUG

>>C<<

2.

DRAIN PLUG GASKET

3.

STARTER CONNECTOR

4.

STARTER

5.

OIL DIPSTICK AND DIPSTICK 
GUIDE

6.

O-RING

<<A>>

>>B<<

7.

LOWER OIL PAN

8.

OIL PAN BOLT HOLE COVER

<<B>>

>>A<<

9.

UPPER OIL PAN

UPPER OIL PAN REMOVAL 
STEPS (Continued)

OIL PAN

TSB Revision

ENGINE MECHANICAL <3.0L>

11C-32

CAUTION

Do not use the oil pan remover (MD998727). It will damage 
the upper oil pan.
2. Place a wooden block against the lower oil pan as shown in 

the illustration and remove by tapping with a hammer.

.

<<B>> UPPER OIL PAN REMOVAL
1. Remove the upper oil pan mounting bolts.
2. Screw the bolts (M10) securing the upper oil pan to the 

transaxle assembly in the illustrated bolt holes, then remove 
the upper oil pan.

INSTALLATION SERVICE POINTS

.

>>A<< UPPER OIL PAN INSTALLATION

CAUTION

The bolt holes for bolts 13 and 14 in the illustration are cut 
away on the transaxle side. Be careful not to insert these 
bolts at an angle.
Tighten the oil pan, upper mounting bolts in the order shown.

AC001724

LOWER OIL PAN

AB

AC001725

AC001726AB

1

4

8

5

12

9

2

3

7

11

6

10

16

15

13

14

UPPER OIL PAN

REAR OIL
SEAL CASE

TRANSAXLE 
SIDE


Content   ..  118  119  120  121   ..